|
ALL LESSONS |

Lesson 09 - Data
Theory
Data is often thought of in terms of scientific research or stock prices or in the realm of the counter creative... but that is not really the case at all. Let's see some examples.
A collage is a bunch of objects that can be placed to make a picture. In the digital world, if a creator (user) makes a collage, it would be helpful to save the collage for when they come back. They may also want to share the collage with others across computers and even across the world! Here are types of apps where we might want to save and share:
Apps that save
- meme makers
- avatar builders
- op art tools
- chat forums
- survey forms
- login accounts
- game levels
- collages
- comic makers

Resources
- Videos describing the HTML, Canvas, PHP, MySQL pages in the lesson
- Also see video links to the right of section sub headings
- Creative Coding Videos
- Two dozen sample files connectiing front end to database
- These are the files to which the videos refer
- ZIP File of Sample Files
- Make Data queries easier! Check out ZIM Base
- Base ZIP File
OVERVIEW
In this module we see how to store and retrieve the data to communicate and create! To do this we will use a server script (PHP) and a database (MySQL).
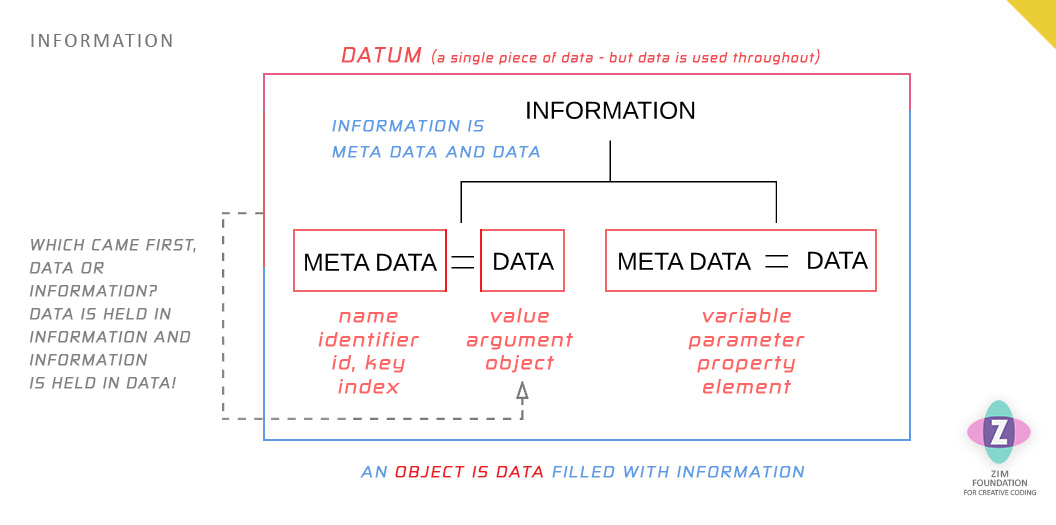
Data alone, will not be enough:
  The data says 10?  So?
  Oh, sorry... that is the width.
We also store meta data that tells us the purpose of the data. In the example above, the data is 10 and the meta data is width.
The combination of data and meta data is called information! Let's go have a look!
Reference
Data, Meta Data and Information ► Creative Coding Video 31 ► ZIP Sample Files
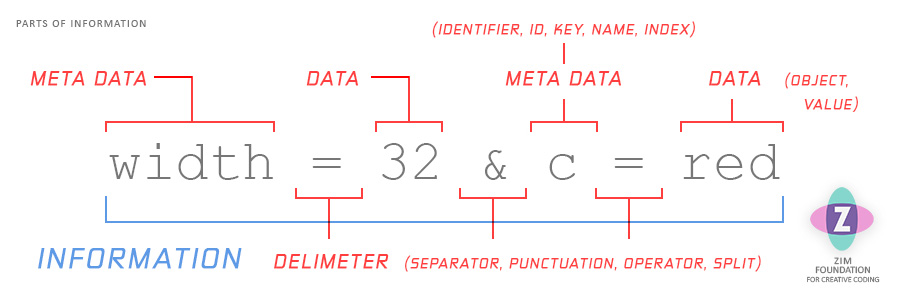
Data is an object, which is also called a value, like 7, true, "red".
Meta data describes the data otherwise we might not recognize its purpose.
These pairings are very common and collectively are called information.
Here are some examples:
// META DATA and DATA

x = 10; // a variable

{color:red}; // a property in an object literal

sound.paused = false; // a propery in an object

{width:10px;} // a css style

["good","bad"] // two array elements at indexes 0 and 1

search=love&data=today // CGI format for URLs

[time=>10, on=>true] // PHP Associative Array (like object)
Delimiters
To separate meta data and data pairs we use delimiters which are specified depending on the language or situation.
// DELIMITER EXAMPLES

// JS Object Literal: comma delimiter between pairs
{size:"big", type:"fish", smell:true}

// CSS: semi colon between pairs, spaces between border values
{color:red; border:thin solid blue;}

// Arrays: comma between the elements with meta data being the index
["run", "walk", "stop", "jump"]

// CGI Format: & between pairs
search=love&data=today
Practice
You have been using many of these things already, like variables and objects. But we can give you a few tests!
Reference
Organization ► Creativity Framework - Code Zero (Organization)
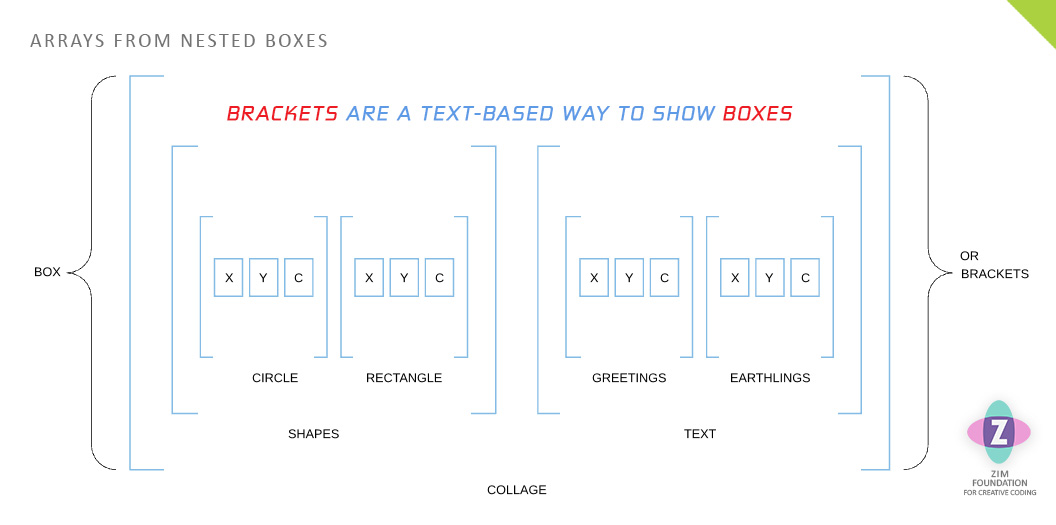
To organize basically means to group things and to group things inside of things.
Information changes depending on how we organize.
Grouping by red things is often different than grouping by square things.
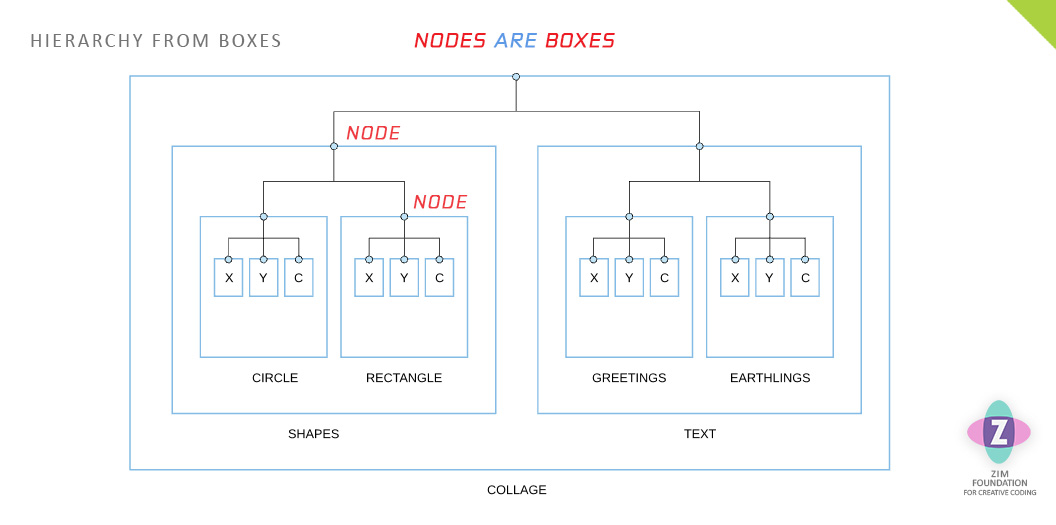
To plan our our organization, we can use nested boxes. We can start with a sketch or a wireframe diagram of what we want to make. This can help us figure out what to save. For example, our collage might have shapes and text as follows:

By the way, we coders organize inside of nested Arrays (lists).
If you erase the top and bottom lines of the boxes and leave the corners
then you get arrays!
Brackets are the text-based way to show boxes.
This is true with Arrays [ ] and also with Objects { }.
A hierarchy diagram is also used to show organization. Below you can see that a hierarchy can be drawn on or mapped to the boxes. These mappings are part of the Creativity Framework by ZIM Founder, Dan Zen (Dr Abstract).
Nodes are the same as the boxes - which are the same as the brackets.
INFORMATION IN A HIERARCHY ► Creative Coding Video 31 ► ZIP Sample Files
Information may have many meta data / data pairs. We call a single pair a variable, element or parameter but when refering to objects, it is called a property**.
** A property is a combination of a name and a value. It is information.
We also have specific names for meta data (name, identifier, id, key and index) and data (value, argument, object).
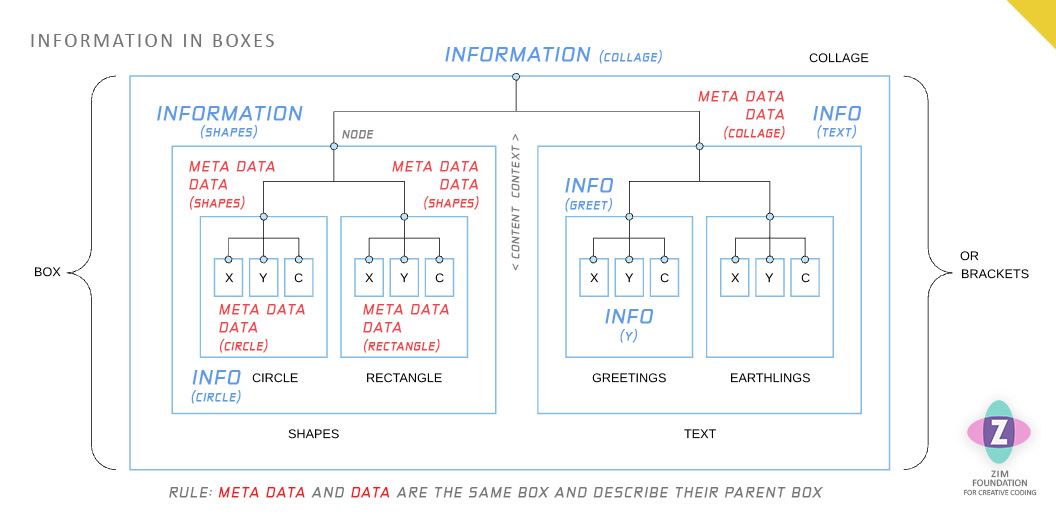
Look at the diagram above with the box names underneath the box. In a hierarchy, a node (box) is an object. The information of the object is all the meta data and data from ONE level below the object (inside the box). This is called the node's content. Just specifiy ONE level below because that one level already includes the next level below, etc. The node is also data for the information of the node above (parent node). This is called the node's context.
Note that this means that a node has content and that a node is content. The same with context. Such is the magnificence of life. An exception is the last node, called a leaf node and the very first node called Node Zero (Nodism).
INFORMATION IN CODING ► What IZ Object ► ZIP Sample Files
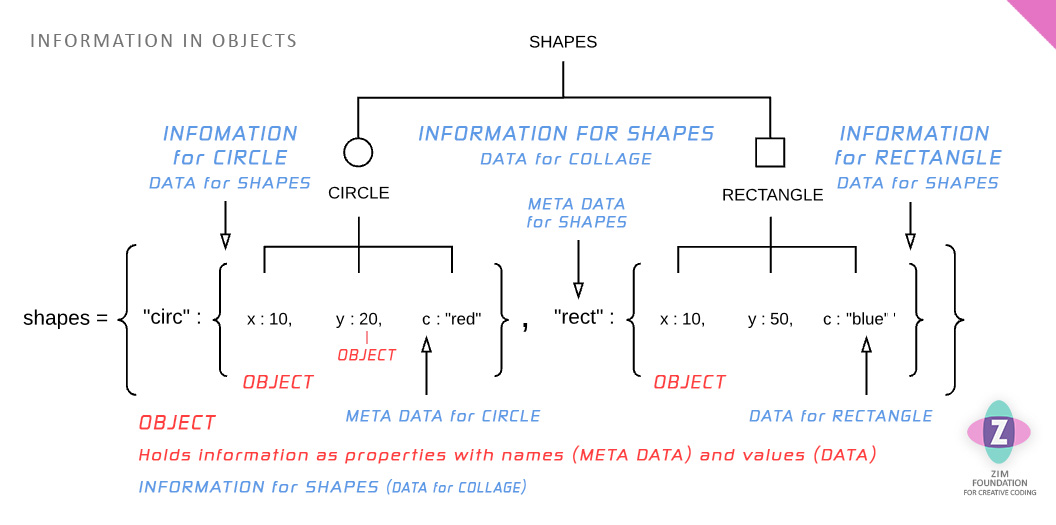
An Object Literal { } holds information as properties. These are separated by commas. The meta data and data are separated by colons.
The meta data is the name of a {node/box/object}. The data is the {node/box/object}. The brackets are the box which is the object which is the node which holds a part of information that our original object literal holds.
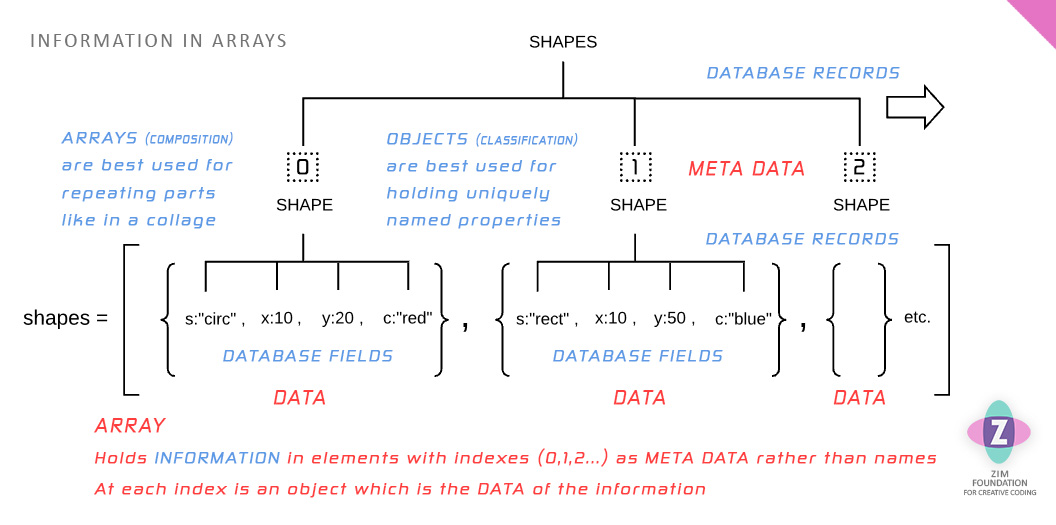
We can use an index number as meta data if we do not need an understandable string id. In this case, we use an Array rather than an object literal.
We have also hinted at our next topic by adding Database records and fields. Records hold each object. And fields are the properties inside the objects.
INFORMATION IN DATABASES ► Creative Coding Video 33 ► ZIP Sample Files
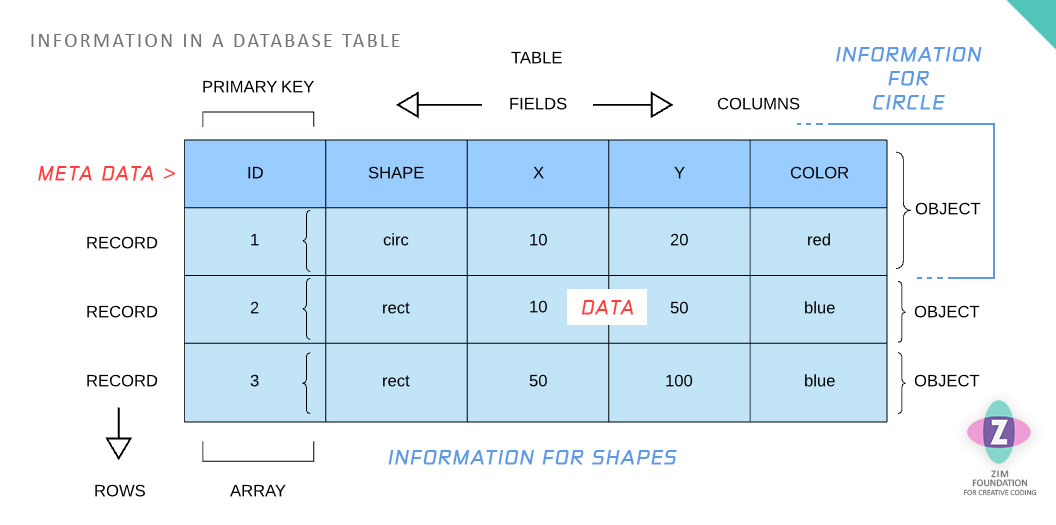
A database is used to hold information in tables which are grids of rows across and columns down.
- The rows are called records and these hold each object of the type being stored in the table. A primary key is used as the meta data for the object and then the rest of the row is the data.
- The columns are called fields and these hold each property of the object. The meta data for the property is at the top of the table as the field name. The data for the property is in the table.
This seems fairly simple but it is only holding one type of object.
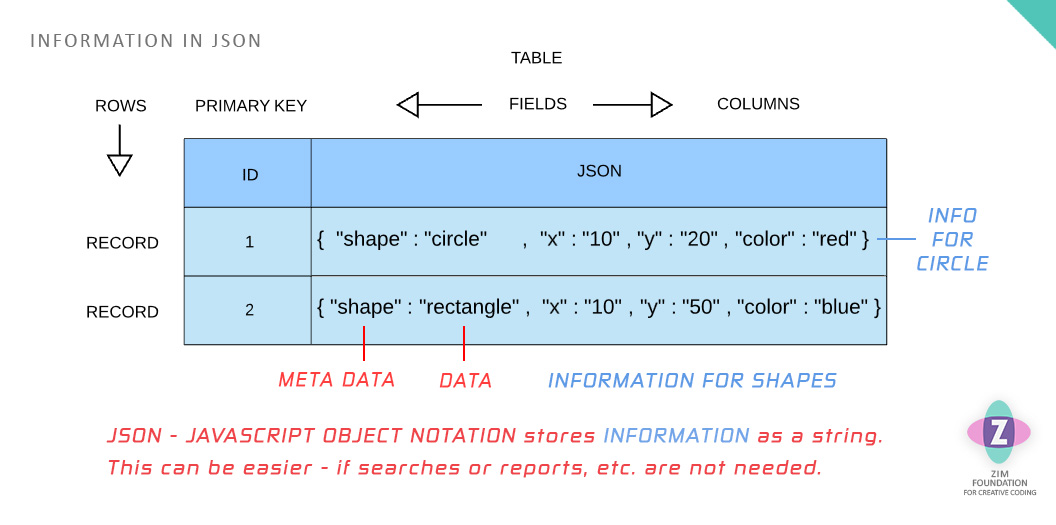
To hold nested objects a relational database is used
and is beyond our teaching here on the database side.
Any number of nested objects can be stored easily with JSON
JavaScript Object Notation. See the diagram below.
JSON holds an object literal or an array as a string.
This means that whatever complex data we may have had in our JavaScript
we can just JSON.stringify() it and store it as one field in the database table.
JSON saves time in processing the data but the data cannot be sorted or reported
in the database.
Practice
Here are some questions to help see how you are doing with organization and storing information in code!
Reference
Client and Server ► Creative Coding Video 34 ► ZIP Sample Files
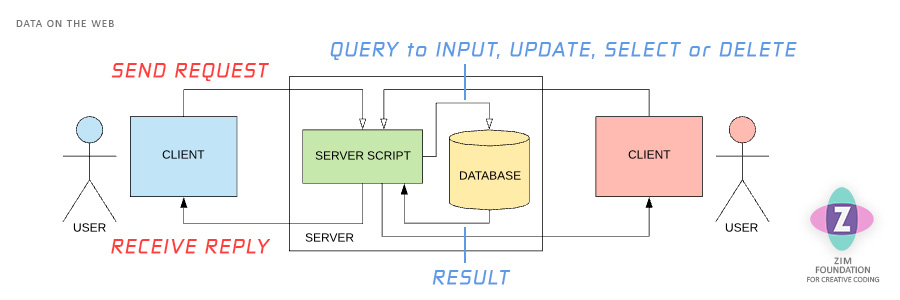
The Internet provides a global way to share information. Information usually does not pass directly between people but rather goes to a server for processing and security and where it is stored in and retrieved from a database.
Web Information
- People are called users
- The user's computer is called a client
- A server is a computer that serves Web pages
- The client can send information to the server
- A server script stores information in a database
- The client can request information from the server
- The server script queries the database and returns information
CLIENT - HTML FORM ► Creative Coding Video 32 ► ZIP Sample Files
In HTML Hypertext Markup Language we collect user data in a form.
This informs us with information.
The form has fields with a parameter called name.
This holds the data that is sent to the server so it is a must!
There is also an id parameter that we can use in JavaScript to identify the field and get its value.
The form tag has a method parameter that is either
GET for sending information on the URL,
or POST for sending data invisibly.
POST is usually used for privacy and GET is used to share the URL.
Here is what the HTML form code looks like in an example.html page:
<form action="example.php" method="post">
    <input type="text" id="visitor" name="visitor" placeholder="enter name">
    <!-- send along a number just for some more example data -->
    <input type="hidden" id="count" name="count" value="5">
    <input type="submit" id="submit" value="SUBMIT">
</form>
CLIENT - JavaScript Validation ► Creative Coding Video 32 ► ZIP Sample Files
We may want to check to see that the data the user is submitting is good.
This is called validation.
We can do that with JavaScript on the DOM Document Object Model.
Here is what the JavaScript for the form above looks like.
The script can be placed in the HTML below the form.
Or it goes in the head using a "DOMContentLoaded" event.
<script>
    // get a reference to the form input tags
    const visitor = document.getElementById("visitor");
    const submit = document.getElementById("submit");
    // add an event for when the user clicks
    // addEventListener() is like on() in ZIM
    submit.addEventListener("click", e=>{
        // validate the data
        if (visitor.value == "") {
            alert("please enter name");
            // should show a custom message not the system alert
            // if not valid do not submit form
            e.preventDefault();
        } else {
            // else valid and would let data to server
            // here we are just testing.
            // We would remove these for real
            alert(visitor.value);
            e.preventDefault();
        }
    });
</script>
Reference
Server - Database Table ► Creative Coding Video 33 ► ZIP Sample Files
Information is stored on the server in a database
and more specifically, in a table. See the earlier section on Information in Databases.
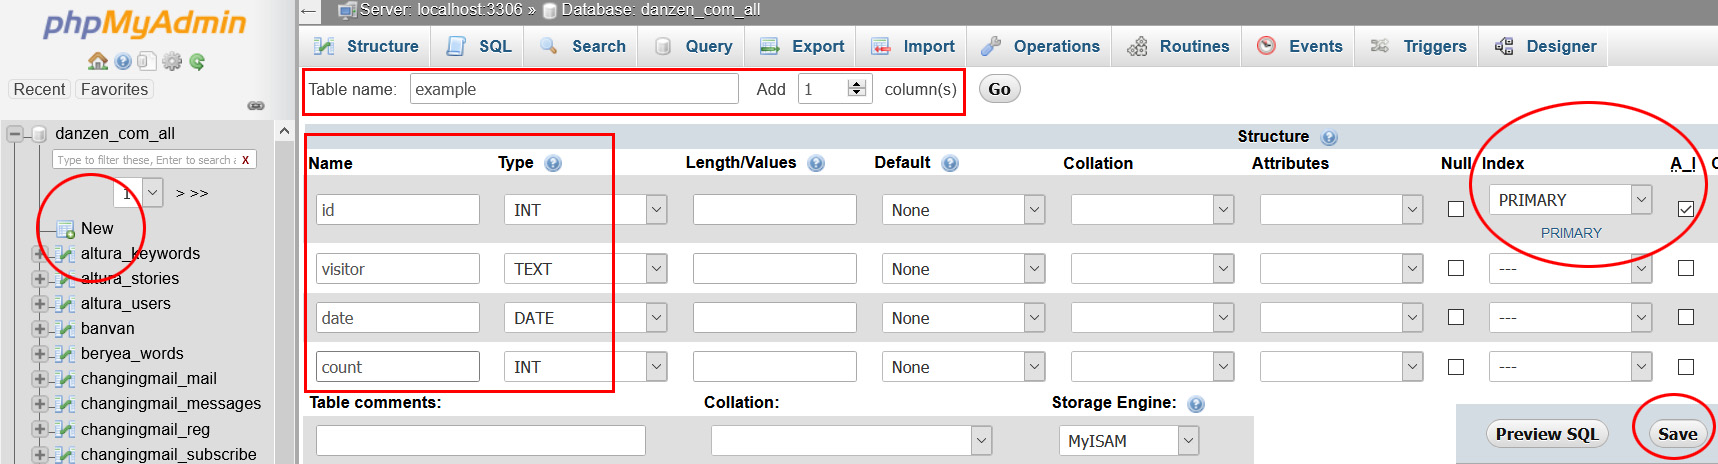
Follow these instructions to set up a table in MySQL with phpMyAdmin in cPanel.
Database Table Setup
- You need access to a server with cPanel
- Login to cPanel and select phpMyAdmin
- -- if no databases then go back to cPanel
- -- go to MySQL Databases and make a database
- Back in phpMyAdmin, select your database
- Press the little New link
- Give your table a name at the top
- Adjust the field number (an id will be one field)
- Make the first field the id of type int
- Scroll to the right and select the AI checkbox
- AI (auto increment) will pop up a primary box
- -- or just set a primary if you have custom ids
- In the box press GO = do not do anything else
- Scroll back to the left and fill in field names
- Choose the type of fields usually int or text
- Press save
Managing Table
- Press the Structure tab to change the table
- Press the Operations tab to copy, export, delete, etc.
- Press the Insert tab to manually add records
- In Browse (once there are records)
- Press the Browse tab once there are records
- Press the field names to sort by fields
- Press the edit icon to edit a field
- Check records and delete them, etc. down below
- Press the Browse tab again to refresh to see new records
Reference
Server - PHP ► Creative Coding Video 34 ► ZIP Sample Files
PHP PHP Hypertext Preprocessor is a common server script.
The script is a text document with .php extension and it must be uploaded and run on the server.
To upload we use an FTP client like FileZilla or an FTP package in our code editor.
Here is what the PHP syntax looks like in an example.php page:
<?php // start php - anywhere in html which goes outside PHP in the document

    $color = "blue"; // store a variable - use $ at start
    echo "My color is " . $color; // echo writes HTML, . is concatenation
    // or embed variables in strings
    echo "My color is $color";

    function testMatch($item) {
        global $color; // access $color or use parameter
        if ($color == $item) echo "match"; // or use brackets
        else echo "no match";
        echo "<br>"; // can echo HTML parts
    }
    $colors = ["red", "blue", "green"]; // array
    foreach ($colors as $c) {
        testMatch($c); // no match, match, no match on different lines
    }

    // also a traditional for loop - note the $i
    // also note the count() instead of a length property
    // as the PHP core is function based
    for ($i=0; $i<count($colors); $i++) {
        testMatch($colors[$i]); // no match, match, no match on different lines
    }

    // end PHP below and go back into optional HTML code
?>
PHP has Associative Arrays that are like object literals. They hold a key and a value.
<?php
    // associative array
    $person = [eyes=>"green", fingers=>10];
    echo $person[eyes]; // green
    $person["nose"] = true; // assigning a key and value

    echo "<table>";
    foreach($person as $key=>$val) {
        echo "<row><td>$key</td><td>$val</td></tr>";
    }
    echo "</table>";
    // will make an HTML table with
    // eyes     |    green
    // fingers  |    10
    // nose     |    true
?>
Server - PHP Data ► Creative Coding Video 34 ► ZIP Sample Files
Collecting data from the HTML form in PHP can be done as follows:
// to collect POST variables PHP gives us a $_POST associative array:
// that will hold variables that match the HTML form name parameters
// make sure the form has a method parameter of POST
$visitor = $_POST["visitor"];

// or to collect GET variables PHP gives us a $_GET associative array
// make sure the form has a method parameter of GET
$visitor = $_GET["visitor"];

// but we should use isset() to error check to make sure this exists
// here we use a ternary operator - (boolean) ? if true : if false;
$visitor = isset($_POST["visitor"]) ? $_POST["visitor"] : "";
Server - MySQLi Insert ► Creative Coding Video 34 ► ZIP Sample Files
SQL Structured Query Language is a commonly used to operate on a databases.
A query is question that expects a result.
We will use MySQLi which is a new version that binds user data to avoid previous hacking issues (MySQL injection).
Below we connect to the database and insert our data!
<?php
    // connect to the database
    $hostname = "localhost"; // do NOT change this
    $username = "username"; // change these
    $password = "password"; // change these
    $databasename = "databasename"; // change these
    $mysqli = new mysqli($hostname, $username, $password, $databasename);

    $visitor = isset($_POST["visitor"]) ? $_POST["visitor"] : "";
    $count = isset($_POST["count"]) ? $_POST["count"] : 0;

    // create our query but put a ? wherever user information would go (visitor and count)
    // also, change the tablename to your tablename
    // the id can be null if it has been set to auto-increment in the table structure
    $query = "INSERT INTO tablename (id, visitor, date, count) VALUES (NULL, ?, CURDATE(), ?)";

    // use MySQLi "prepared statements" to bind the user data to the statement
    // create, prepare, bind, execute and close a statement (sorry for the complexity!)
    $stmt = $mysqli->stmt_init();
    if ($stmt->prepare($query)) {
        $stmt->bind_param("si", $visitor, $count); // matches the ? in the query
        // options for the letters are s, i, b - string, integer, blob (picture)
        $stmt->execute();
        $stmt->close(); // if we are doing another statement
        echo "Thank you";
    } else {
        echo "Oops, an error";
    }

    // press the Browse tab in phpMyAdmin to see the result in the table

    // add the SELECT code below to here, inside the PHP
?>
Server - MySQLi Select ► Creative Coding Video 35 ► ZIP Sample Files
Continuing the example above, below we select from the database and output the result as an HTML table!
// make the query to select from the database
// this will select visitors with the same count
// the count came from the client computer so use the ? for binding
// btw the count is just an extra number we sent along to show more data
// you do not need to use a WHERE at all if you want all records
// you can also ORDER BY date DESC LIMIT 10, etc. and more - search SQL
// after the SELECT comes the fields for which we want to receive data
// this is not the rows but rather the columns!
// change the tablename to your table
$query = "SELECT visitor, date FROM tablename WHERE count=?";

$stmt = $mysqli->stmt_init();
if ($stmt->prepare($query)) {
    $stmt->bind_param("i", $count); // matches the ? in the query
    $stmt->execute();
    // bind results for a prepared statement
    // the order matches the fields we selected
    $stmt->bind_result($tempVisitor, $tempDate);
    // create an HTML table and fill it with fetched results
    echo "<br><br><table>
    <tr><th>VISITOR</th><th>DATE</th></tr>";
    // this gets each result record and inserts the data into our temp variables
    // we called them temp, because they get overwritten for each result record
    while ($stmt->fetch()) {
        echo "<tr>
                <td>".$tempVisitor."</td>
                <td>".$tempDate."</td>
            </tr>";
    }
    echo "</table>";
    $stmt->close();
} else {
    echo "<br><br>Sorry could not retrieve data";
}
Reference
Async with AJAX ► Creative Coding Video 36 ► ZIP Sample Files
Sometimes we just want to send or receive data without loading the page.
We can do this with an asynchronous call such as AJAX Asynchronous JavaScript and XML - no XML needed
The code for AJAX is on the client in JavaScript and can be a little complex so we use a library to make it easier.
The form will have no action and method parameters.
AJAX will instead send the data in URL encoded format.
A callback function is made that will be called when AJAX recieves the response back from the server.
Here is the JavaScript code using the ajax.js file provided in the ZIP file.
The PHP page is same as the code in box 08 above as we only need INPUT and not the SELECT.
<!-- call the AJAX library -->
<script src="ajax.js"></script>

<script>
    // this time the code is in the head tag
    // and we must wait until the tags are loaded
    window.addEventListener("DOMContentLoaded", e=>{
        // get a reference to the form input tags
        // note: we have added the count tag
        const visitor = document.getElementById("visitor");
        const count = document.getElementById("count");
        const submit = document.getElementById("submit");
        // add an event for when the user clicks
        // addEventListener() is like on() in ZIM
        submit.addEventListener("click", e=>{
            // validate the data
            if (visitor.value == "") {
                alert("please enter name");
                // should show a custom message not the system alert
            } else {
                //--------------------------------- AJAX
                // custom AJAX class from imported js file
                var client = new HttpClient();
                client.requestType = "POST";

                // Send to server
                // send CGI format of prop1=val&prop2=val
                // but should encodeURI each value to fix special characters
                // note: do not encodeURI the whole string... just the values!
                // use ES6 templating to insert values rather than + concatenation
                // "...visitor="+encodeURI(visitor.value)+"&count..."
                const string = `visitor=${encodeURI(visitor.value)}&count=${encodeURI(count.value)}`;
                client.makeRequest('sample_ajax.php', string);

                // callback function runs when result is received from server
                // the result will be what is echoed from PHP
                client.callback = function(result) {
                    // should show a custom message not the system alert
                    alert(result);
                }
                //---------------------------------- END AJAX
            }

            // do not submit the form - AJAX does this
            e.preventDefault();

        }); // end submit

    }); // end DOMContentLoaded
</script>
Reference
Binding ► Creative Coding Video 37 ► Creative Coding Video 38 ► ZIP Sample Files
Data Binding is a way to more automatically connect the front end property values to the back end data.
We can bind TO the server data or bind FROM the server data or BOTH.
An advantage is that a Bind object takes care of all the sending and receiving and updating of the properties.
Here is what that looks like in ZIM on the server we would handle the data the same as the previous sections
const bind = new Bind("https://zimjs.com/base/shapes.php", GET);

bind.from(()=>{ // get the bind data from the server

    // Here is the object with the properties we want to bind
    const blob = new Blob()
        .center()
        .bind("blob", ["points", "x", "y"]); // a string id and properties

    // When we change the object send the data to the server
    // This sends all the data but we can specify if we need to
    blob.on("pressup", ()=>{
        bind.to();
    });
}
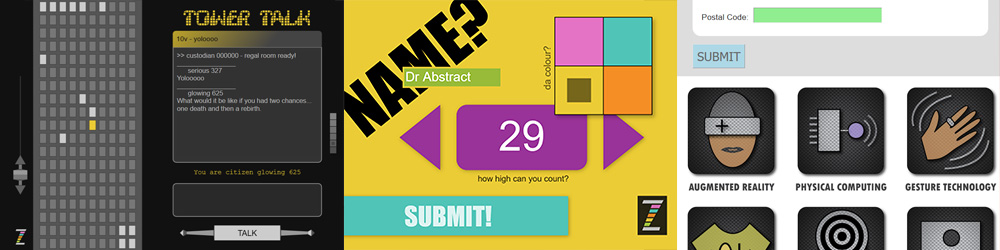
Here are two examples with Binding in ZIM:

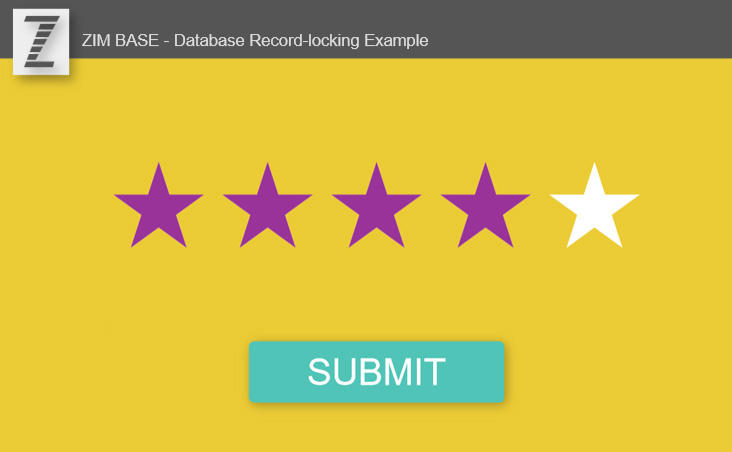
Reference
ZIM Base ► BASE page ► Creative Coding Video 39 ► Creative Coding Video 40
ZIM Base is a custom PHP class to make database queries easier!
It abstracts away all the steps of MySQLi.
Base Features
- Uses PHP strings and arrays as input - no SQL
- Works seamlessly with ZIM Bind, ZIM async and ZIM Ajax
- Provides easy object and JSON access to results
- Makes global variables from either POST or GET
- Handles record locking and reply to JSONp or AJAX
Here is a link to the ZIM Base Commands and the Base ZIP which includes three examples.
<?php

// import ZIM Base - your database connection is in there too
require_once('zim_base.php');

// collect either GET or POST variables
$base->makeVars("id", "data");

// INSERT (table, variables, update, where, more)
$result = $base->insert("zim_base", ["id"=>$id, "data"=>$data]);

// SELECT > SINGLE (table, fields, where, more)
$result = $base->select("zim_base", "*", ["id"=>$id]);

if ($result->num_rows > 0) {
    $record = $result->record;
    echo $record["data"];
}

// SELECT > MULTIPLE (table, fields, where, more)
$result = $base->select("zim_base", ["id", "data"], ["status"=>1], "ORDER BY id");
if ($result->num_rows > 0) {
    foreach ($result->assoc as $record) {
        echo $record["data"];
    }
}

// UPDATE (table, update, where, more)
$result = $base->update("zim_base", ["data"=>"new data"], ["id"=>$id]);
if ($result->affected_rows < 1) {echo "error"; exit;}

// DELETE (table, where)
$result = $base->delete("zim_base", ["id"=>2]);
if ($result->affected_rows < 1) {echo "error"; exit;}
?>
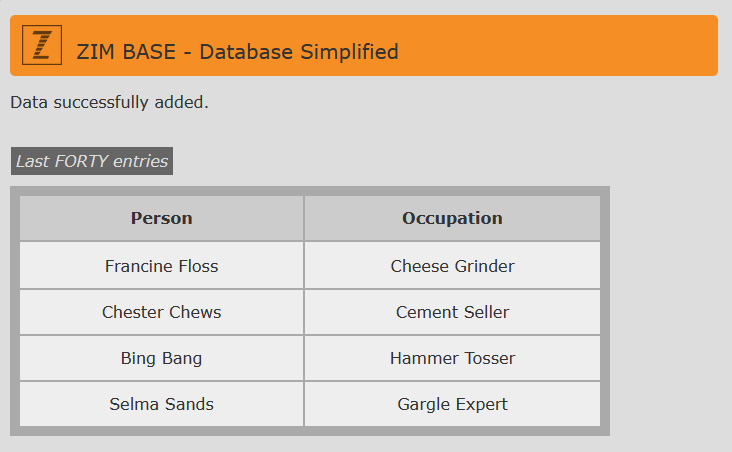
Here is an example of ZIM Base used with HTML - the PHP code is in the Base ZIP
Summary
We have now seen how to let people save and share their creations! This is the true power of coding and the Internet. Mastering data will probably take some time - be proud as you continue to learn, create and help others to create as well!
We hope that you have enjoyed using ZIM and you continue to do so. There are all sorts of tutorials in the Learn section and sample code in the Examples section. Do not forget the Tips for the latest way to code! Connect with us on SLACK - All the best!
|
VIDEOS
ALL LESSONS |