


BADGE 1
MENUUse a template make a box with physics!
1. Copy and paste the code below into a text document on your computer - save as physics.html.
Normally, you would get this template from the ZIM CODE page.
We like using ATOM which is a free text editor with good code syntax coloring.
HIGHLIGHT MORE
ZIM Learn References
<!doctype html>
<html>
<head>
<meta charset="utf-8" />
<title>ZIM Badges - PHYSICS</title>

<!-- Welcome to ZIM at https://zimjs.com - Code Interactive Media Pizzazz! 				-->
<!-- ZIM runs on the HTML Canvas powered by JavaScript and CreateJS http://createjs.com -->
<!-- Founded by Inventor Dan Zen - http://danzen.com - Canadian New Media Award Winner 	-->
<!-- ZIM is free to use. You can donate to help improve ZIM at https://zimjs.com/donate 	-->

<script src="https://code.createjs.com/createjs-2015.11.26.min.js"></script>
<script>
	var zon = true; // set to false to turn off console messages from zim
	var zns = false; // set to true to require zim namespace - eg. new zim.Frame( )
</script>
<script src="http://d309knd7es5f10.cloudfront.net/zim_6.7.3.js"></script><!-- add _doc to see code -->
<!-- use zimjs.com/distill for minified individual functions! -->

<style>
	body {background-color:#000;}
</style>

<script>

// SCALING OPTIONS
// scaling can have values as follows with full being the default
// "fit"        sets canvas and stage to dimensions and scales to fit inside window size
// "outside"    sets canvas and stage to dimensions and scales to fit outside window size
// "full"       sets stage to window size with no scaling
// "tagID"      add canvas to HTML tag of ID - set to dimensions if provided - no scaling

var scaling = "fit"; // fit scales to fit the browser window while keeping the aspect ratio
var width = 1024; // can go higher...
var height = 768;
var frame = new Frame(scaling, width, height); // see docs for more options and info
frame.on("ready", function( ) {
    zog("ready from ZIM Frame");

    var stage = frame.stage;
    var stageW = frame.width;
    var stageH = frame.height;
    frame.outerColor = frame.grey;
    frame.color = frame.lighter;

    // put your code here (you can delete this code)


    stage.update( ); // update the stage to see any changes

}); // end of ready
</script>

</head>

<body>
<!-- canvas with id="myCanvas" is made by zim Frame -->
</body>
</html>
2. COPY the script tag (including the /script tag) for zim_6.7.3 and PASTE it TWICE below the minified individual functions comment.
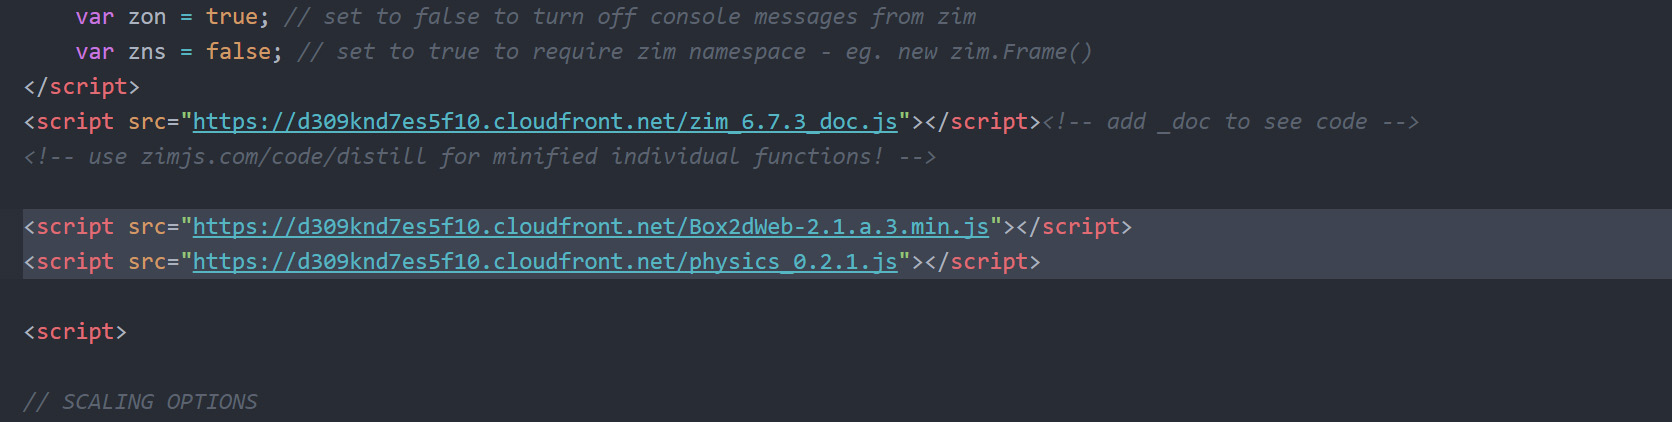
- Change the first copy to ask for Box2dWeb-2.1.a.3.min.js
- Change the second copy to ask for physics_0.2.1.js
SCRIPTS: when we add script tags, we are importing the code at the src of the script tags into our code.
Note that we are already importing CreateJS and ZIMjs code. We often call this code a module,
or if it includes many things, then a library -
CreateJS is a library as it includes the EaselJS, SoundJS, PreloadJS and TweenJS modules.
ZIM is a system that works together inside ZIM Frame - so we call that a Framework.
We now have added a physics framework and a physics module.
These all are hosted on the ZIM CDN (Content Delivery Network).
PHYSICS: we are going to use the famous Box2D physics engine which was used to power Angry Birds.
A physics engine does all the calculations for forces and collisions on our objects.
The physics engine has shapes like rectangles and circles but these are not used for final display.
The physics_0.2.1 module maps the ZIM Display Objects to the physics shapes -
it also makes working with Box2D a little easier.
HIGHLIGHT MORE ANSWER
3. After it says put your code here, make a variable (var) called physics and use the new keyword to assign (=) a new Physics() and pass a reference to frame as a parameter.
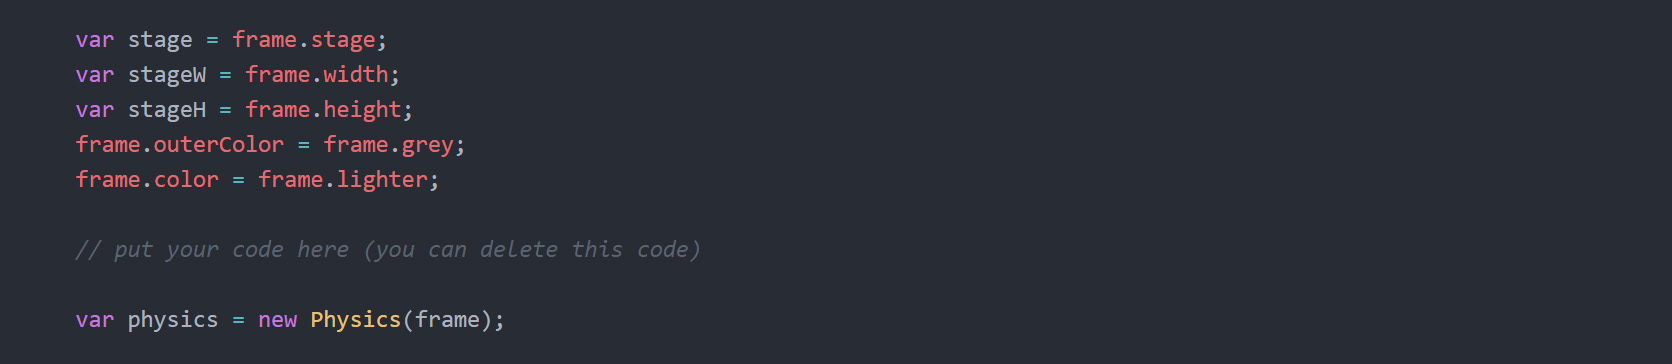
Physics( ) is a class defined in our physics_0.2.1 module.
A class is like a template for making objects using the new keyword.
In this case, the object made is a Box2D physics world.
We often need to tell a class (or a function) more information.
We do this by passing parameters in to the brackets Class(param1, param2, etc.).
In this case, we need to put the value frame in the brackets of Physics( ) to tell Physics where to make its world.
A little later, we are going to experiment with gravity, which is the third parameter of Physics. For now, it will use a default gravity.
HIGHLIGHT MORE ANSWER
4 a) Make a variable (var) called boxBody and assign (=) the result of the physics' makeRectangle() method. Pass a width of 200 and height of 200 as parameters.
By convention, we add the suffix of Body to the physics objects but not to the ZIM objects that we will make.
4 b) On the next line, set the x property of the boxBody to 400.
4 c) On the next line, set the y property of the boxBody to 200 as well.

4 b) On the next line, set the x property of the boxBody to 400.
4 c) On the next line, set the y property of the boxBody to 200 as well.
There is a helpful LEARN section on ZIM but we will tell you some tips in the grey dashed sections (like this one) as we go.
A method does something (it is like a verb). To use a method, put the object first (in this case the object is physics) then a period (.) and then the method with round brackets. We call this dot syntax because a dot separates the object and the method. Here, we need to pass the width and height in as parameters in the brackets of the method.
A property describes an object or is something the object has (it is like an adjective). To use a property, put the object first followed by a dot (.) then the property and use the assignment operator (=) to assign the desired value. Here we need to set the x and y properties to desired values. The x value starts at 0 at the left and increases to the right. The y value starts at 0 at the top and increases going down.
HIGHLIGHT MORE ANSWER
A method does something (it is like a verb). To use a method, put the object first (in this case the object is physics) then a period (.) and then the method with round brackets. We call this dot syntax because a dot separates the object and the method. Here, we need to pass the width and height in as parameters in the brackets of the method.
A property describes an object or is something the object has (it is like an adjective). To use a property, put the object first followed by a dot (.) then the property and use the assignment operator (=) to assign the desired value. Here we need to set the x and y properties to desired values. The x value starts at 0 at the left and increases to the right. The y value starts at 0 at the top and increases going down.
5 a) To see the physics shapes we use the debug mode. Run the debug() method of physics using the dot (.) syntax.
5 b) We need to update the debug mode when we resize the screen. Use the on() method of frame and pass the method two parameters: "resize" and function(){}
5 c) Inside the function body { } call the updateDebug() method of physics.
5 d) We can now test the app in a Browser such as Chrome, Firefox, Safari or Edge. With Atom, we can right click and choose Open in Browser. Or find the file and double click it - or drop the file on an open browser window. We should see a box falling to the ground. If you do not see anything, then open the console (F12) and look for errors. NOTE: ZIM physics adds walls around the stage. You can change this when making the new Physics().
The on() method is used to capture events.
Events are when something happens like a click or when something loads or changes.
We put the on( ) method on the object that will receive the event.
Here, the object is the overall ZIM frame.
The first parameter of the on( ) is what type of event we want to capture written as a String in quotes (""). Here we are capturing a "resize" event on the frame.
The second parameter of the on( ) is what function to call when the event happens. Here we use an anonymous function.
A function stores code that we can run any time and often multiple times by calling the function. We can pass parameters to the function through the ( ). Note, this is like with a class... and indeed, a class in JavaScript is just a function that we handle in a special way. The block of code the function will run is stored inside { }. There may be many statements in the block of code or just one! A statement ends with a semi-colon (;) and is like a step in instructions. Traditional functions have a name. Here we are using an anonymous function as we will not need to refer to it again. We usually make new lines inside the block of code { } so that we can clearly see each statement.
HIGHLIGHT MORE ANSWER
The first parameter of the on( ) is what type of event we want to capture written as a String in quotes (""). Here we are capturing a "resize" event on the frame.
The second parameter of the on( ) is what function to call when the event happens. Here we use an anonymous function.
A function stores code that we can run any time and often multiple times by calling the function. We can pass parameters to the function through the ( ). Note, this is like with a class... and indeed, a class in JavaScript is just a function that we handle in a special way. The block of code the function will run is stored inside { }. There may be many statements in the block of code or just one! A statement ends with a semi-colon (;) and is like a step in instructions. Traditional functions have a name. Here we are using an anonymous function as we will not need to refer to it again. We usually make new lines inside the block of code { } so that we can clearly see each statement.
6. After the on() method and its resize event, call the drag() method of physics using the dot syntax (.) to drag the physics shape.
HIGHLIGHT MORE ANSWER

ZIM Learn References
7 a) Make a variable (var) called box and assign (=) a new Rectangle() with a width and height of 200 and a color of frame.blue.
7 b) On the end of this statement, use a dot (.) to chain the rectangle's centerReg() method and pass it stage as a parameter to center the rectangle to the stage.
7 c) Also on the end of this statement, use a dot (.) to chain the rectangle's cur() method which will set the cursor of the rectangle to a default of "pointer" indicating that we will be able to drag the rectangle.
Chaining is a technique that can be used with ZIM methods. See the MORE link for a video about Chaining.
We use centerReg() to add the rectangle to the stage and at the same time center the registration point of the rectangle. This is important as the physics shapes automatically have their registration point at the center. In the next step we will place our ZIM rectangle on to the physics rectangle (mapping) and the shapes will line up if their registration points are in the same place.
The registration point is the location in an object used for its x and y position. An object will also scale and rotate about its registration point. A ZIM Rectangle, and most rectangular objects such as a Bitmap (picture), have their default registration point at the top left. A ZIM Circle has its registration point in the middle. The registration point can also be changed with the reg() method or regX and regY properties.
HIGHLIGHT MORE ANSWER
We use centerReg() to add the rectangle to the stage and at the same time center the registration point of the rectangle. This is important as the physics shapes automatically have their registration point at the center. In the next step we will place our ZIM rectangle on to the physics rectangle (mapping) and the shapes will line up if their registration points are in the same place.
The registration point is the location in an object used for its x and y position. An object will also scale and rotate about its registration point. A ZIM Rectangle, and most rectangular objects such as a Bitmap (picture), have their default registration point at the top left. A ZIM Circle has its registration point in the middle. The registration point can also be changed with the reg() method or regX and regY properties.
8. Use the addMap() method of physics and pass a first parameter of boxBody and a second parameter of box
to constantly place the ZIM box on the physics boxBody.
HIGHLIGHT MORE ANSWER

ZIM Learn References
9. The physics debug shapes are above the ZIM shapes. So comment the debug code out using // at the start of each line.
Or /* at the start and */ at the end for multi-line comments. In Atom, we can select the code we want to comment out and press CTRL /.
Now view the app in the Browser, drag the blue box around and collect your badge!
HIGHLIGHT MORE ANSWER

CLAIM YOUR BADGE
ZIM Learn References
(SHOW YOUR TEACHER)