BADGE 1
TOPUse a template and start coding!
1. Copy and paste the code below into a text document on your computer - save as alien.html.
We like using ATOM which is a free text editor with good code syntax coloring.
HIGHLIGHT MORE
ZIM Learn References
<!doctype html>
<html>
<head>
<meta charset="utf-8" />
<title>ZIM ALIEN DETECTOR</title>

<!-- Welcome to ZIM at https://zimjs.com - Code Interactive Media Pizzazz! 	        -->
<!-- ZIM runs on the HTML Canvas powered by JavaScript and CreateJS http://createjs.com -->
<!-- Founded by Inventor Dan Zen - http://danzen.com - Canadian New Media Award Winner 	-->
<!-- ZIM is free to use. You can donate to help improve ZIM at https://zimjs.com/donate 	-->

<script src="https://d309knd7es5f10.cloudfront.net/createjs.min.js"></script>
<script>
	var zon = true; // set to false to turn off console messages from zim
	var zns = false; // set to true to require zim namespace - eg. new zim.Frame()
</script>
<script src="https://d309knd7es5f10.cloudfront.net/zim_6.2.2.js"></script>
<!-- use zimjs.com/distill for minified individual functions! -->

<style>
	body {background-color:#444;}
</style>

<script>

// SCALING OPTIONS
// scaling can have values as follows with full being the default
// "fit"	sets canvas and stage to dimensions and scales to fit inside window size
// "outside"	sets canvas and stage to dimensions and scales to fit outside window size
// "full"	sets stage to window size with no scaling
// "tagID"	add canvas to HTML tag of ID - set to dimensions if provided - no scaling

var scaling = "fit"; // this will resize to fit inside the screen dimensions
var width = 1024;
var height = 768;
var color = "#444";
var frame = new zim.Frame(scaling, width, height, color);
frame.on("ready", function() {
	zog("ready from ZIM Frame"); // logs in console (F12 - choose console)

	var stage = frame.stage;
	var stageW = frame.width;
	var stageH = frame.height;

    // see https://zimjs.com/learn.html for video and code tutorials
    // see https://zimjs.com/docs.html for documentation
    // see https://zimjs.com/bits.html for 64 Interactive Media techniques

	// put your code here


	stage.update(); // this is needed to show any changes

}); // end of ready

</script>

<meta name="viewport" content="width=device-width, initial-scale=1, maximum-scale=1" />

</head>

<body>
<!-- canvas with id="myCanvas" is made by zim Frame -->
</body>
</html>
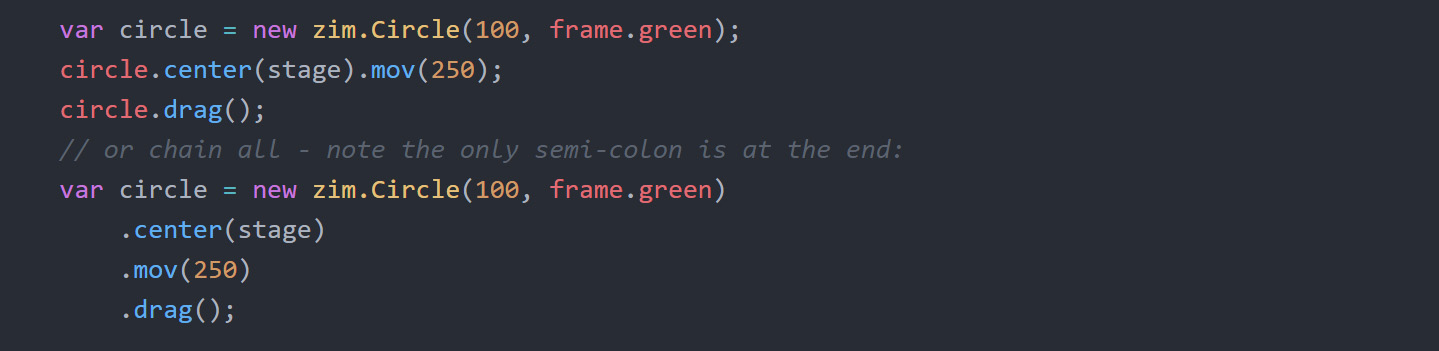
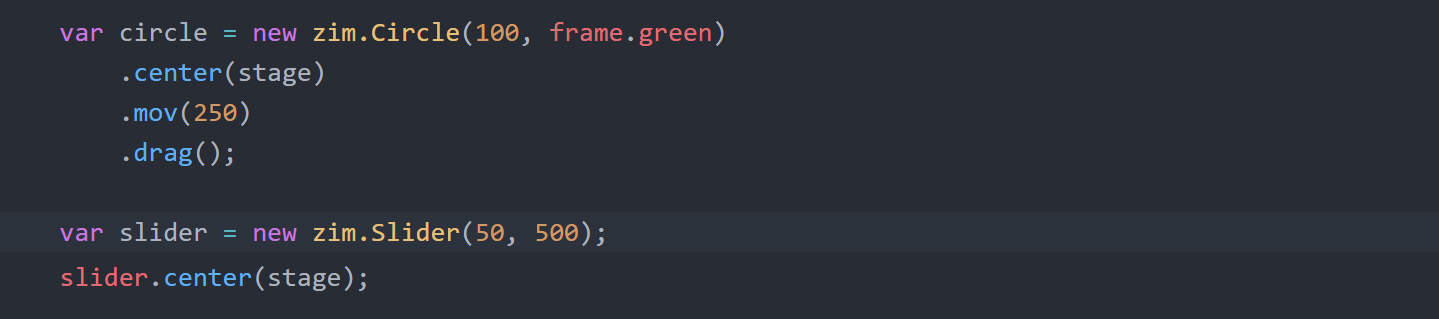
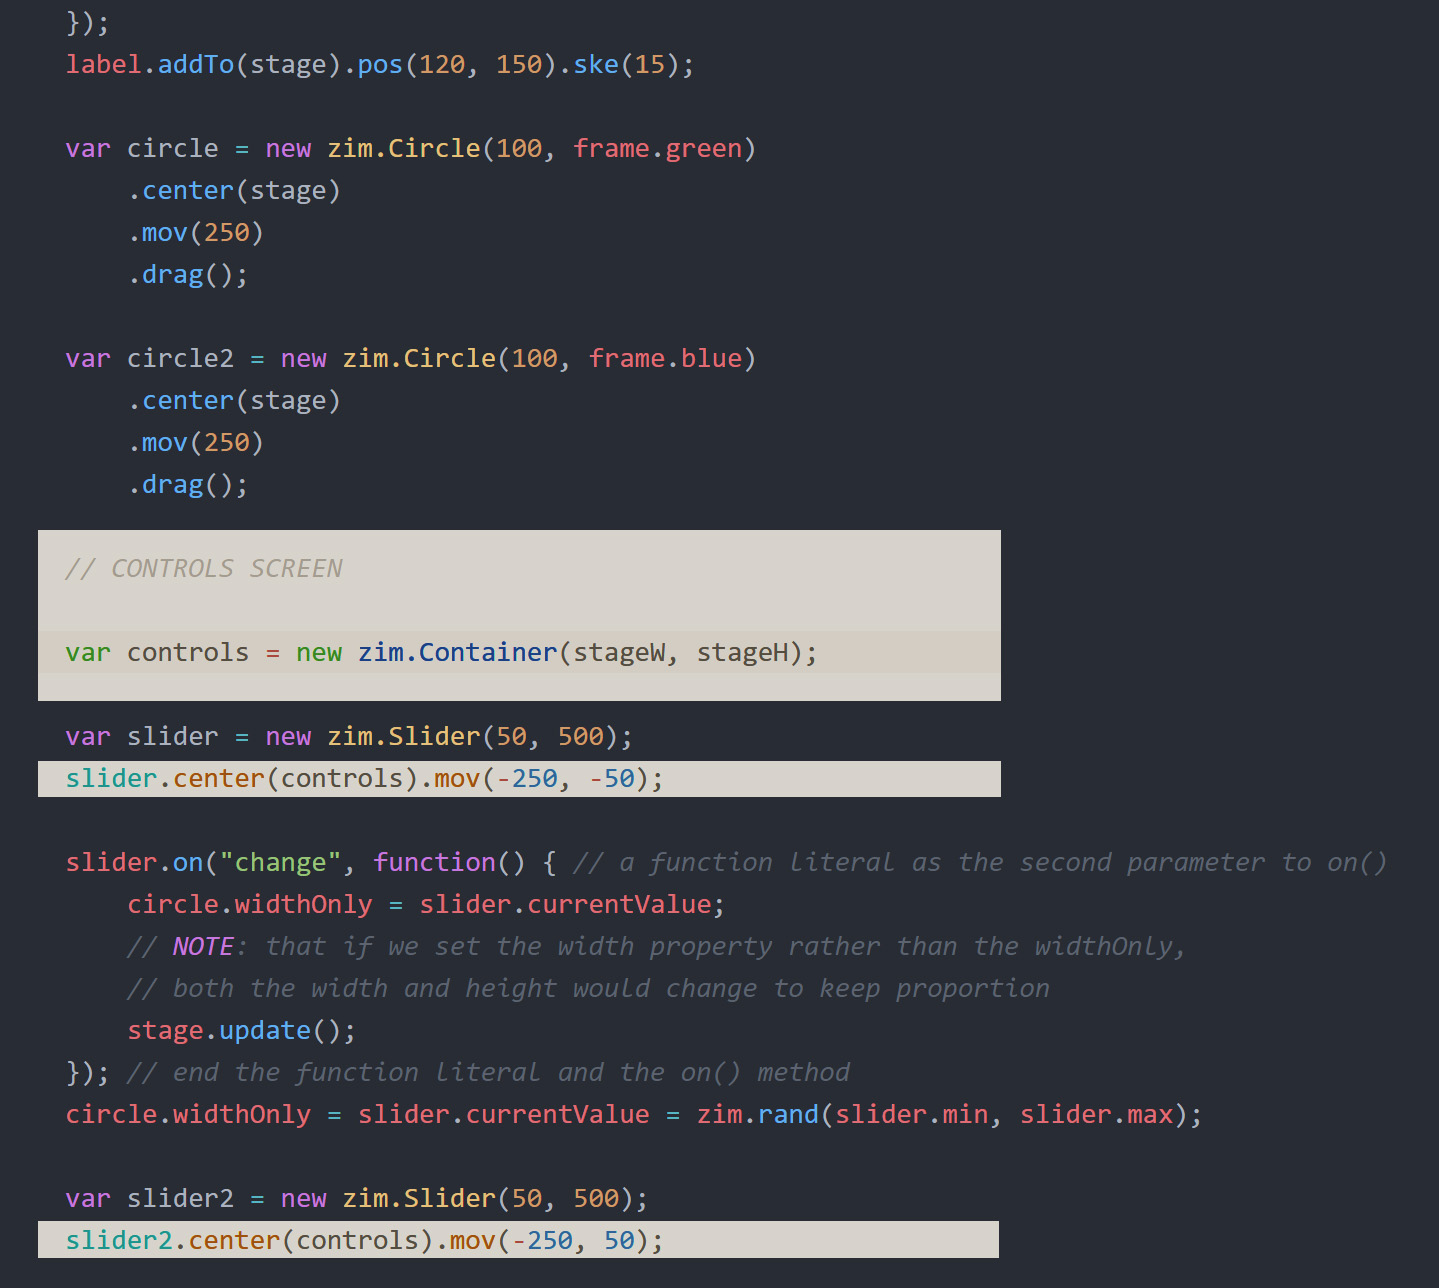
2. After it says put your code here, make a variable (var) called circle and use the new keyword to assign (=) a new zim.Circle()
with a radius of 100 and a color of frame.green.

Click on any of the green links to see the docs about the feature and show you how to use it.
Here we need to pass extra information to the new zim.Circle() when we make it.
We pass the extra information in as parameters separated by commas (,).
In this case, we need to put the values 100 and frame.green in the brackets of Circle() and separate them with a comma.
The color could be any HTML color such as "blue", "#333", etc. (note the quotes)
but we have stored a few special ZIM colors in the frame class so we often use those.
On the next line, use the circle's center() method which adds the circle to and centers the circle on the stage.
There is a helpful LEARN section on ZIM but we will tell you some tips in the grey dashed sections (like this one) as we go. Here is tip: a method does something (it is like a verb).
To use a method, you put the object first (in this case the object is circle) then a period (.) and then the method with round brackets. We call this dot syntax because a dot separates the object and the method.
You can pass extra information into the round brackets as parameters.
Here, we need to pass a reference to the stage to tell the center() method to center the circle on the stage.
HIGHLIGHT MORE ANSWER
3. Use the circle's mov() method to move the circle to the right 250 pixels.
HIGHLIGHT MORE ANSWER

ZIM Learn References
4. Use the circle's drag() method to make the circle draggable.
Test the app in a Browser by finding the page on your computer and dropping it on an open Browser.
(In Atom, you should get the open-in-browser package)
HIGHLIGHT MORE ANSWER
CLAIM YOUR BADGE
ZIM Learn References
(SHOW YOUR TEACHER)

BADGE 2
TOPCreate controls using components
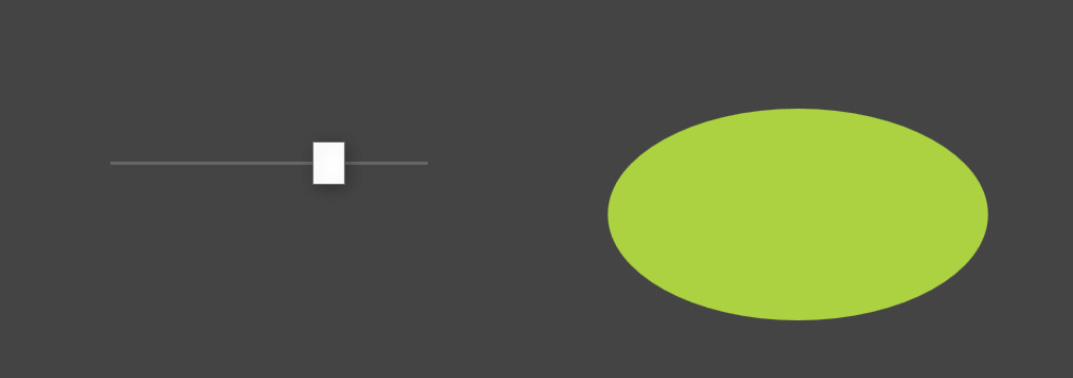
5. Make a variable (var) called slider and assign (=) a new zim.Slider() with a min value of 50 and a max value of 500. Then center() the slider on the stage.
HIGHLIGHT MORE ANSWER
ZIM Learn References
6. Use mov() to move the slider minus 250 pixels (left) and minus 50 pixels (up).
HIGHLIGHT MORE ANSWER

ZIM Learn References
We want to change the width of the circle when we slide the slider.
To do this we will use an event.
Events are when things happen - like we click on something, or a picture is loaded. There are a half dozen common events we use.
We use the event to call a function( ) { } which has a block of code between { } that does something.
In our block of code, we make statements which end in a semi-colon (;) and are steps in the code.
The statement we will use below is to set a property of the circle equal to (=) a property of the slider.
A property describes an object (it is like an adjective) or is something that the object has.
To use the property, we put the object first and then a period (.) and then the property.
Again, this is called dot syntax as we use a dot between the object and a property, like we did between the object and a method.
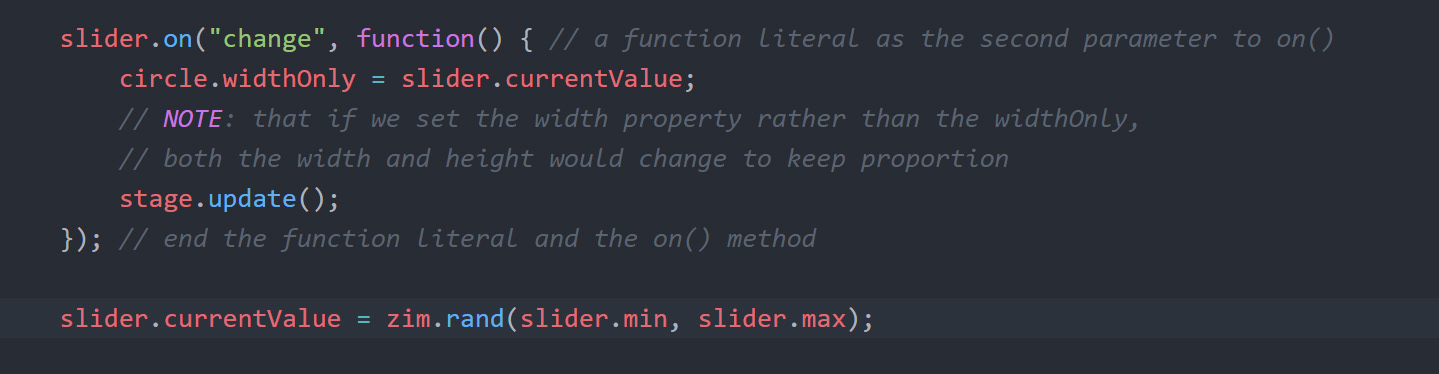
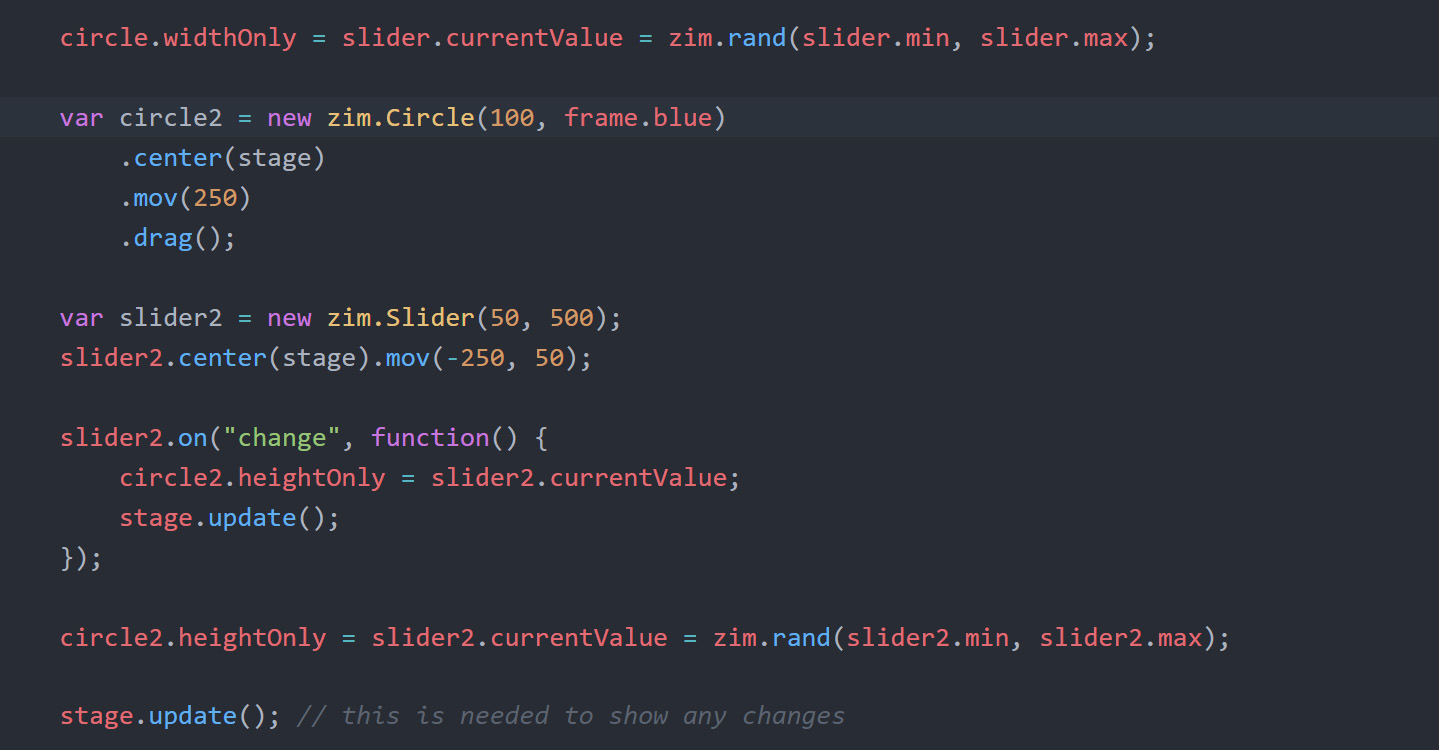
7. Use the Slider's on() method to add a "change" event (as a first parameter) that calls a function (as a second parameter)
to set the Circle's widthOnly property equal to (=) the Slider's currentValue property and then updates the stage with stage.update(). View in a Browser and try the slider - the circle should change width.
HIGHLIGHT MORE ANSWER

8. After the on() method and its function, set the currentValue of the Slider equal to a random number between the slider.min and slider.max using zim.rand().
HIGHLIGHT MORE ANSWER
ZIM Learn References
9. Set the widthOnly property of the Circle equal to the currentValue of the Slider. Now the circle should have a random width each time you refresh the Browser (CTRL R or ⌘ R).
HIGHLIGHT ANSWER

CLAIM YOUR BADGE
(SHOW YOUR TEACHER)
BADGE 3
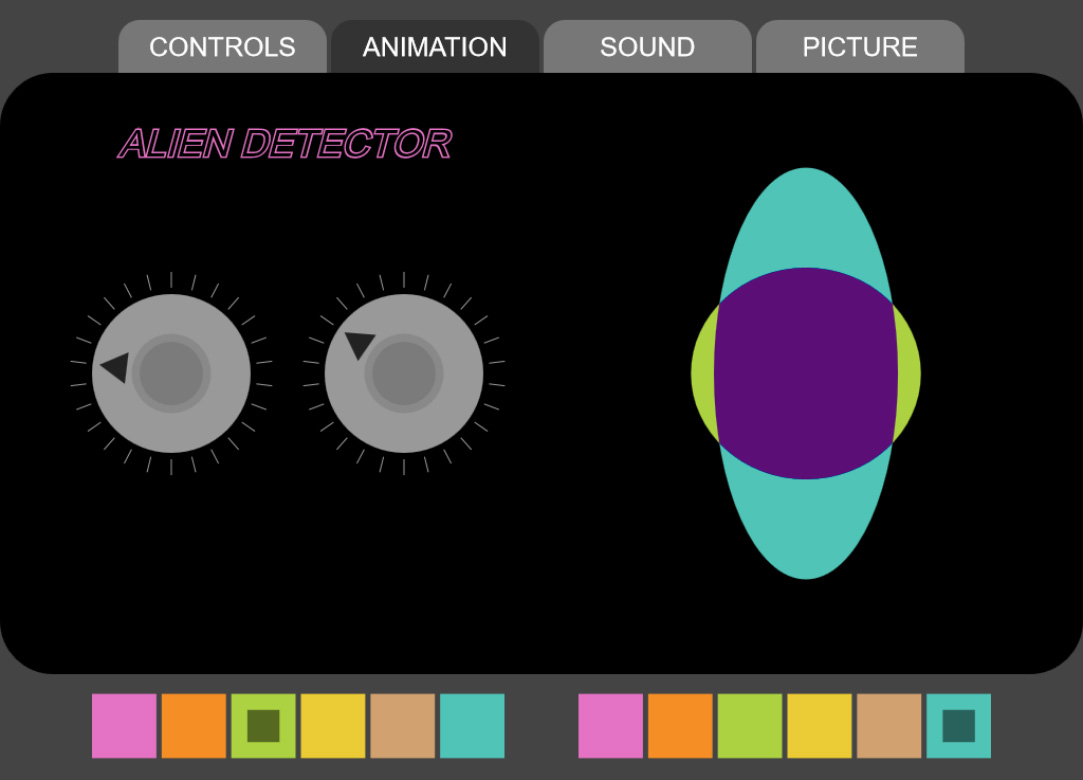
TOPCreate pages with Tabs and ColorPickers
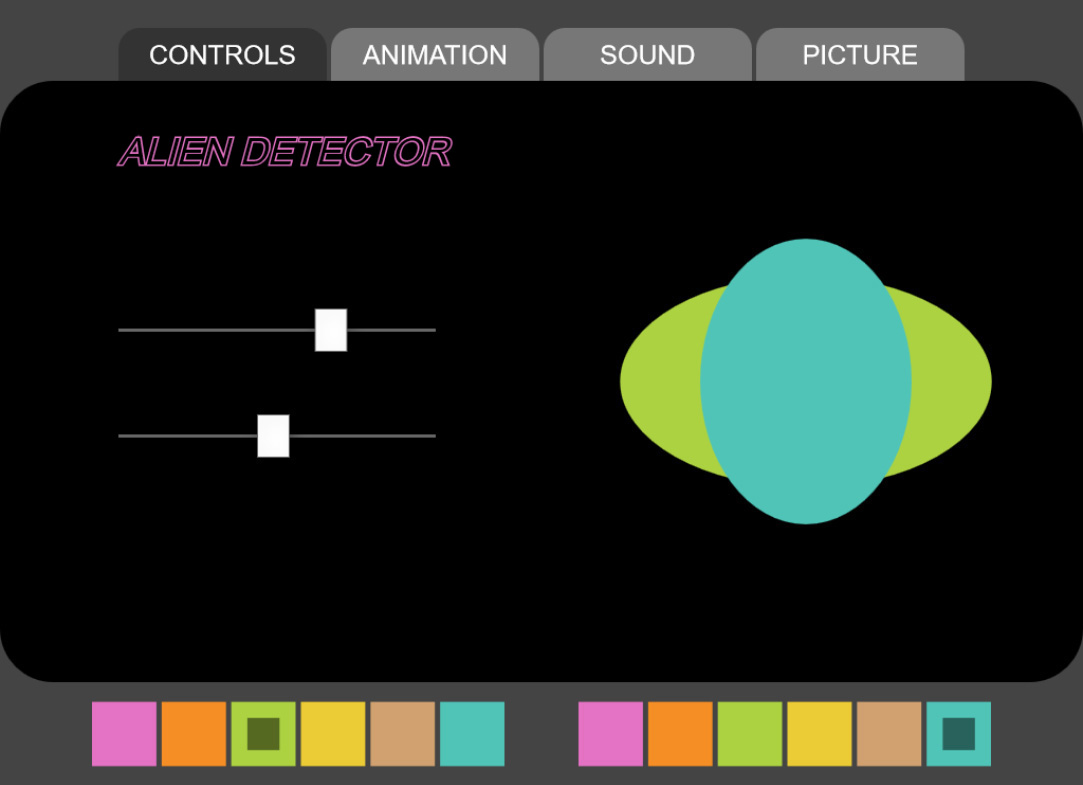
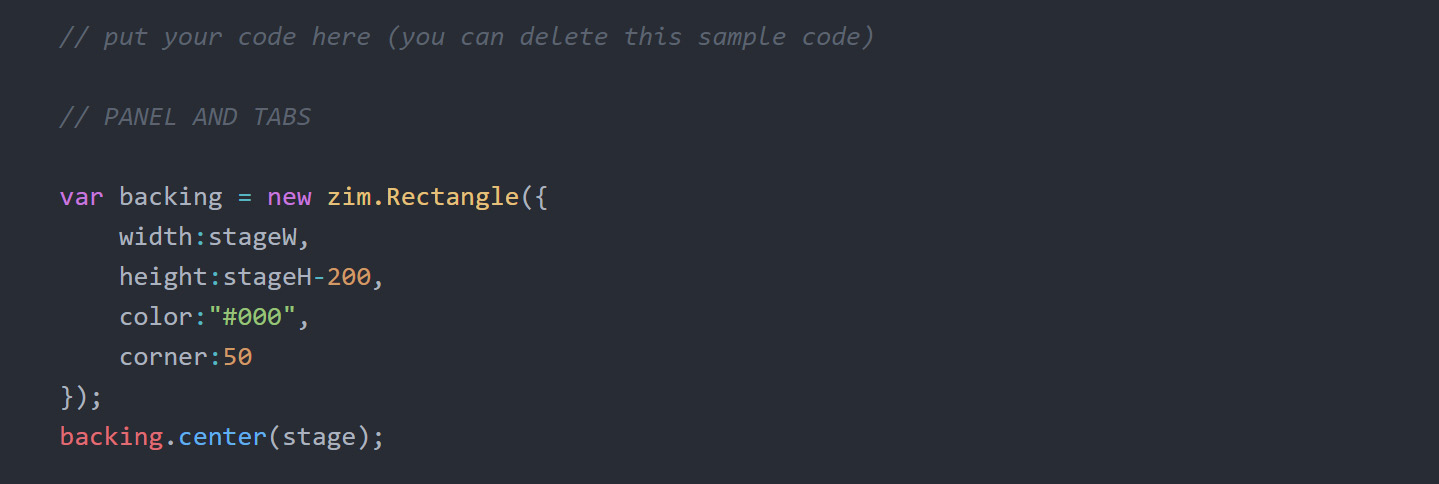
10. ABOVE the code for your Circle, make a variable (var) called backing and assign (=) a new zim Rectangle() with a single configuration object (ZIM Duo Technique).
The configuration object {} should have a width of stageW, a height of stageH-200, a color of "#000" (or "black") and a corner of 50. Then center() the backing on the stage.
HIGHLIGHT MORE ANSWER
11. BELOW the backing, make a variable (var) called tabs and assign (=) a new zim Tabs() with a single configuration object. The configuration object {} should have
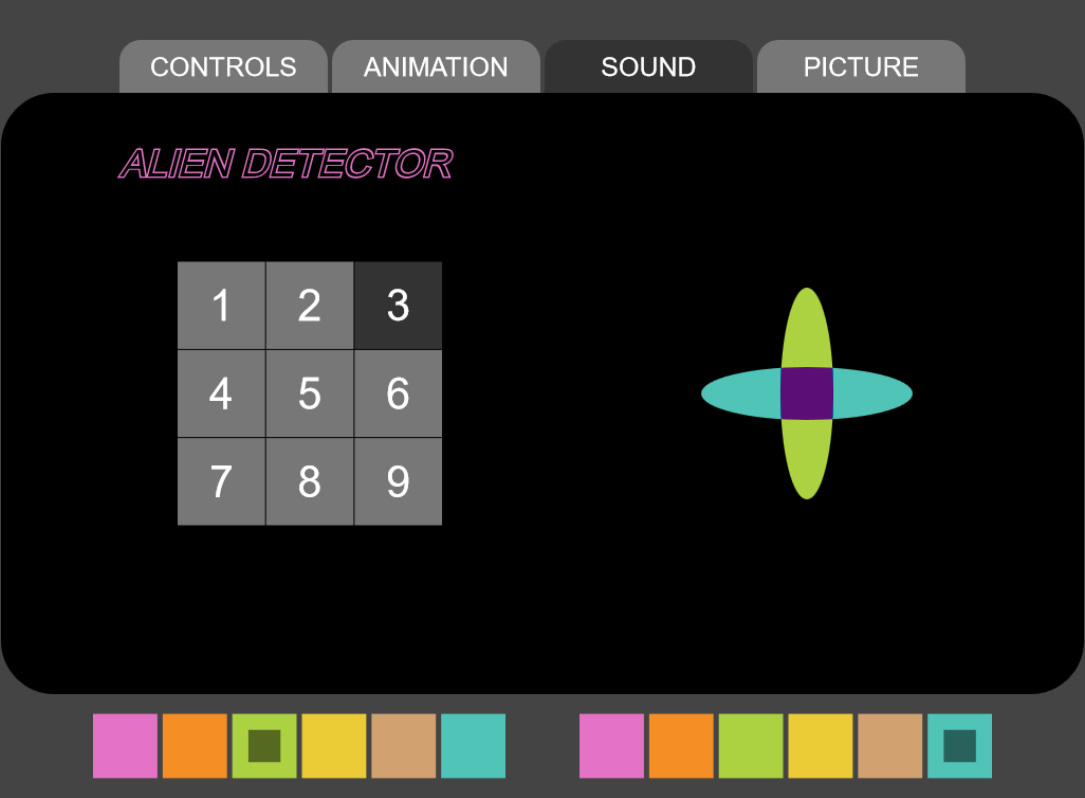
a width of 800, a height of 50, a tabs property holding an Array of four strings: ["CONTROLS", "ANIMATION", "SOUND", "PICTURE"],
a corner of 20 and a spacing of 4.
Then center() the tabs on the stage.
Pass in 0 for the second parameter.
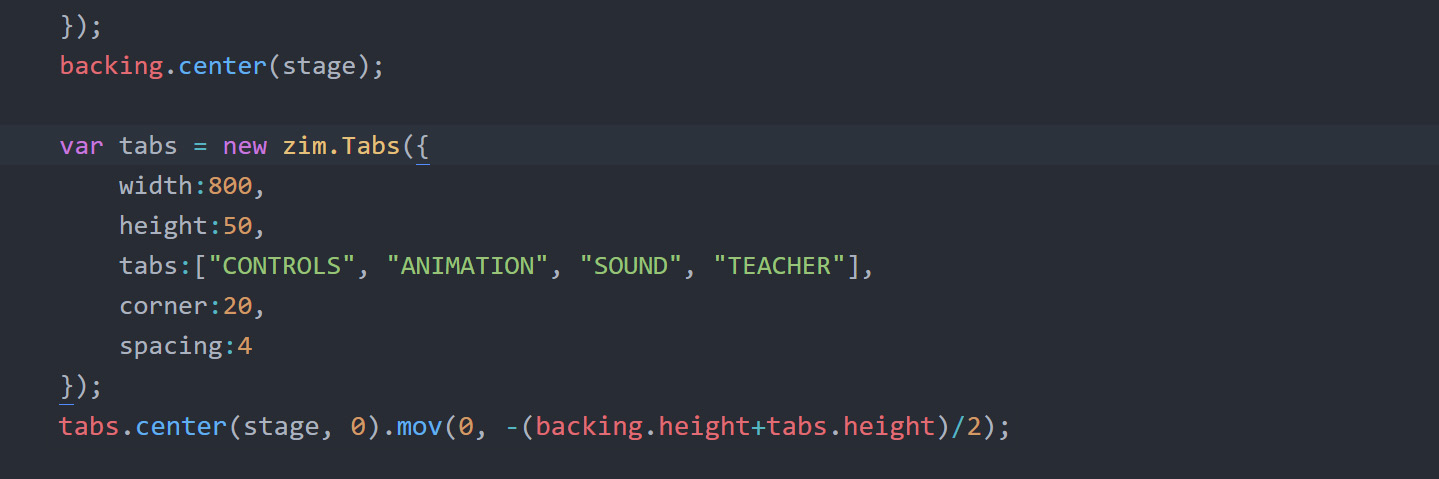
This layers the tabs below the backing so that when we animate in the tabs at the very end of our code,
they will pop up from behind the backing rather than animate on top of the backing.
Alternatively, we could have just made and added the tabs first before the backing for the same effect.
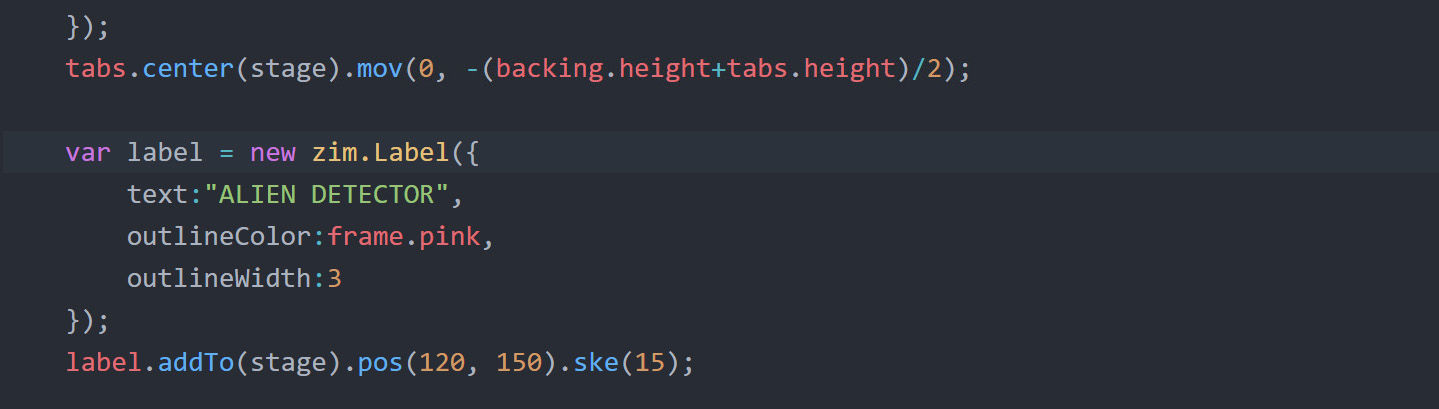
Use mov() to move the tabs 0 in the x and -(backing.height+tabs.height)/2 in the y to put the tabs at the top of the backing.
HIGHLIGHT MORE ANSWER
ZIM Learn References
12. BELOW the Tabs, make a variable (var) called label and assign (=) a new zim.Label() with a single configuration object. The configuration object {} should have
text of "ALIEN DETECTOR", outlineColor of frame.pink and outlineWidth of 3.
Use addTo() to add the label to the stage
and pos() to position at 120 in the x and 150 in the y (absolute position).
Use ske() to skew the label 15 in the x (make italic).
HIGHLIGHT MORE ANSWER
ZIM Learn References
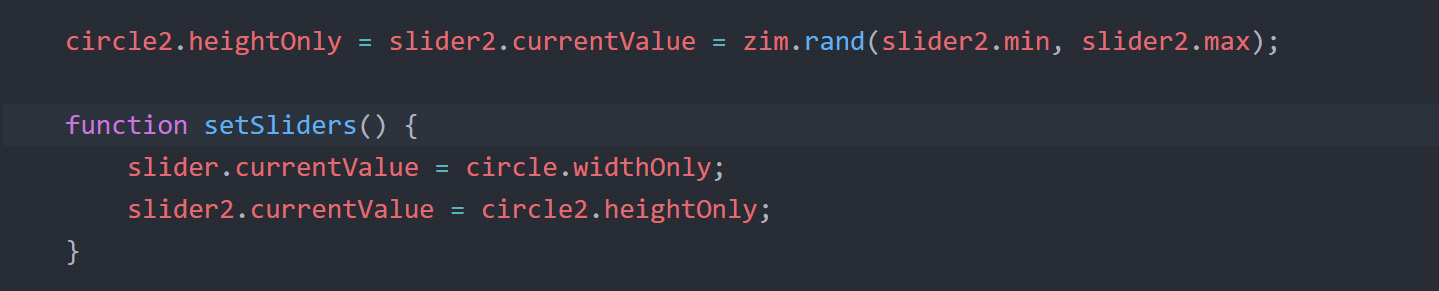
13. Copy and paste all the circle and slider code to just before the last stage.update(). In the pasted code, change all circle references to circle2, all slider references to slider2 and all widthOnly properties to heightOnly.
Also change the color of the circle2 to frame.blue and adjust the mov() of the slider2 to a y of 50 rather than -50.
HIGHLIGHT ANSWER
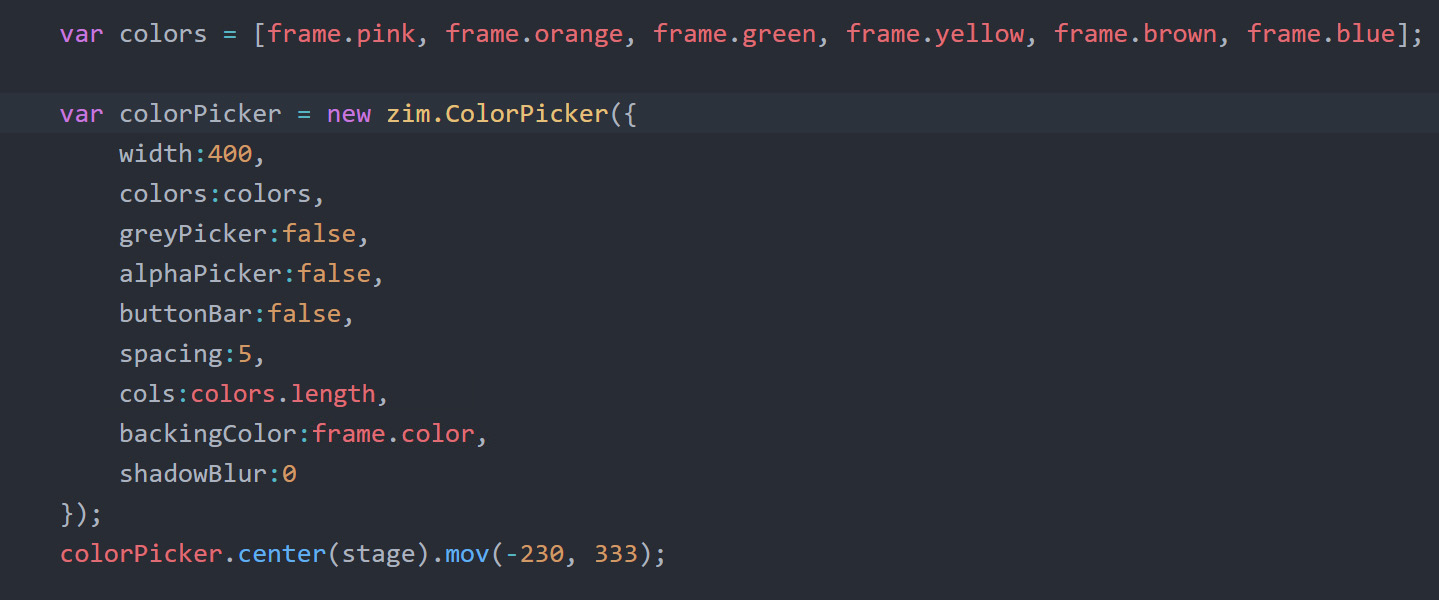
14. BELOW the pasted code, make a variable (var) called colors and assign (=) an array with six colors: [frame.pink, frame.orange, frame.green, frame.yellow, frame.brown, frame.blue].
HIGHLIGHT MORE ANSWER

ZIM Learn References
15. BELOW the Array, make a variable (var) called colorPicker and assign (=) a new zim.ColorPicker() with a single configuration object. The configuration object {} should have
a width of 400, a colors of colors (points to the colors array), a greyPicker of false, a alphaPicker of false, a buttonBar of false,
spacing of 5, cols of colors.length (6), backingColor of frame.color, and shadowBlur of 0.
Then center() the picker on the stage and use mov() to move the picker to x of -230 and y of 333 (bottom left).
HIGHLIGHT MORE ANSWER
ZIM Learn References
16. Set the colorPicker's selectedColor property equal to the first circle's color.
HIGHLIGHT ANSWER

17. Use the on() method of the colorPicker to add a change event that calls a function
to set the color property of the first circle equal to the selectedColor property of the colorPicker and updates the stage with stage.update().
HIGHLIGHT MORE ANSWER

ZIM Learn References
18. Make a variable (var) called colorPicker2 and assign (=) the colorPicker's clone().
COPY and PASTE the rest of the colorPicker code (to center(), mov(), selectedColor and the on() method). Then in the pasted code, change colorPicker to colorPicker2 and set the mov() to an x of 230 rather than -230.
View in Browser and try the ColorPickers and Sliders.
HIGHLIGHT ANSWER

CLAIM YOUR BADGE
(SHOW YOUR TEACHER)
BADGE 4
TOPCreate an Animation page with Dials
There are four pages - one for each tab.
We will put the components (sliders, dials, pad and loader) and any items unique to each page in a zim.Container() so that we can add and remove the items together from the stage manually or with zim.Pages().
The backing, tabs, label, circles and colorPickers will always stay on the stage so we will not put them in the containers.
19. MOVE the circle2 code (and its center, mov and drag) to just below the circle code.
Then BELOW this and ABOVE the slider code, make a variable (var) called controls (matching the controls tab) and assign (=) a new zim.Container() with stageW and stageH as the two parameters.
We will add this to the stage later with the Pages object.
CHANGE the code to center() the slider and slider2 in the controls container rather than on the stage.
HIGHLIGHT MORE ANSWER
ZIM Learn References
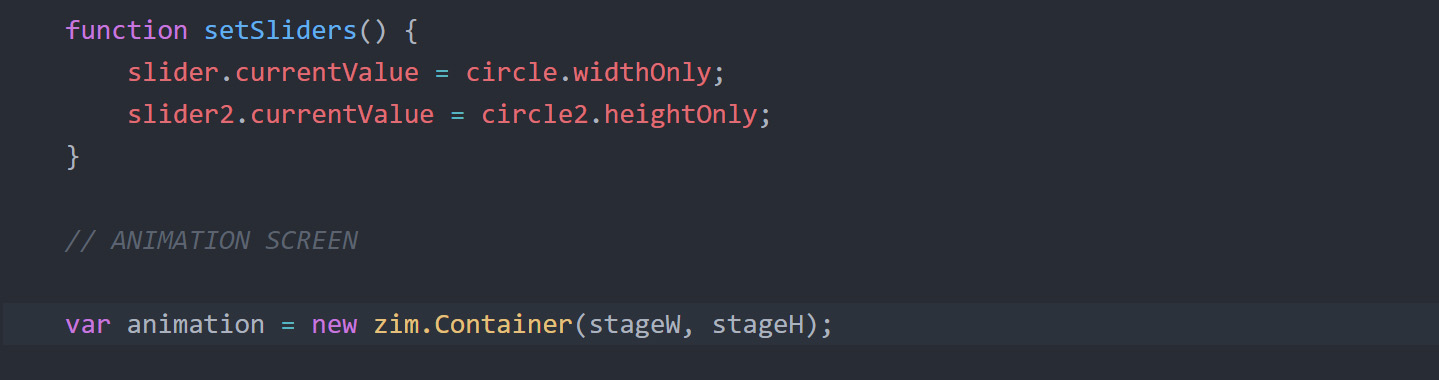
20. Each page has components that will update the size of the circles so we need a function that will update the sliders to the right value when we come back to the Controls page.
BELOW the slider code make a function called setSliders() that will set the currentValue property of each slider to the widthOnly properties of their matching circle.
HIGHLIGHT MORE ANSWER
ZIM Learn References
21. We are ready to make the Animation page. BELOW the slider function we just made, make a variable (var) called animation (matching the animation tab) and assign (=) a new zim.Container() with stageW and stageH as the two parameters.
We will add this to the stage later with the Pages object.
HIGHLIGHT MORE ANSWER
ZIM Learn References
On this page, we will animate the circles and use dials to control the speed.
Animation happens over time intervals in milliseconds.
The longer the time interval the slower the animation.
We want our dials to be slow (big intervals) at the start and go faster (small intervals) as we rotate clockwise.
Usually dials are the reverse with small values at the start and big values at the end. So our min and max for the dials will seem backwards.
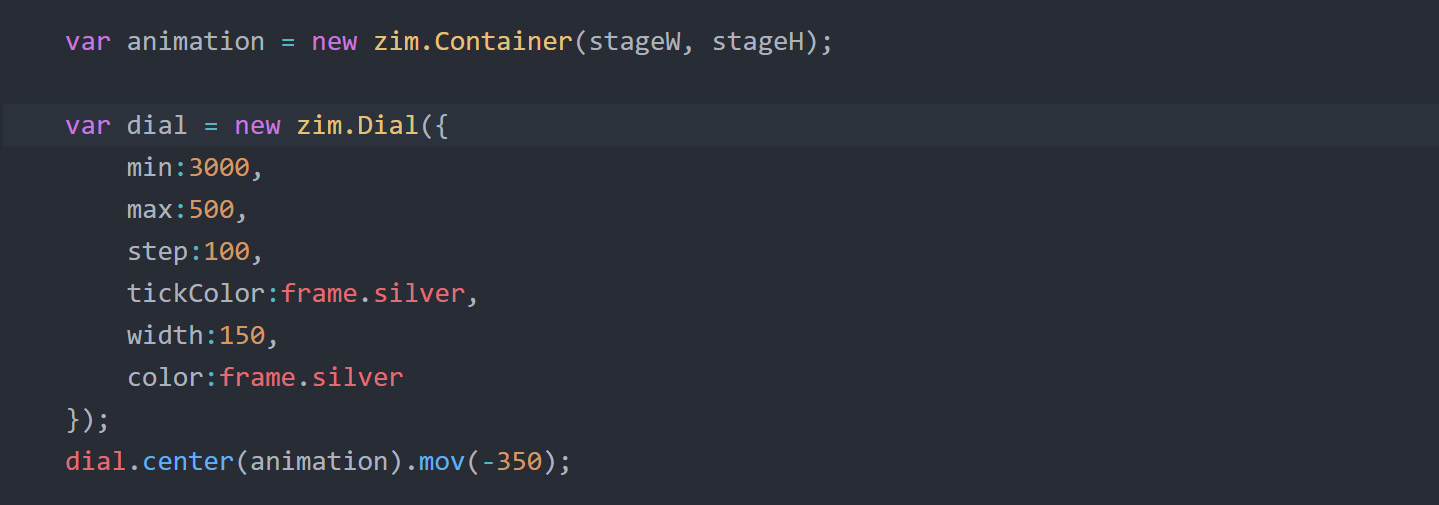
22. Make a variable (var) called dial and assign (=) a new zim.Dial() with a single configuration object. The configuration object {} should have
a min of 3000, a max of 500, a step of 100, a width of 150, a color of frame.silver and a tickColor of frame.silver.
Then center() the dial in the animation container (not the stage!) and use mov() to move the dial -350 in the x direction.
HIGHLIGHT MORE ANSWER
ZIM Learn References
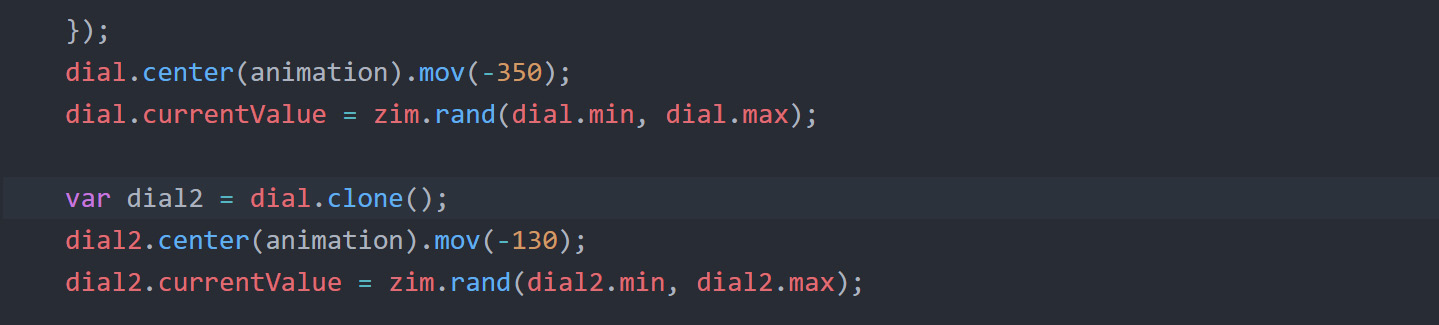
23. Set the dial's currentValue equal to a zim.rand() number between dial.min and dial.max.
HIGHLIGHT MORE ANSWER

ZIM Learn References
We need to handle the pages so we can see what we are doing.
We will add the pages at the bottom of the code so that we know all the pages are made.
For now, there are only two pages made but we will add the others as we go.
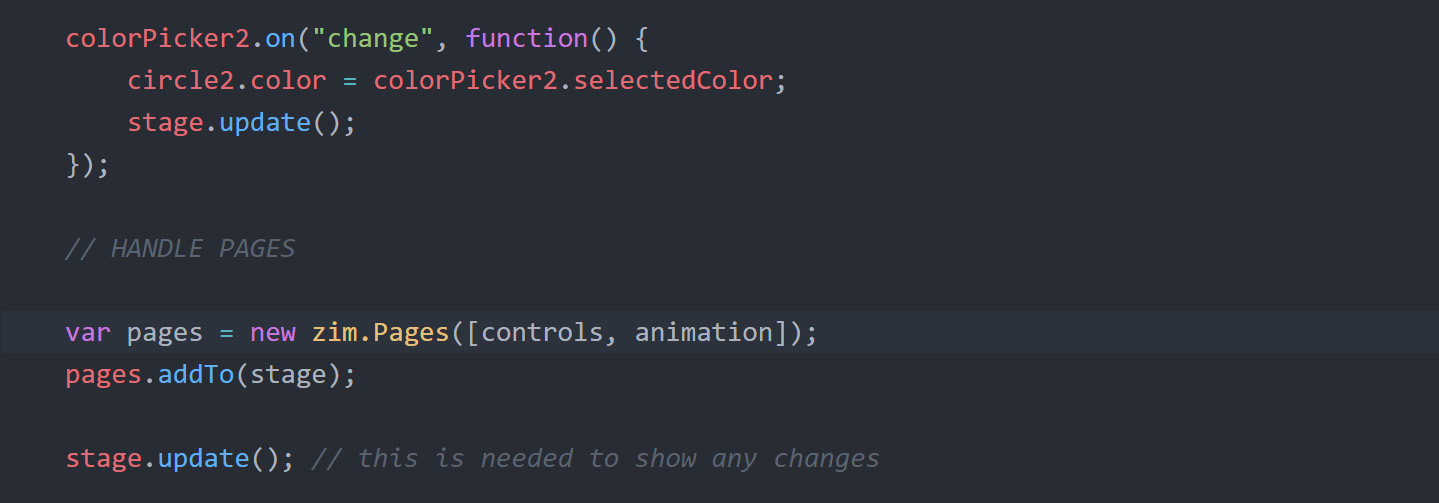
24. At the bottom, BEFORE the last stage.update() and AFTER the colorPicker2 code, make a variable (var) called pages and assign (=) a new zim.Pages() with its first parameter being an Array holding the pages we have so far [controls, animation]. Note - this is not a configuration object but just a regular parameter.
Use the addTo() method to add pages to the stage. This should show the first page in the array (controls) when viewed in the Browser. HIGHLIGHT MORE ANSWER
ZIM Learn References
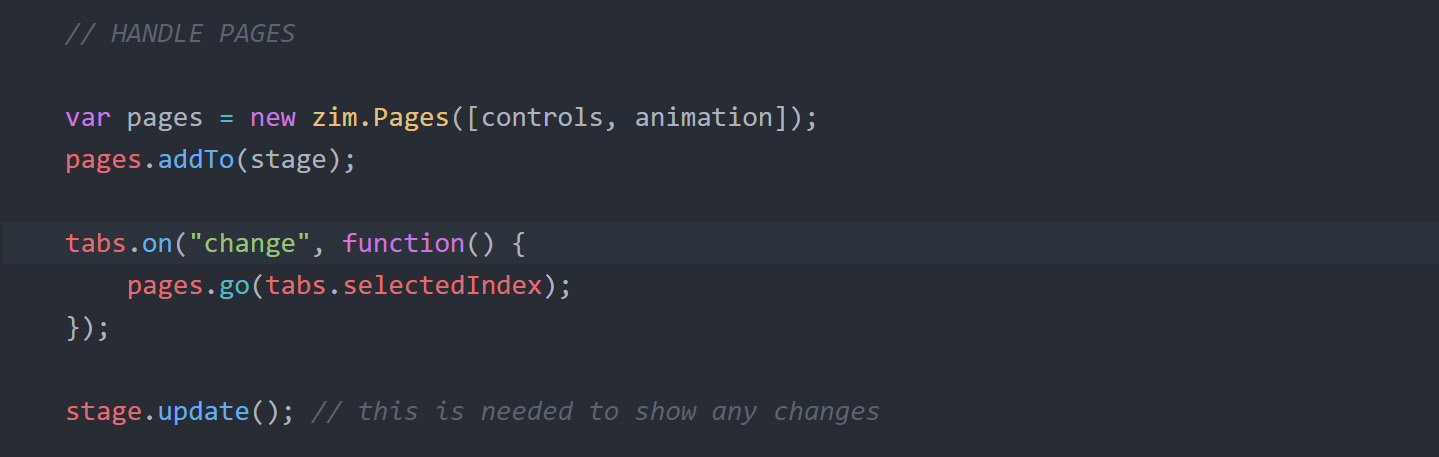
25. Use the on() method of tabs to add a change event that calls a function to
change the page with the page's go() method. We could pass the reference to a page as the parameter, for example: pages.go(animation); but we can also pass an index number. So pass the tabs' selectedIndex property as the parameter of go(). Now, the first two pages should work with the tabs when viewed in the Browser.
HIGHLIGHT MORE ANSWER
ZIM Learn References
26. BELOW the Dial code, up above, make a variable (var) called dial2 and assign (=) the dial's clone().
Copy center(), mov() and currentValue of the first dial except use dial2 instead of dial and set the mov() to an x of -130 rather than -350.
HIGHLIGHT ANSWER
We are going to animate the circles based on the dials.
We have to do this when we go to the animate page.
We also need to re-animate the circles every time we rotate the dial as the speed will change.
Each time we animate we need to stop the previous animation.
We should make a function that will do these steps for us because we have to do them multiple times.
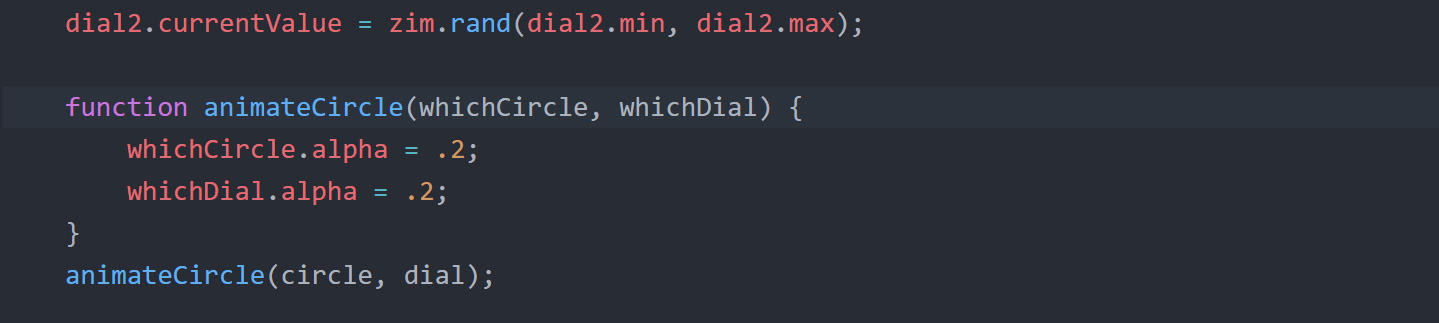
27. BELOW the dial code, use the keyword function to make a function called animateCircle(){} and have the function collect two parameters, whichCircle and whichDial.
Inside the function, let's just test that our function works by setting the whichCircle's and whichDial's alpha properties to .2 (note the decimal).
Below the function, call the function animateCircle() and pass circle and dial as parameters.
View in Browser and see if the dial and circle are dimmed (click the animate tab).
HIGHLIGHT MORE ANSWER
ZIM Learn References
We are ready to animate the scaleX of the circle and scaleY of circle2 from .5 to 2 to make the Alien Detector.
Normally we animate from the current value but in this case, the current values will be set by the sliders and yet we always want to animate from .5 to 2.
So we will use the set parameter of animate() to always start the animation at a scaleX of .5 (half normal scale).
We will use the obj parameter (called the animation object and can hold any number of properties to animate) of animate() to animate to a scaleX of 2 (twice normal scale).
Unfortunately, we need to animate the scaleY for the circle2 and this would complicate our function.
So the easiest solution is to just rotate the second circle - we will do that in the step after this step.
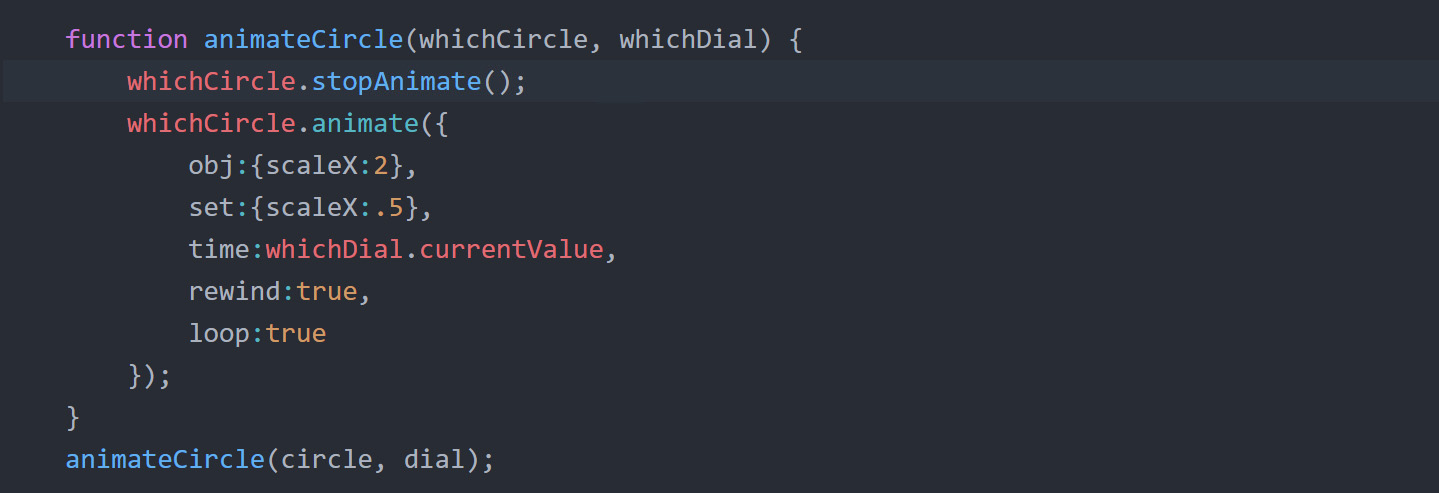
28. DELETE the alpha changes inside the animateCircle() function and replace them with the following:
first, we will stop any existing animations by telling whichCircle to stopAnimate().
Then we will animate whichCircle using its animate() method with a single configuration object having the following properties:
a set property of {scaleX:.5}, an obj property of {scaleX:2}, a time property of whichDial's currentValue, a rewind property of true and a loop property of true. Now, the circle should animate at the initial speed of the dial when viewed in a Browser.
HIGHLIGHT MORE ANSWER
ZIM Learn References
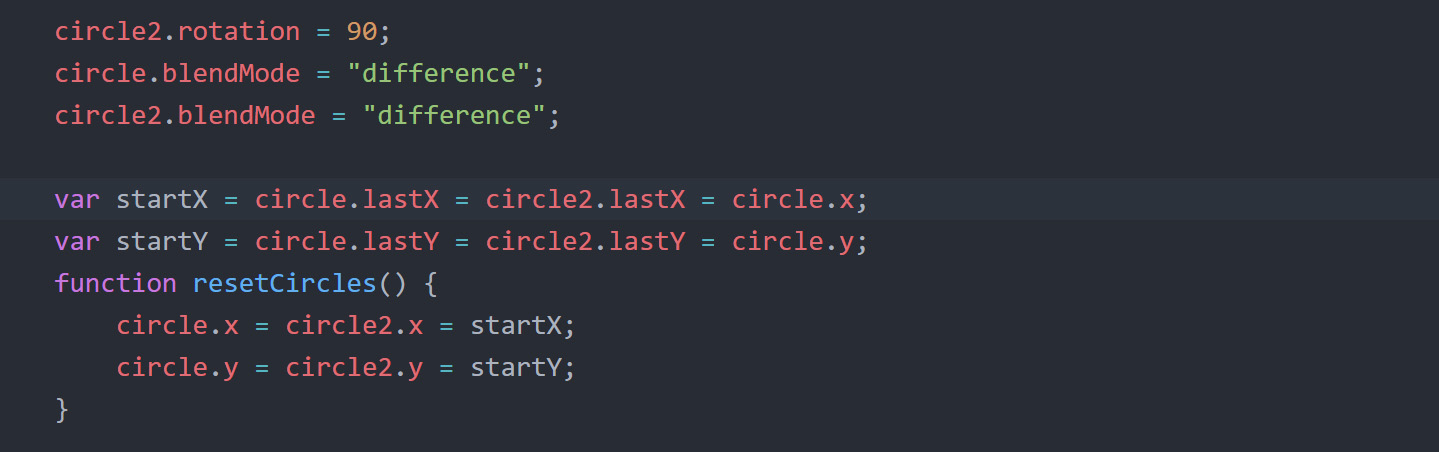
29 a) BELOW the Circle code, up above, set circle2's rotation property to 90.
This means that when the circle2 animates in scaleX it will appear to animate in scaleY because it is rotated.
29 b) IMPORTANT: do a FIND and REPLACE to change all heightOnly to widthOnly everywhere so that the sliders work properly now that circle2 is rotated (not shown in this answer).
29 c) Set both circle and circle2 to have blendMode properties of "difference". This means they will blend together and with an upcoming picture in a cool manner.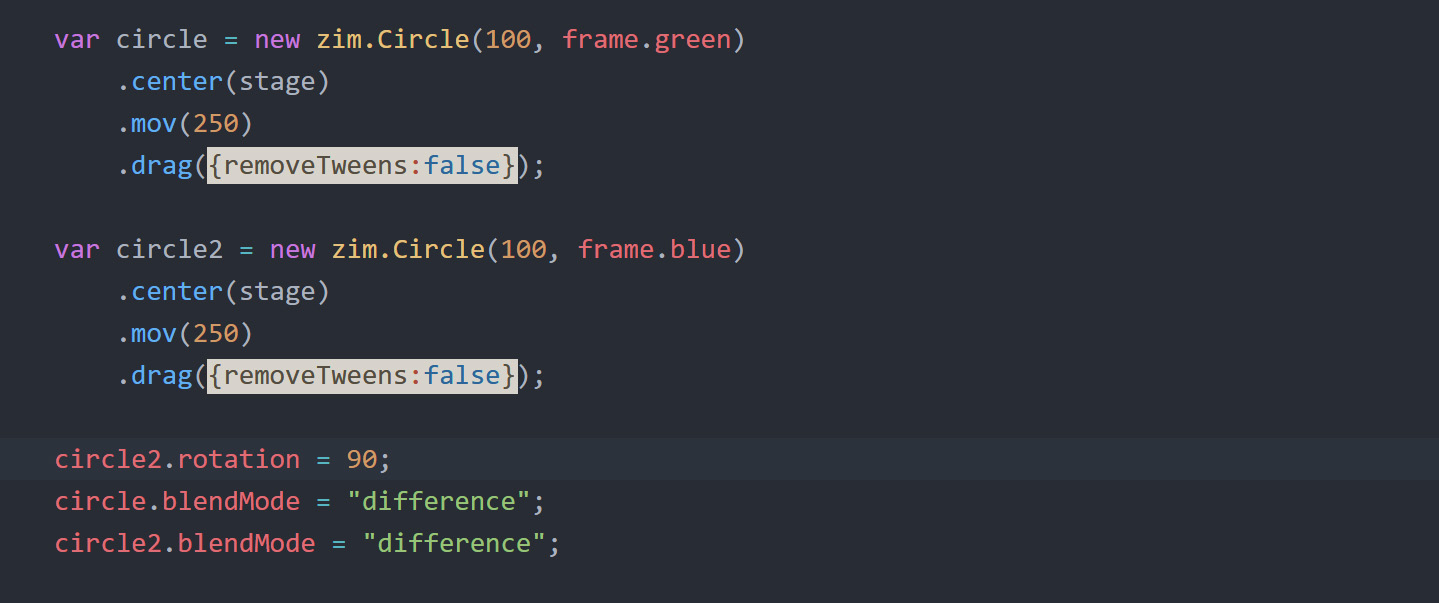
When we drag the circles, the drag() method automatically stops any animations on the object.
In this case, it is okay for the circles to animate while we are dragging so we want to turn this feature off.
29 d) ADJUST the drag() to receive a single parameter that is a configuration object with
a removeTweens property set to false.
HIGHLIGHT ANSWER
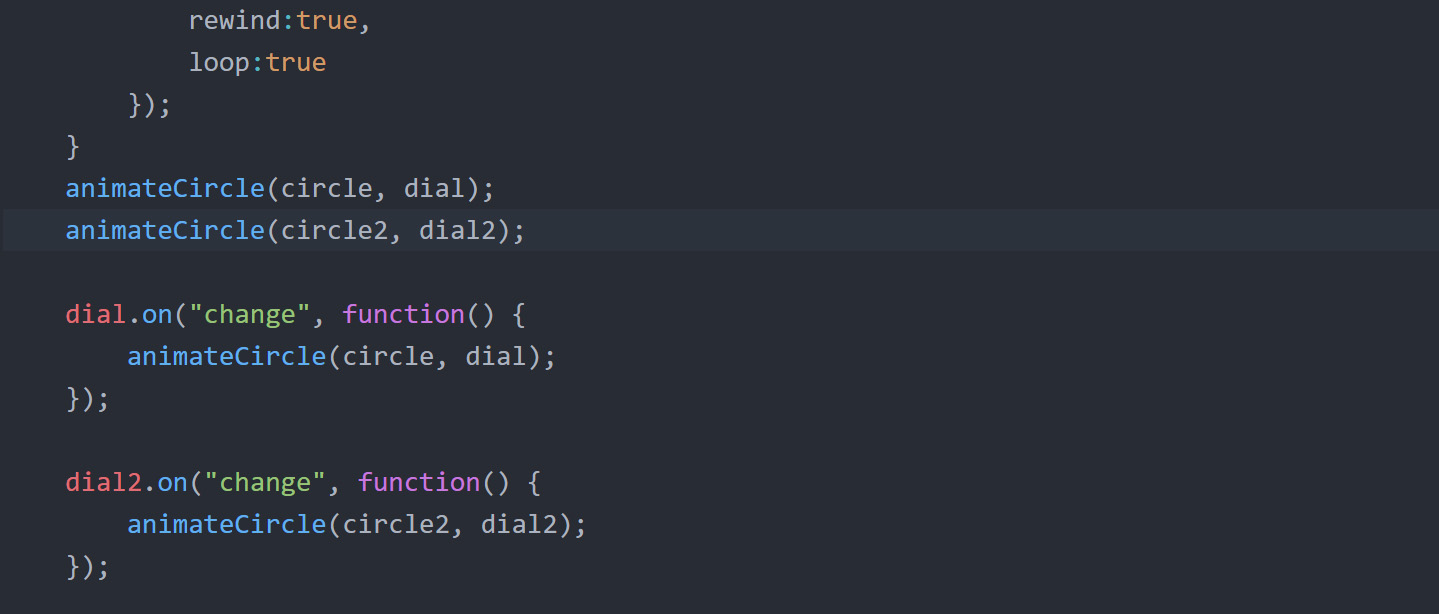
30. Back BELOW the Dial code, call the function animateCircle() again and pass circle2 and dial2 as parameters - to animate the second circle.
We will move both of the function calls down into the pages area in the next step.
Use the on() method of the dial to add a change event that calls a function
that will call the animateCircle() function passing the circle and the dial as parameters. COPY this and change all occurances of dial to dial2 and circle to circle2.
Now, rotating the dials should change the animation speed of the circles when viewed in a Browser and the animation tab is pressed.
HIGHLIGHT MORE ANSWER
ZIM Learn References
We do not want to animate the circles until they press the animation tab.
We know when this will happen down in the pages' change event.
If the page is animation we will start the animation.
If the page is controls we will stop the animation and set the sliders.
This is the logic of the app and we use conditionals (if statements) to handle the flow.
if (this is true) {then do this}
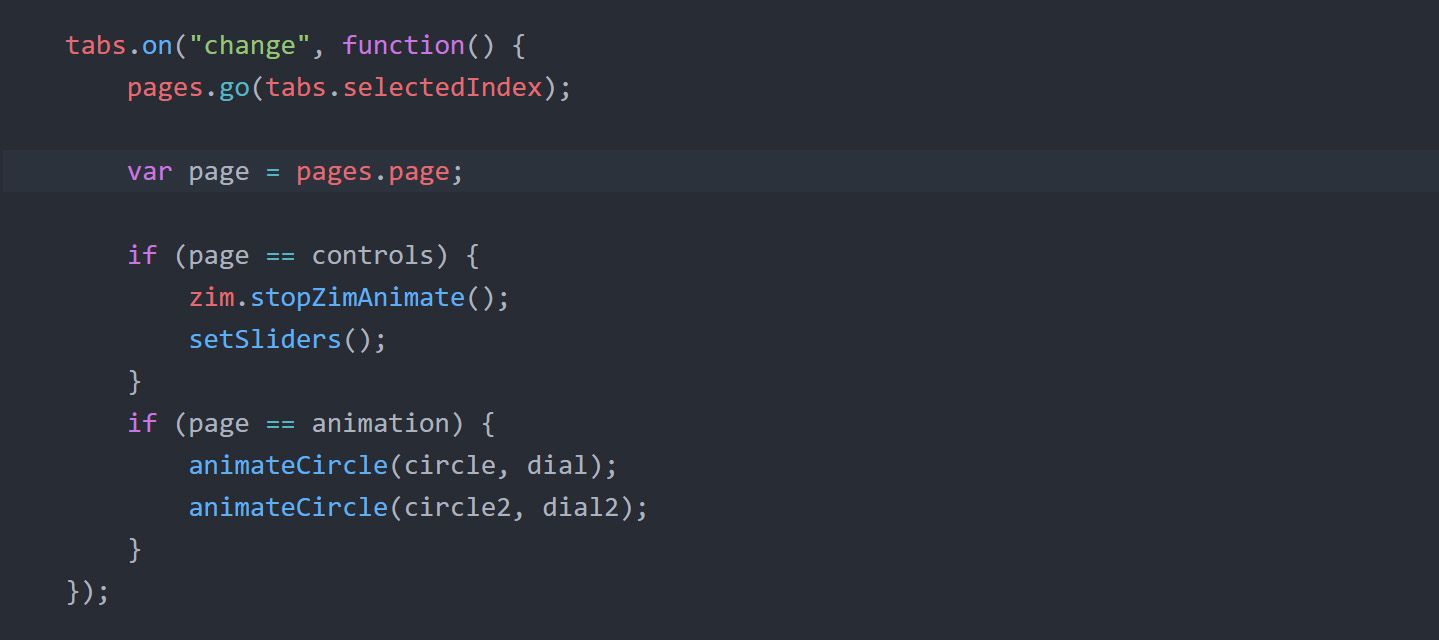
31 a) DOWN in the tabs' change event function, after the go() method, make a variable (var) called page and assign (=) the page's page property for convenience.
if (this is true) {then do this}
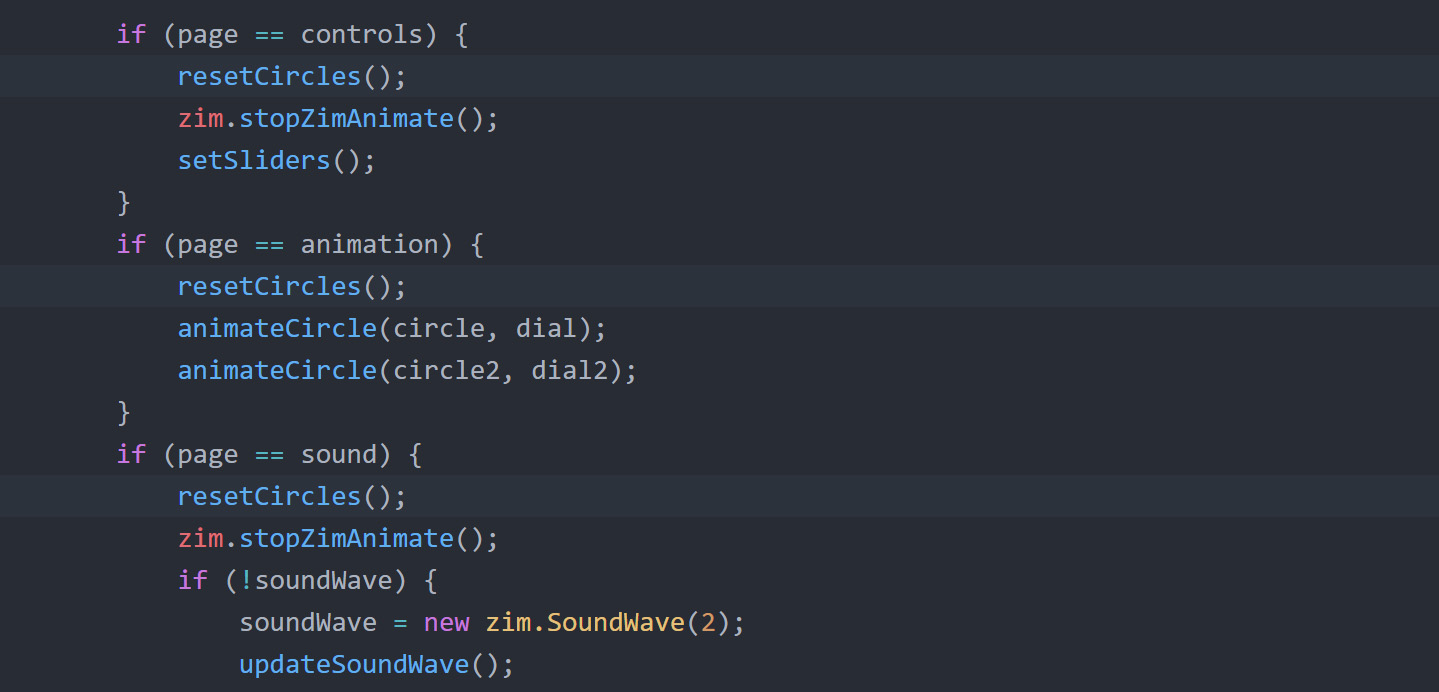
31 b) Use a conditional if ( ) { } to test if the page is == (comparison operator) to controls. If it is, then use the general zim function zim.stopZimAnimate() to stop all animations. Also, call the setSliders() function which will set the sliders to match the current width of the circles.
31 c) Use a second conditional to test if the page is == to animation. CUT the two animateCircles() calls (not the function but the calls to the function) from the dial code and PASTE inside the curly brackets of the latest conditional. Now, if the page is animation, the two animateCircles() functions are called.
View in Browser and the circles should only animate when in the animation section. If your circles are animating when you first open the app, make sure that you did not leave the animateCircles() calls in the dial section. We will add to the logic of the pages as we add the last two pages. HIGHLIGHT MORE ANSWER
ZIM Learn References
(SHOW YOUR TEACHER)

BADGE 5
TOPAnimate to the Mic and add a Pad to set speed
Here we will animate to the microphone with zim.SoundWave().
We can also animate sounds from an mp3 for instance - see the docs for an example.
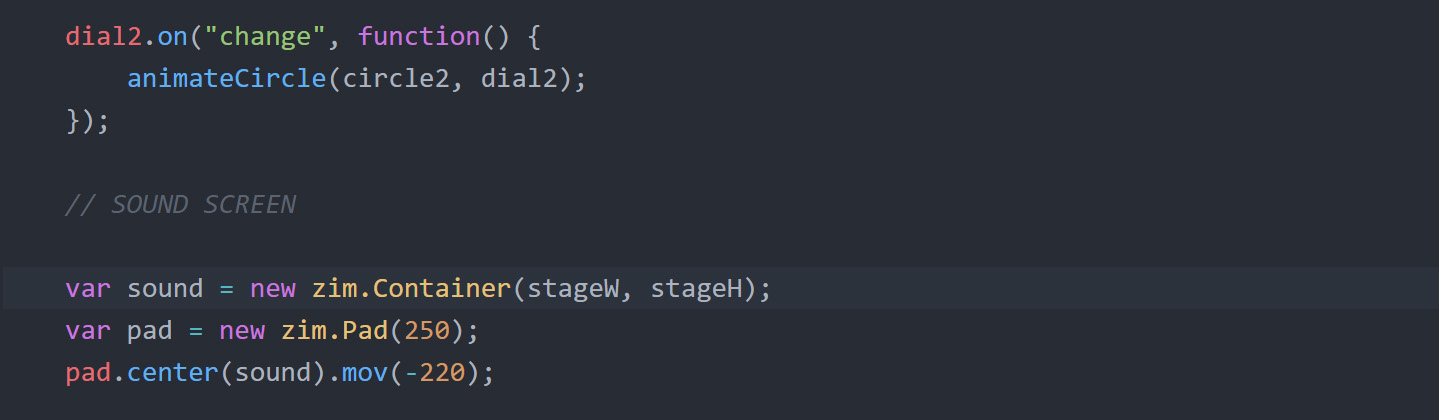
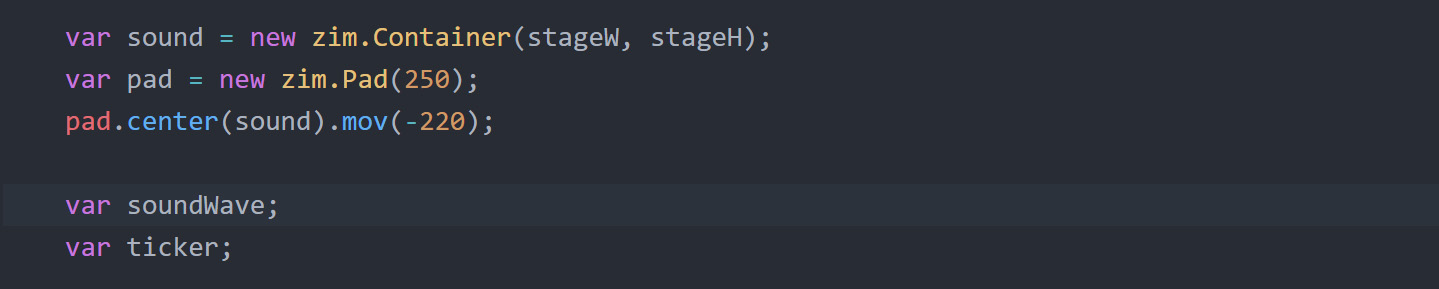
32 a) BELOW the dial code make a variable (var) called sound (matching the sound tab) and assign (=) a new zim.Container() with stageW and stageH as the two parameters.
We will add this to the stage later with the Pages object.
32 b) Make a variable (var) called pad and assign (=) a new zim.Pad() with a parameter of 250 (the pad width). Then center() the pad in the sound container and use mov() to move the pad to x of -220. HIGHLIGHT MORE ANSWER
ZIM Learn References
33. Declare a variable (var) called soundWave and a variable (var) called ticker. We will assign things to these variables later. But for now, we want them to be available for when we use the pad to control the mic. HIGHLIGHT MORE ANSWER
ZIM Learn References
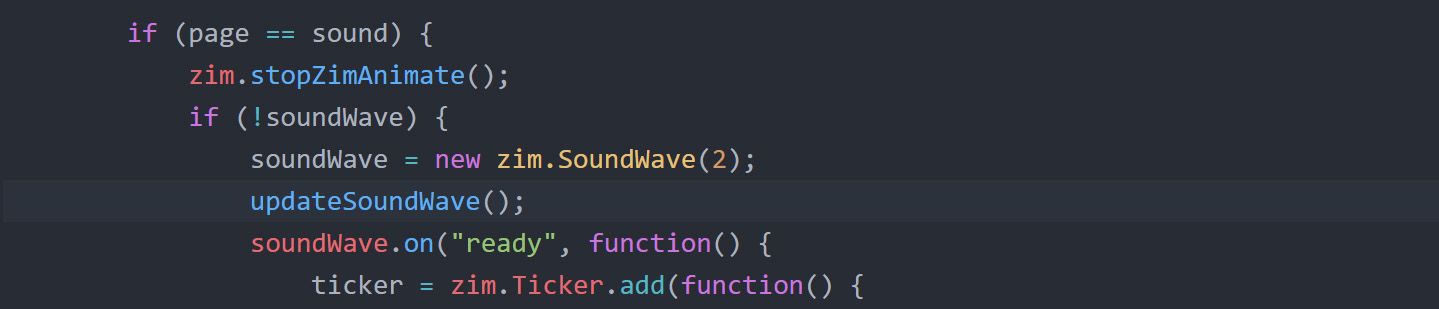
We will make a zim.SoundWave() object when we go to the Sound page.
This will ask to be able to use the microphone.
We only want to make the SoundWave object once.
So we will test to see if it exists and if not, then we will make it.
The SoundWave object will have 2 frequencies - one for each circle. So the lower frequency will change the circle scale and the higher frequency will change the circle2 scale.
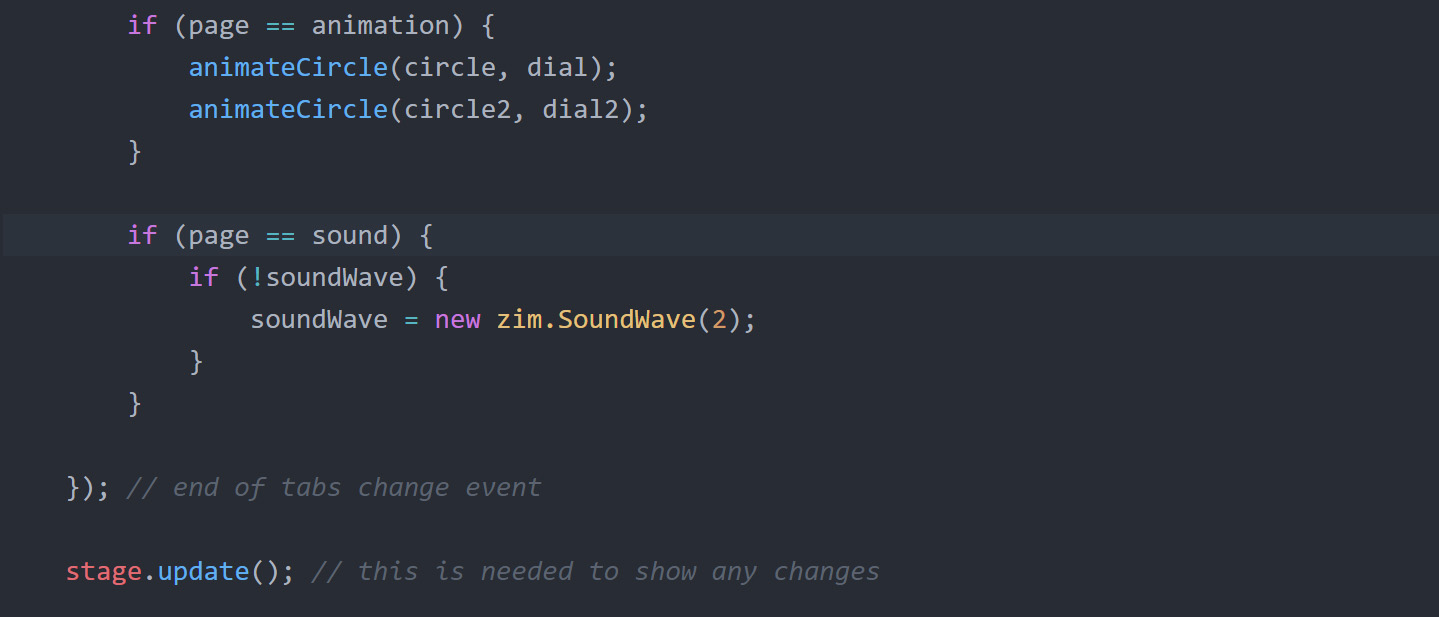
34. In the pages section at the bottom - add the following INSIDE the tabs' change event BELOW the conditional for animation:
make a conditional if ( ) { } to find out if the page == sound.
If it is then make another conditional on a new line inside the { } that tests to see if soundWave does not exist.
To do this, put a ! in front of soundWave. This means not soundWave. So, if there is not a soundWave already made,
then set soundWave equal to (=) a new zim.SoundWave() with a parameter of 2 for the number of waves.
HIGHLIGHT MORE ANSWER
ZIM Learn References
Note: there is no var declaration before soundWave as we have already declared soundWave above. If we put var in front, then we would only have access to soundWave inside this change event function - and we need access to soundWave for the pad control in the next steps.
35. ABOVE when making the pages, add sound after animation to the array passed in as a parameter.
HIGHLIGHT MORE ANSWER

ZIM Learn References
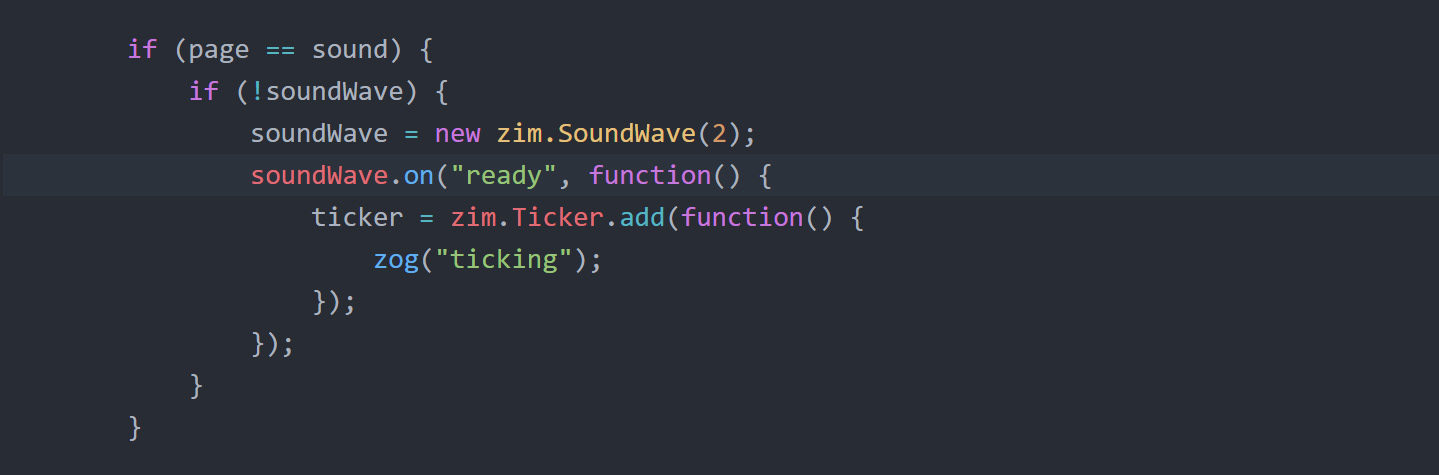
We need to constantly check the levels of the soundWave to be able to animate the circles to the sound.
So we will add a function to the zim.Ticker using the add() method.
We use the add() method directly on the Ticker class (as there is only ONE Ticker) rather than using a new zim.Ticker() which could make many Ticker objects.
The add() method is called a static method - much like max() and min() are static methods of the Math class.
Storing the results of the add() method in the ticker variable allows us to remove and add the function to the Ticker when we need to
as we do not want to animate to the mic when we are not in the Sound page (or the upcoming Picture page).
Note that ticker in the code below does not have var in front as it was declared earlier so we can use it the next time the tabs change.
We add the Ticker function once the SoundWave is ready because we have to wait for the mic to be accepted.
36. BELOW the soundWave assignment (=) use the on() method of soundWave to add a ready event that calls a function with the following command:
make ticker equal to (=) the results of the zim.Ticker's add() method.
INSIDE the parameter brackets of the add() method, pass in a function literal function( ){ } and
INSIDE this function put the code zog("ticking"); so that we can see it work when we view in Browser and press the Sound tab
and F12 to see the Console.
HIGHLIGHT MORE ANSWER
ZIM Learn References
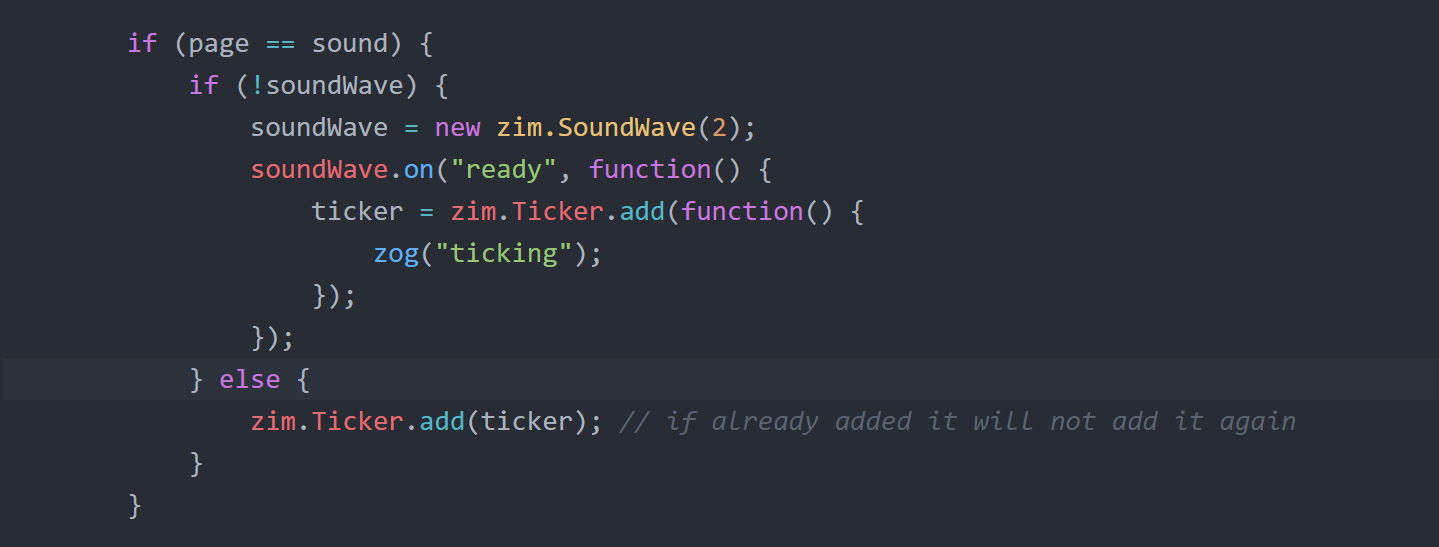
Now we have to code what happens if we are coming back to the Sound page and the soundWave has already been made.
In general, when we leave the Sound page we are going to remove() the ticker function from the Ticker.
So when we come back to the Sound page we will want to add() the ticker function to the Ticker.
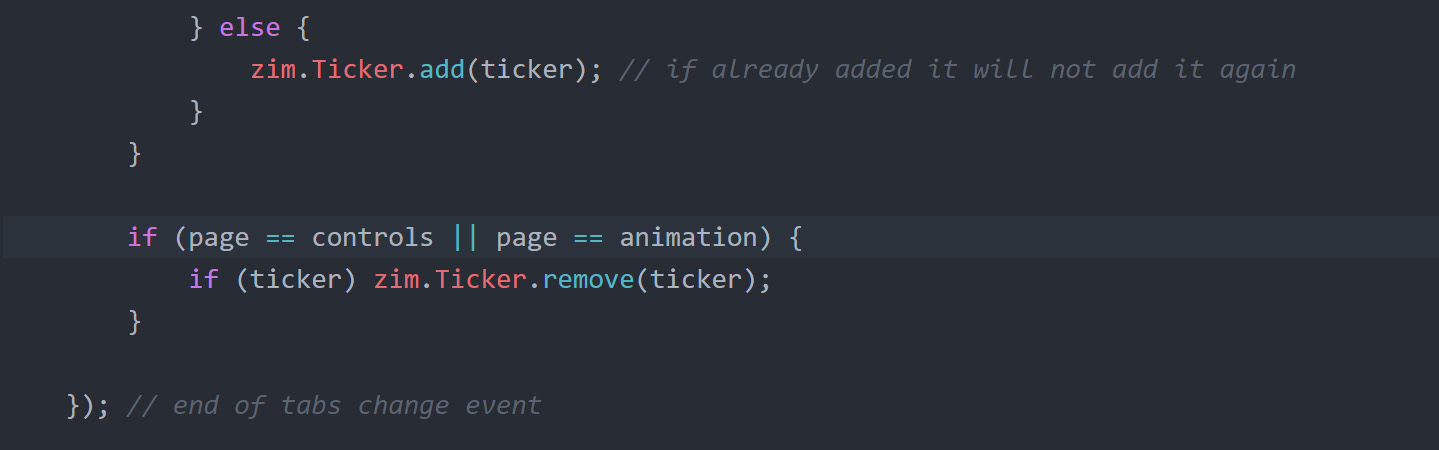
By the way, Ticker.add() will ignore adding the same function to the Ticker.
37. ADD an else { } after the if (!soundWave) { } and in the else brackets on a new line
call the zim.Ticker.add() and pass in the ticker variable as its parameter value.
HIGHLIGHT MORE ANSWER
ZIM Learn References
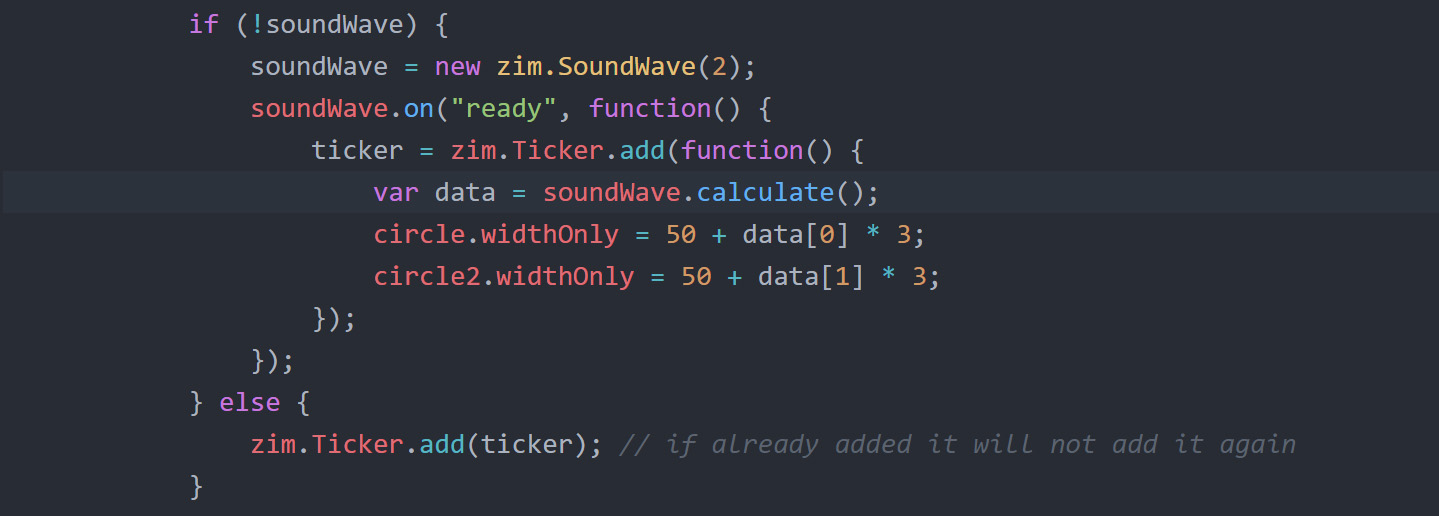
We will now calculate the amplitude (height) of the waves using the soundWave's calculate() method.
This will return (give us) an array of data (which we will store in var data) with a length equal to how many frequencies were asked for in the zim.SoundWave() parameter - in this case 2.
We can access the data for the first wave like so: data[0] and for the second wave like so: data[1].
This gives the average amplitude of the wave for that frequency.
38. DELETE the zog("ticking"); and in its place make a variable (var) called data and assign (=)
the results of the soundWave's calculate() method.
Set the circle's widthOnly property to 50 plus (+) the data array's first element (data[0]) multiplied (*) 3 to make the width bigger.
Adding 50 at the start will make sure that the circle is at least 50 pixels wide. Do the same for the circle2's widthOnly property except use the second element of the data array (data[1]). Note that circle2 has been rotated so really this will change the height of circle2 as desired.
HIGHLIGHT MORE ANSWER
ZIM Learn References
39. At the BOTTOM of the tabs' change event below the last conditional,
add a new conditional if ( ) { } that tests to see if the page == controls or (||) the page == animation
and in either case, if (another conditional) there is a ticker function then remove the ticker function from the zim.Ticker with the remove() method.
Note that since this is a one line conditional, we do not need to use the { }.
Now the soundWave animation will stop when we go back to the Controls or Animation page when viewing in a Browser.
HIGHLIGHT MORE ANSWER
40. At the TOP of the page == sound conditional, stop the animation from the animation page using the zim function zim.stopZimAnimate().
Now the animation will stop when going from the animation page to the sound page when viewing in a Browser.
HIGHLIGHT ANSWER

With the Pad, we will adjust the smoothing property of the soundWave.
The smoothing is how slowly the data is averaged for the sound.
A smoothing of .9 (closer to 1) is slow but smooth whereas a smoothing of .5 will react very quickly but seem gittery.
We have a Pad that has a selectedIndex property that can change from 0 to 8.
We can use zim.Proportion anytime we want to map one range to another range.
We pass in a base min and max which is our control - the pad.
We pass in a target min and max which is what we are changing - the smoothing.
Then as we change the pad, we use the convert() method to convert the selectedIndex of the pad to the matching smoothing (proportionally)
41. BELOW the pad code where we declared soundWave and ticker, make a variable (var) called proportion and assign (=) a new zim.Proportion() object with a single configuration object having the following properties:
baseMin of 0, baseMax of 8, targetMin of .95 and targetMax of .7 (note the higher the pad number the lower the smoothing which makes the scale adjust faster to the sound)
HIGHLIGHT ANSWER

42 a) Set the pad's selectedIndex to 2 (the number 3 on the pad for a gentle animation to the mic).
We will use this later once the soundWave is ready.
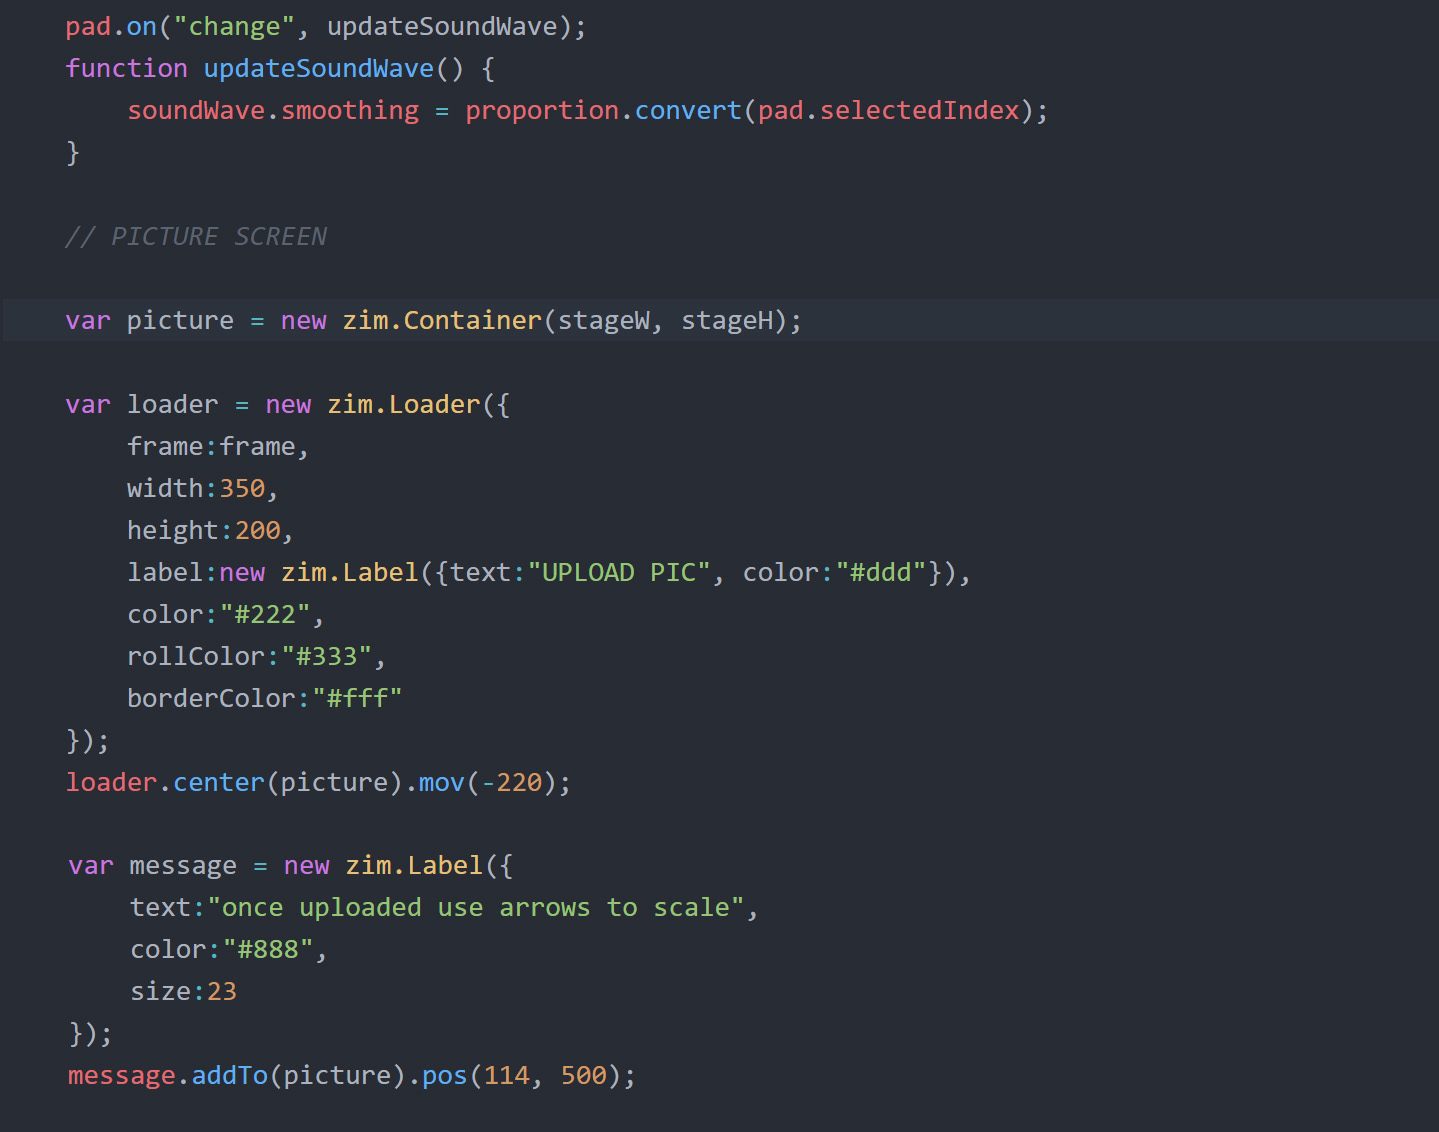
42 b) Use the on() method of the pad to add a change event that calls a function called updateSoundWave.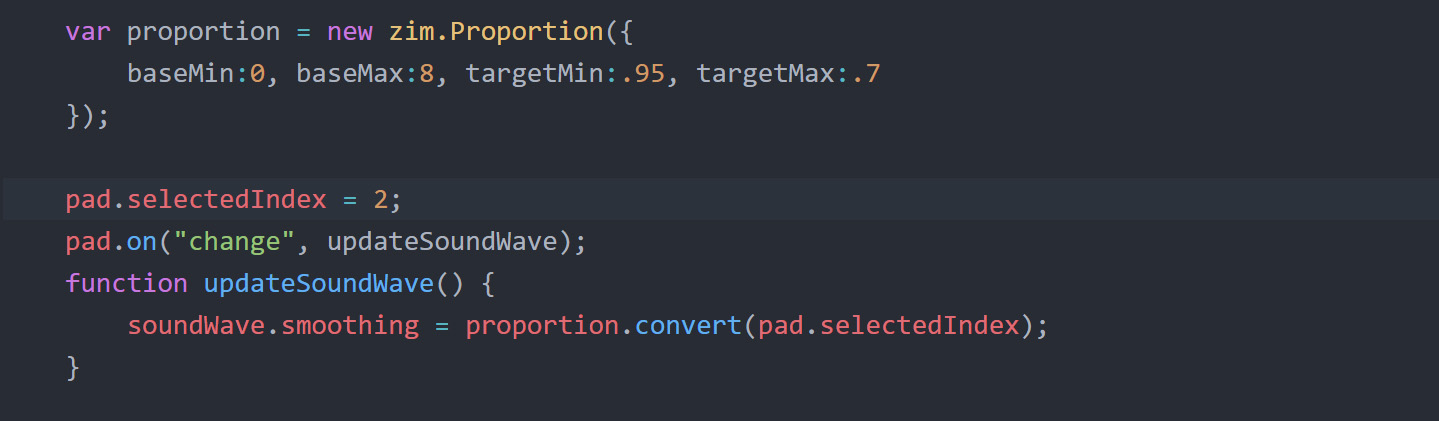
42 b) Use the on() method of the pad to add a change event that calls a function called updateSoundWave.
Note that we are not passing a function literal in as a second parameter but rather a reference to a function (do not put the round brackets after the function name as we are passing a reference to a function, not running the function).
We are giving our function a name this time so that we can also call it from the tab's change event as we change pages.
On the next line, use the function keyword to define the function updateSoundWave( ) { }.
INSIDE the curly brackets set the soundWave's smoothing property equal to return value of the proportion object's convert() method
when passing the pad's selectedIndex property as a parameter to convert().
Now we should see the smoothing of the soundWave animation change as we change press the pad when viewing in a Browser.
HIGHLIGHT MORE ANSWER
43. DOWN in the pages code just AFTER the making of the new zim.SoundWave() call the updateSoundWave() function
so that soundWave starts off with a smoothing that matches the number on the pad.
HIGHLIGHT ANSWER
CLAIM YOUR BADGE
(SHOW YOUR TEACHER)

BADGE 6
TOPCreate a picture Loader page and animate interface!
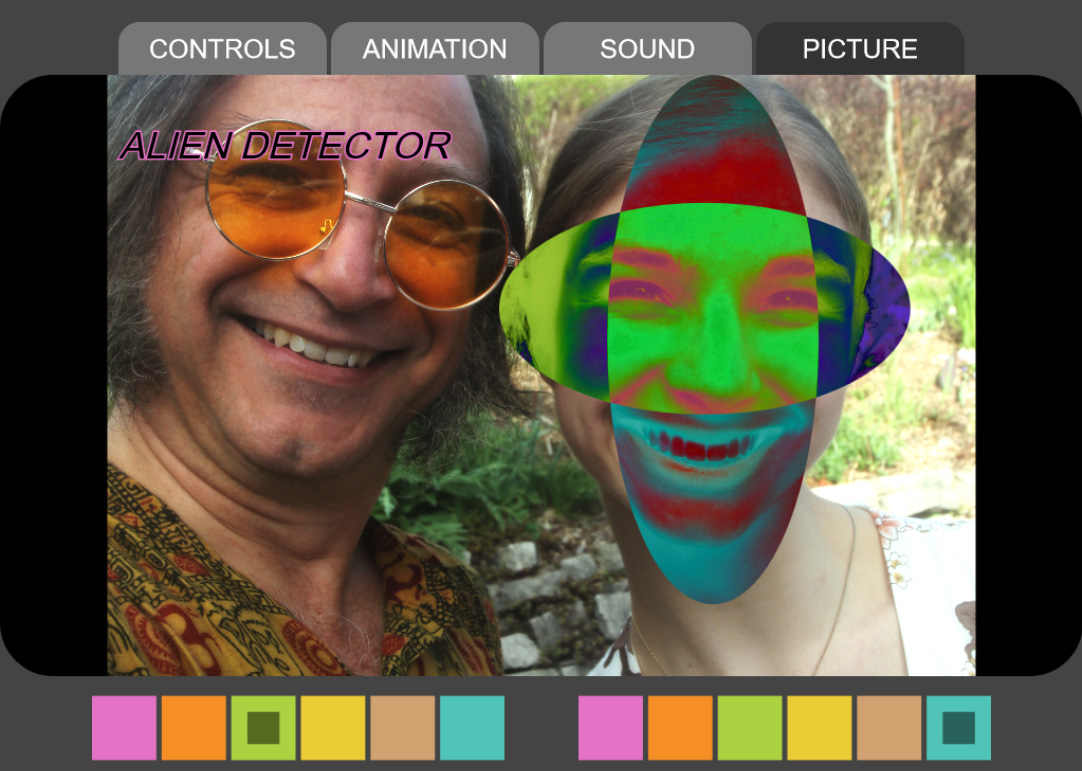
The Picture page will have a zim.Loader() object that lets a user click to upload a picture.
We then capture the picture and mask it with the backing.
We will let the user change the size of the picture with keyboard numbers.
If this were mobile we would use pinch for zoom.
We want the circles to stay on the Picture page in the form they were at from whichever page they come from.
44 a) BELOW the pad code make a variable (var) called picture (matching the picture tab) and assign (=) a new zim.Container() with stageW and stageH as the two parameters.
We will add this to the stage later with the Pages object.
44 b) Make a variable (var) called loader and assign (=) a new zim.Loader() with a single parameter of a configuration object having the following properties: a frame property with a value of frame (for the zim.Frame reference), a width of 350, a height of 200, a label that holds a new zim.Label({text:"UPLOAD PIC", color:"#ddd"}), a color of "#222", a rollColor of "#333", and a borderColor of "#fff". Then center() the loader in the picture container and use mov() to move the loader to x of -220.
44 c) Make a variable (var) called message and assign (=) a new zim.Label() with a single parameter of a configuration object with the following properties: text of "once uploaded use arrows to scale", a color of "#888" and a size of 23. Use the addTo() method to add the label to the picture container and the pos() method to position the message at 114 in the x and 500 in the y. HIGHLIGHT MORE ANSWER
ZIM Learn References
45. DOWN in the pages section, add the picture page to the pages array after sound.
HIGHLIGHT MORE ANSWER

ZIM Learn References
The zim.Loader() overlays an HTML input tag so anytime we move, add or remove the loader we need to call its resize() method.
We can take care of this in the tabs' change event when the page is picture.
But we also have to take care of it when leaving the picture page.
So we can ask for the pages' lastPage property and if this is picture then also resize the loader. We will do this in a single conditional.
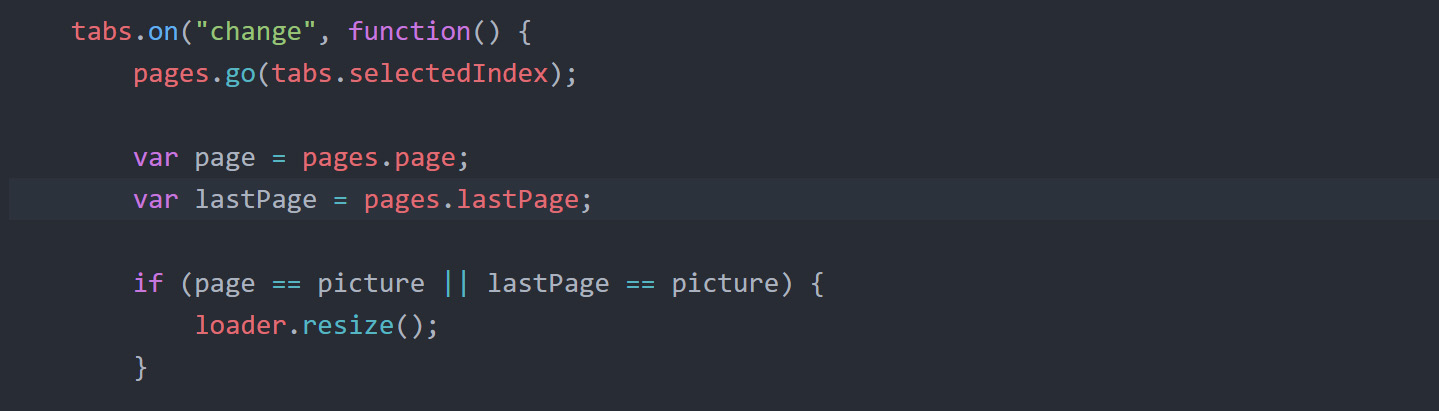
46. BELOW the var page assignment in the tabs' change event, make a variable (var) called lastPage and assign (=) the pages' lastPage property.
Beneath that, make a conditional if ( ) { } that tests to see if the page is equal to (==) picture or the lastPage is equal to (==) picture.
If that is true, then call the loader's resize() method.
HIGHLIGHT MORE ANSWER
ZIM Learn References
We now will use a loaded event to find out when the picture has been loaded by the loader.
When we call an event function, an event object is passed to the function as a parameter.
We usually use e for the parameter name (or evt or eventObj, etc.).
The event object tells us more information about the event. e.target is what causes the event. e.currentTarget is what object the event is placed on. In this case, we want to use e.bitmap to get us the first bitmap loaded. We could use e.bitmaps to get us an array of bitmaps loaded if we wanted multiple pictures (but we do not).
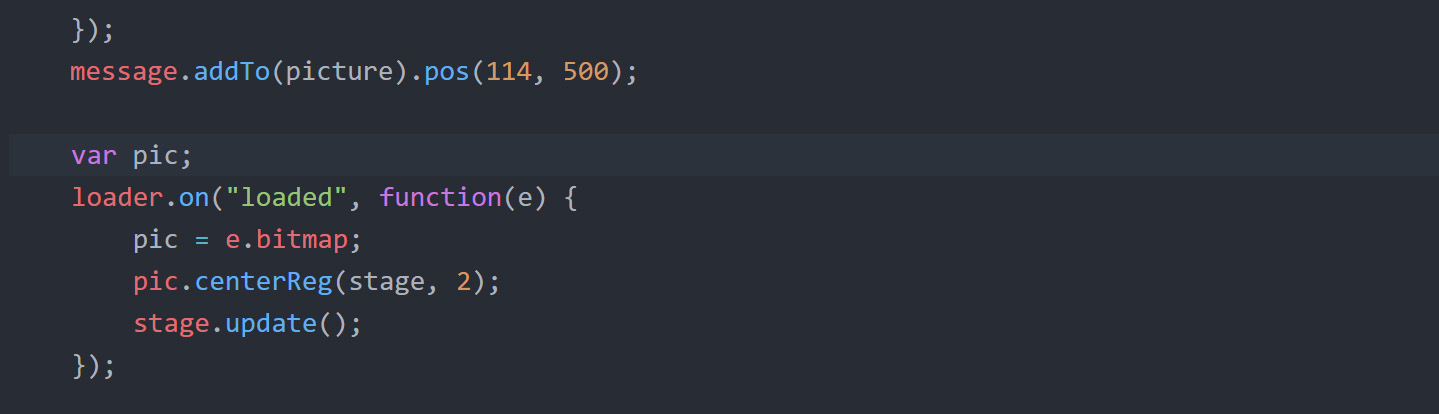
47 a) Back up BELOW the loader code, declare a var (var) called pic. Do not assign a value, we will do that in the event function. But we want access to the pic outside the event function which is why we declare pic outside.
Use the on() method of the loader to add a loaded event that calls a function literal that collects the event object e as its parameter.
In the function set pic equal to (=) the bitmap property of the event object, e.
47 b) centerReg() the pic on the stage (not the picture container because we want the picture to be under the circles) with the second parameter of centerReg() being 2 so the picture is above the backing which is at layer 1 (the tabs are at layer 0). Then put stage.update(). HIGHLIGHT MORE ANSWER
ZIM Learn References
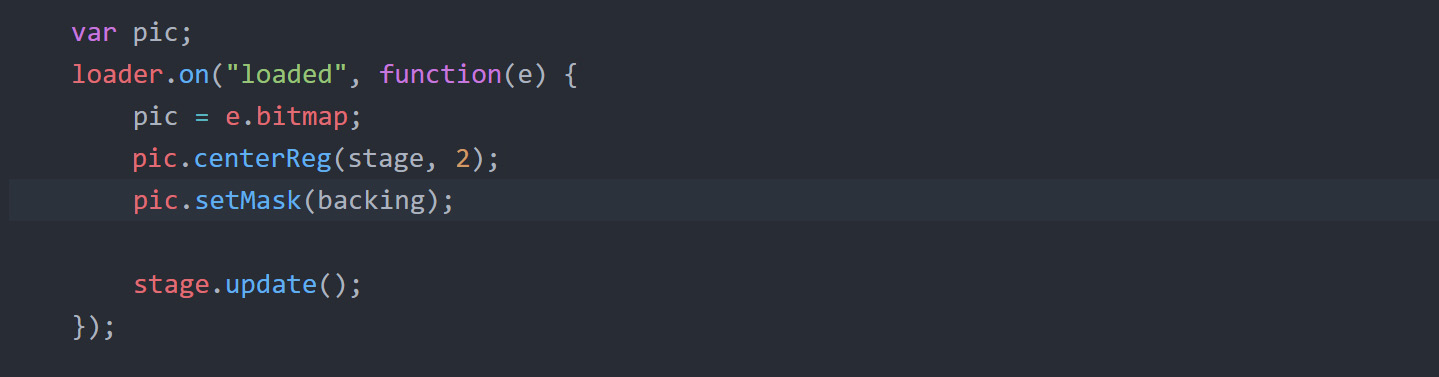
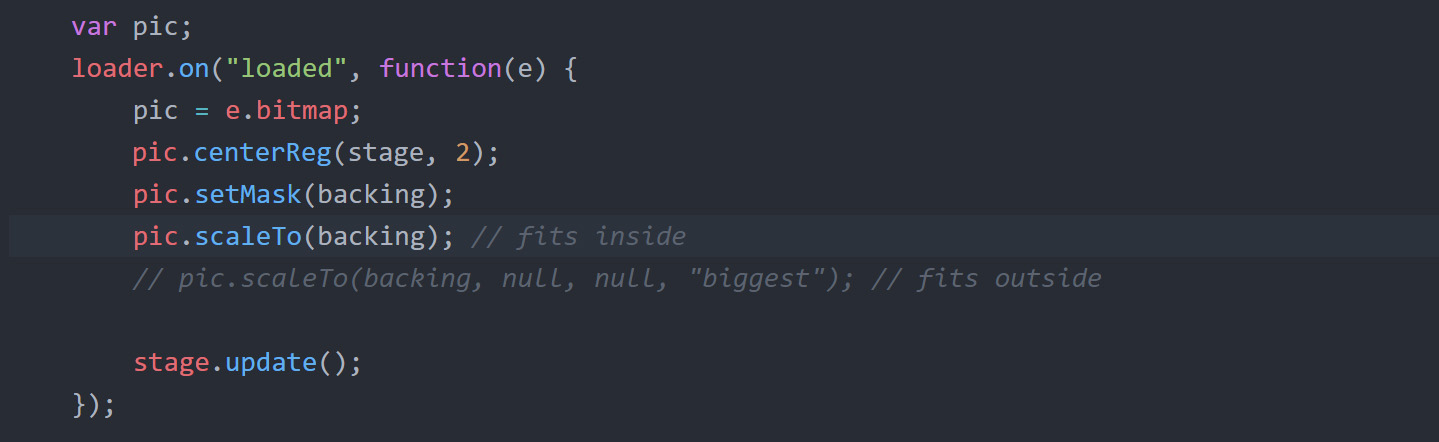
48. Use the pic's setMask() method and pass in the backing as the parameter.
Now we will only see the uploaded picture in the shape of the backing rounded rectangle.
Try this out in a Browser to see the effect.
HIGHLIGHT MORE ANSWER
ZIM Learn References
49. Use the pic's scaleTo() method and pass in the backing as the parameter.
Now the pic fits inside the backing. scaleTo can also do other effects as well.
Try this out in a Browser to see the effect.
HIGHLIGHT MORE ANSWER
ZIM Learn References
50 a) Use the pic's drag() method and pass in a single parameter that is a configuration object
with an onTop property of false so the picture when dragged does not come to the top.
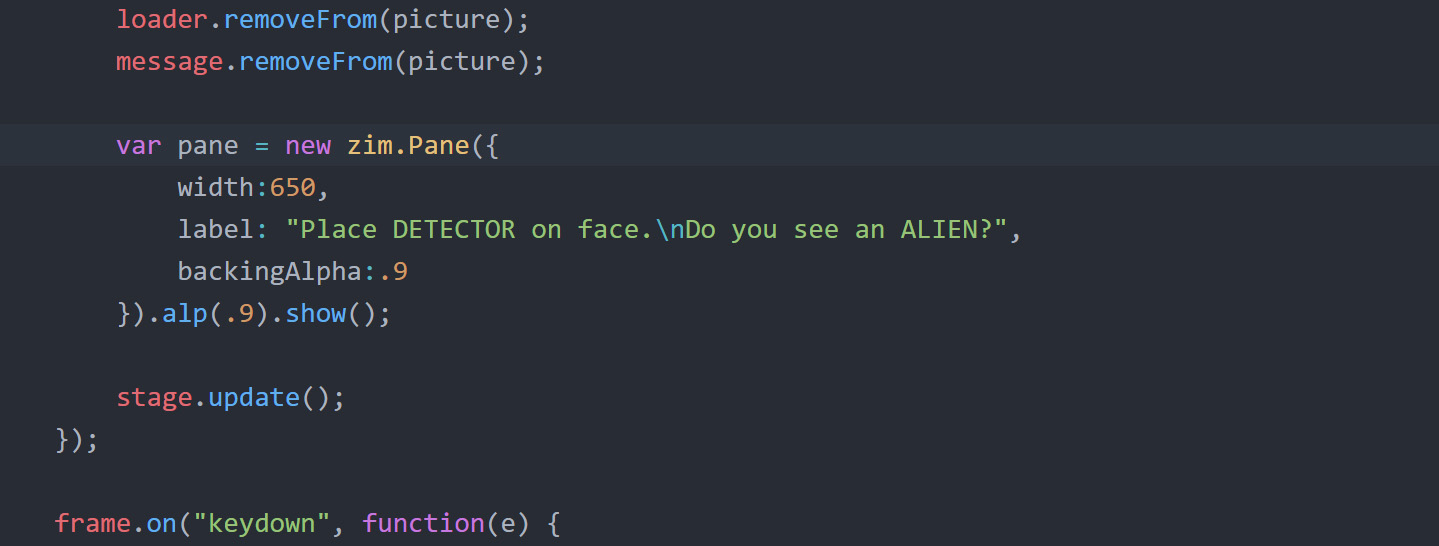
50 b) Use the removeFrom() method twice to remove the loader and the message from the picture container. The object we want to remove comes first and the container we are removing from goes in the brackets. HIGHLIGHT MORE ANSWER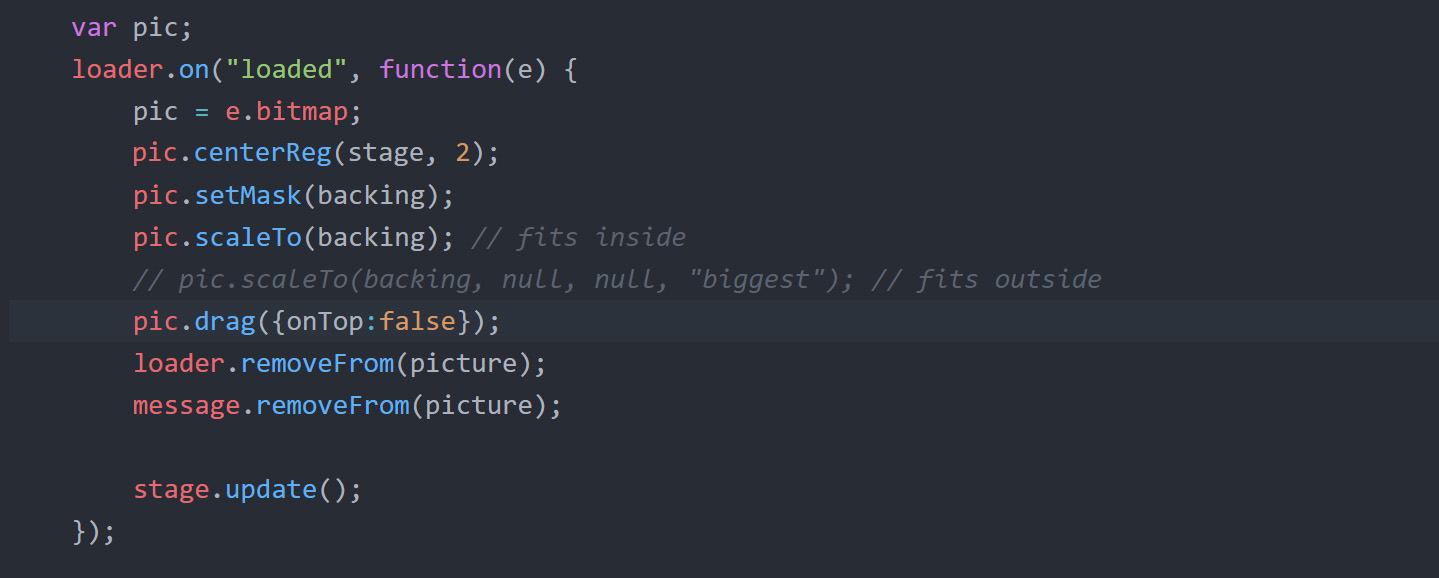
50 b) Use the removeFrom() method twice to remove the loader and the message from the picture container. The object we want to remove comes first and the container we are removing from goes in the brackets. HIGHLIGHT MORE ANSWER
ZIM Learn References
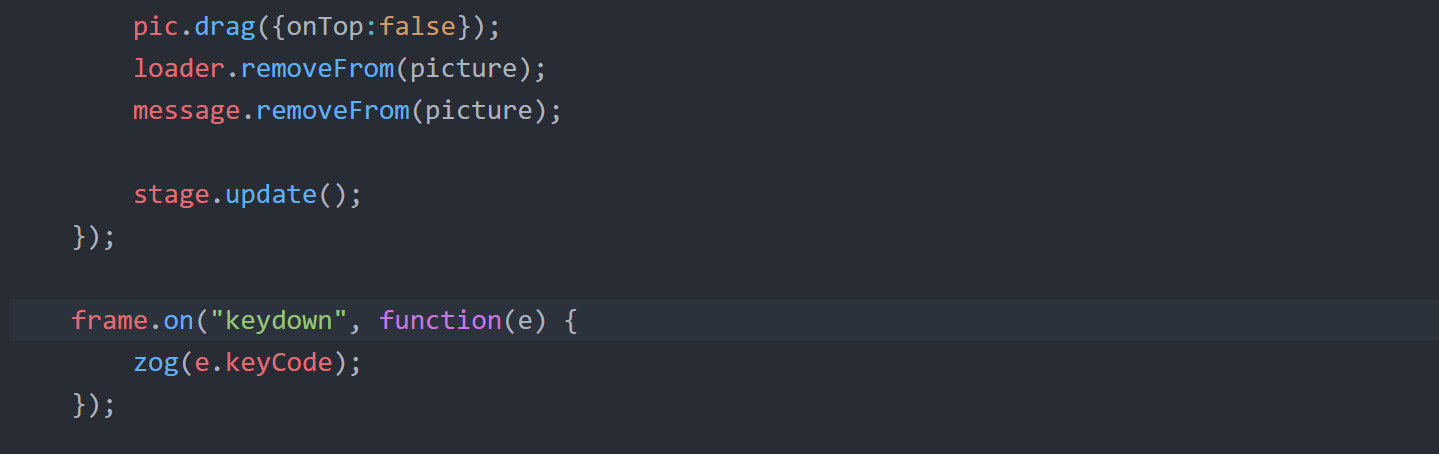
51. Use the on() method of the frame to add a keydown event that calls a function literal with a parameter of e (to collect the event object).
zog() the keyCode property of the event object, e.
Now view in Browser, open the console (F12) - click back on the app and press the arrow keys to see their keyCode numbers: 37 is left, 38 is up, 39 is right and 40 is down.
HIGHLIGHT MORE ANSWER
ZIM Learn References
We want to use the up and right keys to scale the pic up and the down and left keys to scale the pic down. AND we only want to do this when there is a pic and when we are on the picture page.
We could add and remove the event when we get to the Picture page and leave the Picture page.
But we can also just return out of the event function if we are not on the Picture page or there is no picture.
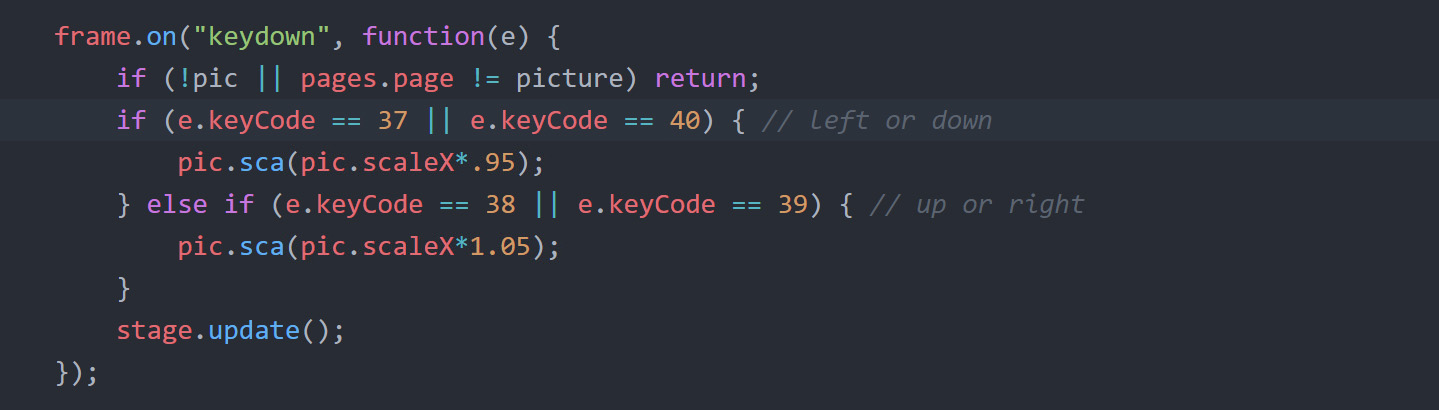
52. Use a conditional if ( ) { } to find out if there is not (!) pic or (||) the pages' page property is not equal to (!=) picture.
If this is the case, then we want to return; which means to leave the function. We can do this on one line so we do not need { }. Test this in the Browser to make sure the arrow keys only log to the console when we are on the Picture page and we have a picture loaded.
HIGHLIGHT MORE ANSWER

ZIM Learn References
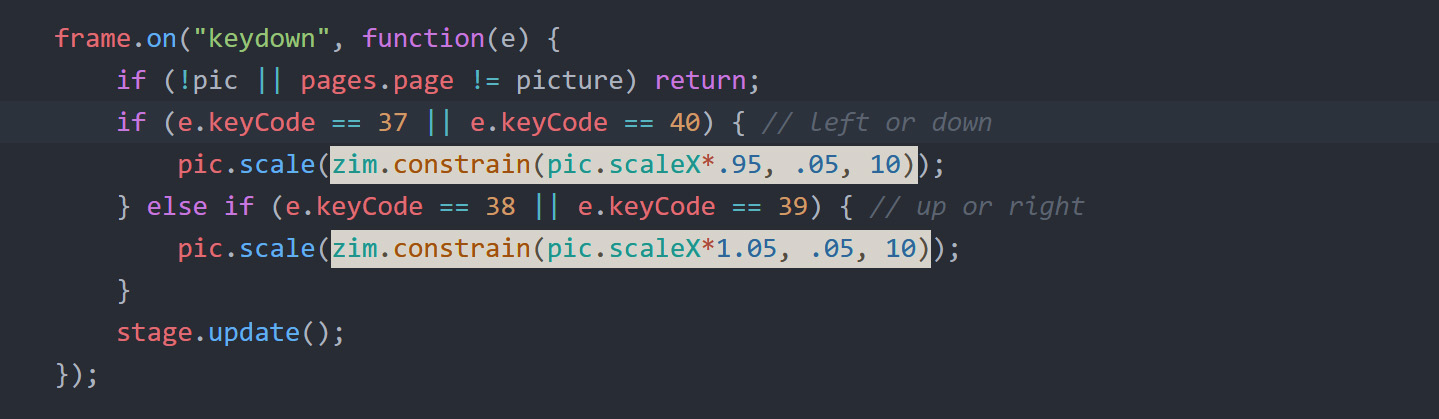
53. Use a conditional if ( ) { } else if ( ) { } to scale the pic down or up depending on the arrow keys.
In the FIRST round brackets, test if the keyCode property of the event object, e, is equal to (==) 37 (left) or (||) if the keyCode property is equal to (==) 40 (down).
If this is the case, in the FIRST curly brackets use the sca() method of the pic to scale the picture down by passing in pic.scaleX*.95 in as a parameter to the sca() method.
This will multiply the scale by a number slightly less than 1 which will reduce the scale.
In the SECOND round brackets of the conditional, do the same for keyCodes 38 and 39 and in the SECOND curly brackets, multiply the scaleX by 1.05 to slightly increase the scale each time.
HIGHLIGHT MORE ANSWER
ZIM Learn References
We do not want the picture to get too big or too small so we want to constrain the scale.
We could do this with more conditionals - if (pic.scaleX > 10) pic.scaleX = 10, etc.
Or we can use the zim.constrain() function around the new scale.
54. Use the zim.constrain() function INSIDE the sca() brackets and put the adjusted scaleX as the first parameter of the constrain().
Put .05 as the second parameter and 10 as the third parameter. Now the new scale will not go less than .05 and more than 10. Do this for both sca() calls.
HIGHLIGHT MORE ANSWER
ZIM Learn References
We want to tell the user to place the circles on the face of the person in the picture to see if they look alien.
We could do something like test a random number and tell them yes or no.
But we will let the user decide if they see an alien or not.
We might want to do this in a splash page or help screen but we will just pop up a zim.Pane().
The pane uses a show() method rather than an addto() or center(), etc. Then it automatically hides when the screen is pressed - although there are options.
55. Up BELOW where we removed the loader and message, make a variable (var) called pane and assign (=) a new zim.Pane() with a single parameter of a configuration object having the following properties:
width of 650, label of "Place DETECTOR on face.\nDo you see an ALIEN?" (the \n makes a new line) and
backingAlpha of .9 to darken the backing.
Use the alp() method of the pane to set the alpha to .9 and then use the show() method of the pane to show the pane.
HIGHLIGHT MORE ANSWER
ZIM Learn References
We have to tidy up a few things as we go from page to page. We need to remove the picture as we leave the Picture page and add it back as we arrive at the Picture page.
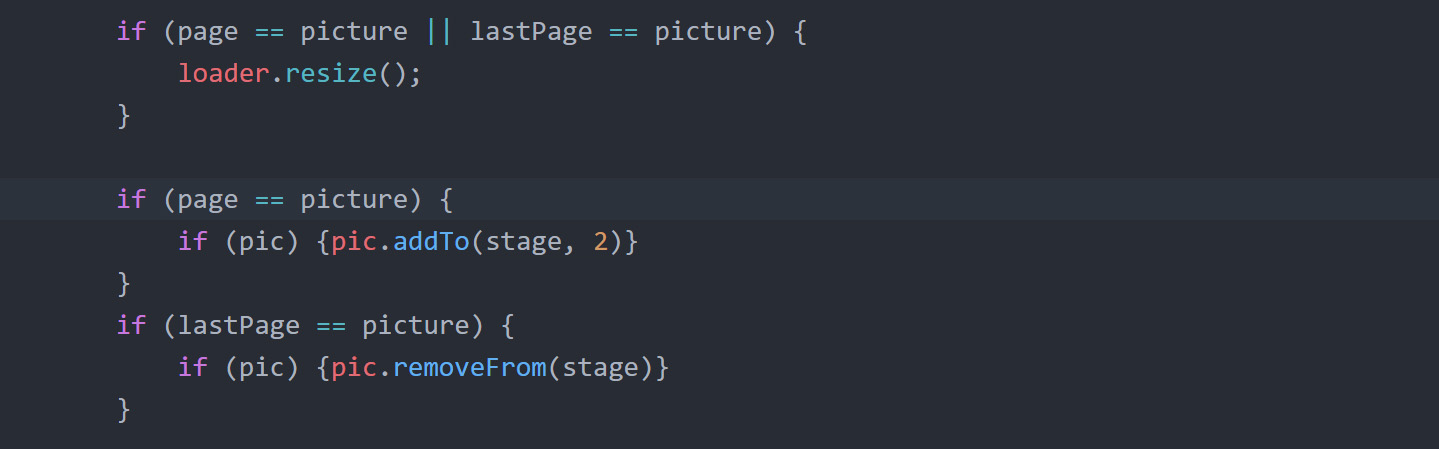
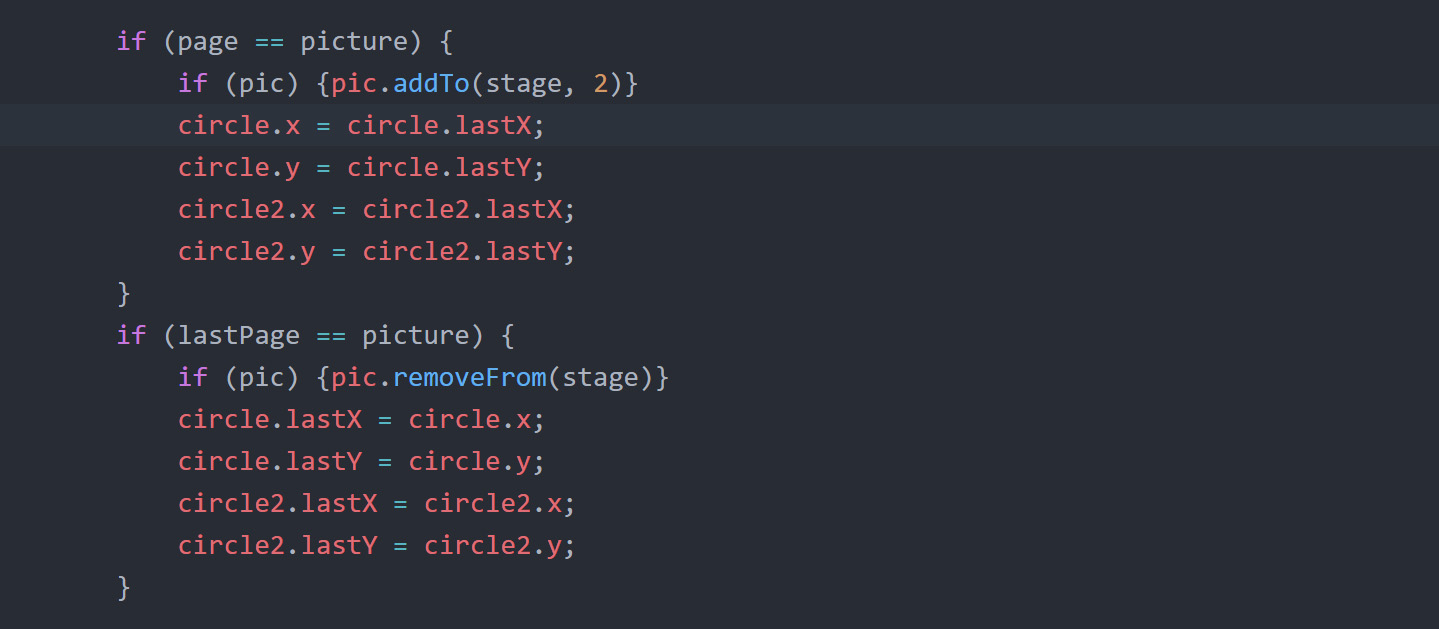
56. Down in the tabs' change event BELOW the page == picture || lastPage == picture conditional,
make a new conditional if ( ) { } to test if the page is equal to (==) picture.
If so, then make another conditional inside to find out if there is a pic. You can just use if (pic) {}
and then if there is a pic, use addTo() to add the pic to the stage with 2 being the second parameter to add the pic above the backing but below the circles, etc.
COPY and PASTE the same nested conditional code and adjust the pasted code to test if the lastPage is equal to (==) picture and if so and there is a pic,
use removeFrom() to remove the pic from the stage as we leave the Picture page.
HIGHLIGHT MORE ANSWER
ZIM Learn References
Also, when we drag the circles to a face in a picture and then go back to the other pages,
the circles can be on top of the components which looks bad.
A solution is to put the circles back to their starting position as we go to the first three pages
but remember where the circles are for the picture page.
Any time we have to remember something, such as a starting position, etc. we can use variables
or we can use properties of the object itself (properties are just variables stored on an object).
Here we will do both. The startX and startY of the circles are the same so we will store these in variables.
The position of the circles on the picture, if the circles are dragged, will be unique to each circle.
We will make lastX and lastY properties of the circles to remember these values.
57 a) Up above BELOW the circle blendMode assignments, make a variable (var) called startX
and assign (=) circle's lastX property.
Then on the same line, assign (=) circle2's lastX property.
Finally, on the same line, assign (=) circle's current x property .
COPY and PASTE this code.
Change the pasted code so it works for y.
The x property is known and at the start this will be the starting x position.
This start position gets put into the lastX of circle2.
Then it gets put into the lastX of circle and finally into the lastX variable.
Of course, all this could have been done individually onto separate lines.
Note: JavaScript has dynamic classes, which means we can add properties to objects when the code is running (run time) like we are doing here.
57 b) With the function keyword, make a function called resetCircles().
In the function body (between the curly brackets) set (assign (=)) circle's x and circle2's x to startX.
COPY and PASTE this code and adjust the pasted code to work with y.
We will call this function down below in the pages code.
HIGHLIGHT MORE ANSWER
ZIM Learn References
58. DOWN in the pages section in the tabs' change event,
in the conditional for if page is equal to (==) picture,
set the x and y properties of circle and circle2 to their lastX and lastY.
Now when we come back to the Picture page, the circles will be placed in their last position.
We also have to remember their last position when we leave the Picture page.
So in the conditional for if lastPage is equal to (==) picture,
set the circle and circle2 lastX and lastY properties to their x and y properties.
HIGHLIGHT MORE ANSWER
ZIM Learn References
The last of our tidy-up logic is to set the circles to their starting position
each time we go to the Controls, Animation or Sound pages so they do not overlap the components.
We will call the resetCircles() function that we made earlier.
59. In EACH of the conditionals for testing if the page is controls, animation and sound,
call the resetCircles() function. Try the app in the Browser and check
to make sure the circles are resetting their positions except for on the Picture page where they
should be set to their last positions on this page.
HIGHLIGHT MORE ANSWER
ZIM Learn References
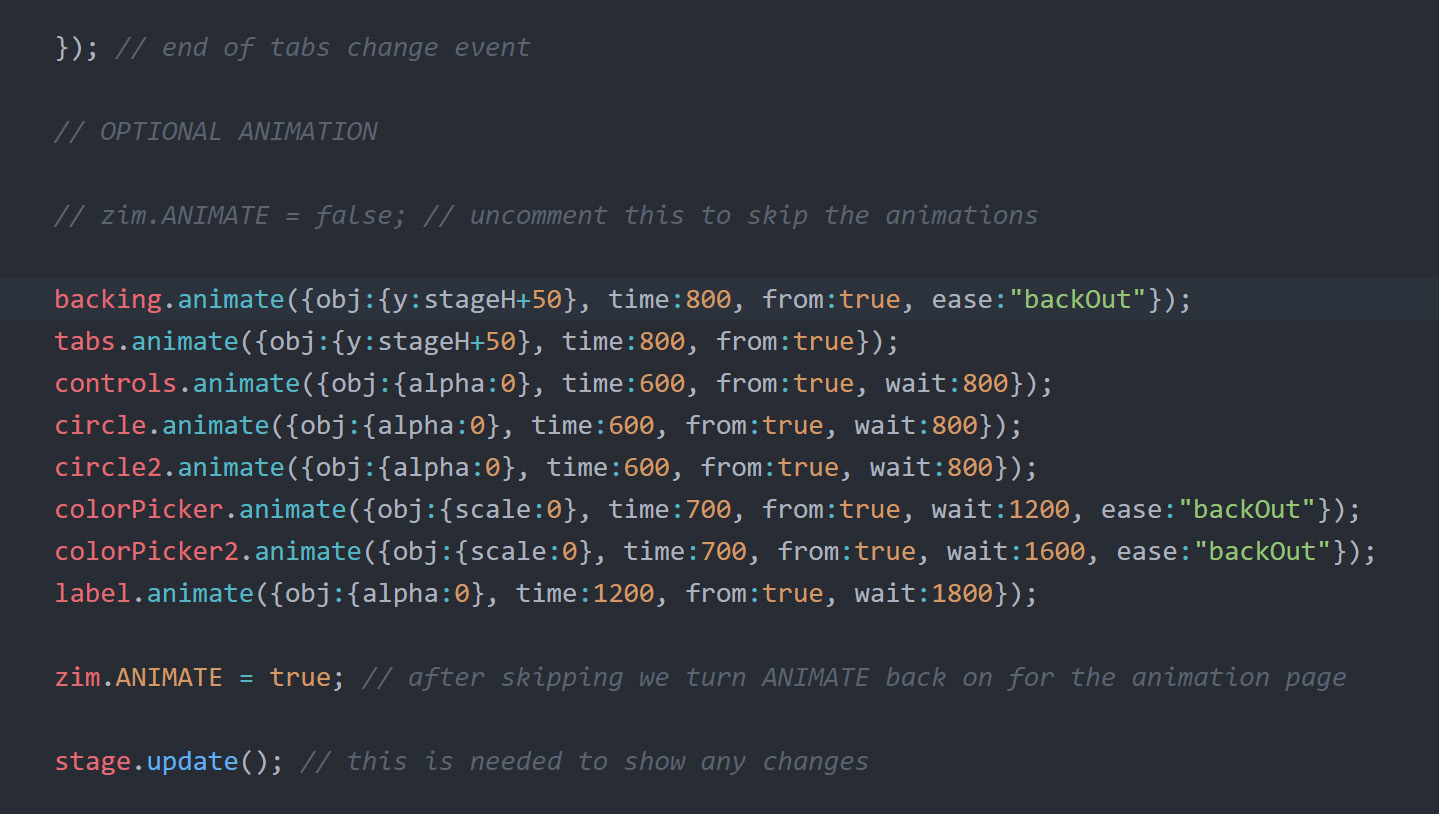
Finally, we will animate in the interface for the app.
Often this is done at the end so that we do not have to wait for the animations to run each time we test
but ZIM has a neat feature - the zim.ANIMATE constant, which can be set to false to avoid running animations.
When you are finished, just comment out or remove the ANIMATE constant (as we have done here so you will see the animation).
60. Use the animate() method of the objects to animate them to their starting locations.
An easy way to do this is use the from parameter and set the animation object value to off stage for moving objects to their start position
or set the animation object value to 0 for fading in the alpha of an object.
Then the object animates from off stage to its current position or from an alpha of 0 to its current alpha (probably 1).
There are a lot of objects to animate, so please see the answer for how to do this.
HIGHLIGHT MORE ANSWER
ZIM Learn References
CONCLUSION: ZIM has many more components, conveniences and controls.
For example, we could use a Blob instead of a Circle or
apply a particle Emitter or
a Sprite for effects.
In general, we have seen how to make these objects with the new keyword and store them in variables to use later.
We have passed in parameters or a single parameter of a configuration object.
We have seen all sorts of properties and methods and the events and logic conditionals to control an app.
There are a few more coding tricks like loops that were not featured in this app - see the many ZIM Learn examples for these.
FINAL STEP: if you are in school, please show ZIM to your coding teacher and what you have accomplished. Perhaps you should test your teacher to see if they are an ALIEN!!
(SHOW YOUR TEACHER)
