OPTION 1 - SELECTING FROM ASSET MENU
SEE VIDEOA. Select (check) the pictures and sounds you want to use.

B. When all done selecting, press the UPDATE button.
C. The selected assets will be listed in the code comments //.
D. Use new Pic("name") or new Aud("name")
E. Sprites have dashes around the box and cols and rows.
F. Use new Sprite("name",cols,rows).run({frame:num})
G. Sprites with red dashes are animations.
H. Use new Sprite("name",cols,rows).run(time)
OPTION 2 - PRELOAD WITH FILES
Assets can be preloaded with file names and path using Zapp Directives:// assets must be in array on one line
// they must include extension like .png, .jpg for pictures
// press the FULL SCREEN icon at top right of the thumbnail
// to see the extension. All sounds are .mp3
// can also drag full screen icon to editor to get the name
zapp_assets = ["ai_balls.png", "hat01.png", "bleep01.mp3"];
zapp_path = "https://zimjs.org/assets/";
new Sprite("ai_balls.png", 3, 3).center().mov(0,100);
const hat = new Pic("hat01.png").center();
const aud = new Aud("bleep01.mp3");
hat.tap(()=>{aud.play();});
To change the background color you can use the color property of the frame (F)

// use the color property of the frame for the stage color
F.color = yellow; // F is the frame!

// use the outerColor property for the color outside the stage
F.outerColor = blue;

// use a Page to make a gradient
new Page(W, H, green, pink).addTo();
SEE EXAMPLES VIDEO
We will add a picture of a BEACH for a background picture.

// ** OPTION 1 - ASSET MENU **
// Press the BACKINGS button at the top
// Select and UPDATE the "beach01" picture
// You should see "Backings: beach01" in the comments
// A background picture can be scaled to the stage
new Pic("beach01")
   .scaleTo()
   .center();


// ** OPTION 2 - ZAPP DIRECTIVES **
// Press the BACKINGS button at the top
// Press the FULL SCREEN at top right of thumbnail
// Get the file name and extension (.jpg or .png)
zapp_assets = ["beach01.jpg"]; // all assets in here
zapp_path = "https://zimjs.org/assets/";
new Pic("beach01.jpg")
   .scaleTo()
   .center();
Full example: Asset Menu | Zapp Directives
Let's add a picture of a BUTTERFLY and make it draggable!

// ** OPTION 1 - ASSET MENU **
// Press the NATURE button at the top
// Select and UPDATE the "bug01" picture
// You should see "Nature: bug01" in the comments

// pictures can be scaled with sca() if you want
// sca(.5) is half as big, sca(2) is twice as big
// You can use center() and mov(x, y) or
// loc(x, y) or pos(x, y, RIGHT, BOTTOM), etc.
// Store the bug in a variable to use later with sounds
const bug = new Pic("bug01")
   .sca(.5)
   .center()
   .drag();


// ** OPTION 2 - ZAPP DIRECTIVES **
// Press the NATURE button at the top
// Press the FULL SCREEN at top right of thumbnail
// Get the file name and extension (.jpg or .png)
// Change the zapp_assets to have the bug
zapp_assets = ["beach01.jpg", "bug01.png"];
zapp_path = "https://zimjs.org/assets/";
// add the bug
const bug = new Pic("bug01.png")
   .sca(.5)
   .center()
   .drag();
Full example: Asset Menu | Zapp Directives
Sometimes we want to group our objects so they move together.
Let's put "gem01" and "cartoon02" in a Container and drag them.

// ** OPTION 1 - ASSET MENU **
// Select and UPDATE the "gem01" picture from NATURE
// Select and UPDATE the "cartoon02" picture from PEOPLE
// You should see the pictures listed in the comments
// make a Container (an invisible holder)
const holder = new Container();

// add the gem
new Pic("gem01").addTo(holder);

// scale the cartoon face to FIT in 60% the holder width
// and center it in the container
new Pic("cartoon02")
   .scaleTo(holder, 60) // 60% the size
   .center(holder);

// position the container and drag all of it together
holder
   .pos(100,50,RIGHT,BOTTOM)
   .drag({all:true});


// ** OPTION 2 - ZAPP DIRECTIVES **
// Press the NATURE and PEOPLE buttons at the top
// Press the FULL SCREEN at top right of thumbnails
// Get the file names and extensions (.jpg or .png)
// Add the gem and the cartoon to the zapp assets
zapp_assets = ["beach01.jpg", "bug01.png", "gem01.png", "cartoon02.png"];
zapp_path = "https://zimjs.org/assets/";
const holder = new Container();
new Pic("gem01.png").addTo(holder); // with extension
new Pic("cartoon02.png")
   .scaleTo(holder, 60) // 60% the size
   .center(holder);
holder
   .pos(100,50,RIGHT,BOTTOM)
   .drag({all:true});
Full example: Asset Menu | Zapp Directives
Here we play a POWERUP sound when we press the butterfly!
// ** OPTION 1 - ASSET MENU **
// Press the SOUNDS button at the top
// Select and UPDATE the "powerup" sound
// You should see "SOUNDS: powerup" in the comments
// To play a sound when pressing a bug
const bug = new Pic("bug01")
   .sca(.5)
   .center()
   .drag();

// use an event and play the sound in the event function
// Aud is short form for Audio - another way to say sound!
const sound = new Aud("powerup"); // make the sound once
bug.on("mousedown", ()=>{
   sound.play(); // play the sound every time we press the bug
});


// ** OPTION 2 - ZAPP DIRECTIVES **
// Press the SOUNDS button at the top
// All sounds have .mp3 as the file extension
// Add powerup to zapp assets
zapp_assets = ["beach01.jpg", "bug01.png", "gem01.png", "cartoon02.png", "powerup.mp3"];
zapp_path = "https://zimjs.org/assets/";
const bug = new Pic("bug01.png")
   .sca(.5)
   .center()
   .drag();

const sound = new Aud("powerup.mp3"); // make the sound once
bug.on("mousedown", ()=>{
   sound.play(); // play the sound every time we press the bug
});
Full example: Asset Menu | Zapp Directives
Let's play some BACKING music. Sounds can only be played AFTER at least one mousedown. The code in the first box loads and makes the sound object. Then we show THREE different ways (A,B,C) to play the sound object with a mousedown.
// ** OPTION 1 - ASSET MENU **
// Press the SOUNDS button at the top
// Select and UPDATE the "backing" sound
// You should see "Sounds: backing, powerup" in the comments
// Create an Aud sound object to play later
const backing = new Aud("backing");

// ** OPTION 2 - ZAPP DIRECTIVES **
// Press the SOUNDS button at the top
// All sounds have .mp3 as the file extension
// Add backing to zapp assets
zapp_assets = [ "beach01.jpg", "bug01.png", "gem01.png", "cartoon02.png", "powerup.mp3", "backing.mp3"];
zapp_path = "https://zimjs.org/assets/";
const backing = new Aud("backing.mp3");
// A. PLAY BACKING SOUND WITH PANE
// Here we play the backing sound once a Pane() is closed.
new Pane("START", yellow).show(()=>{
    // lower the volume and loop the backing sound.
    backing.play(.1, true);
});

// B. PLAY BACKING SOUND WITH TOGGLE
// This code lets people turn on and off the sound.
// Do not worry if this is complicated looking
// it will just help you pause or play the sound.
let backingSound;
const toggle = new Toggle({
   label:"music",
   startToggled:false
})
   .sca(.7)
   .pos(40,40,LEFT,BOTTOM)
   .change(()=>{
      if (!backingSound) {
         backingSound = backing.play(.1, true);
      }
      backingSound.paused = !toggle.toggled;
   });

// C. PLAY BACKING SOUND WITH BUTTON
// This code uses a Button to toggle sound.
// We use pizzazz to make sound icons
// or you could use label:"play" and toggle:"mute"
// We use the tap() method which is like on("click", function).
let backingSound;
const button = new Button({
   width:60,
   height:60,
   corner:0,
   backgroundColor:purple,
   rollBackgroundColor:pink,
   icon:makeIcon("sound", white),
   toggleIcon:makeIcon("mute", white)
}).pos(50,50,LEFT,BOTTOM).tap(()=>{
   if (!backingSound) {
      backingSound = backing.play(.1, true);
   }
   backingSound.paused = !button.toggled;
});

Full example: Asset Menu | Zapp Directives
Emojis are fun! We can easily add Emojis using the ZIM Emoji() class:
// add an Emoji
// inside "", use WINDOW KEY . to pick an emoji
// or use Control + Command + Space on a Mac
// choose a number for the size like 100
new Emoji("🐞", 100).center().drag();
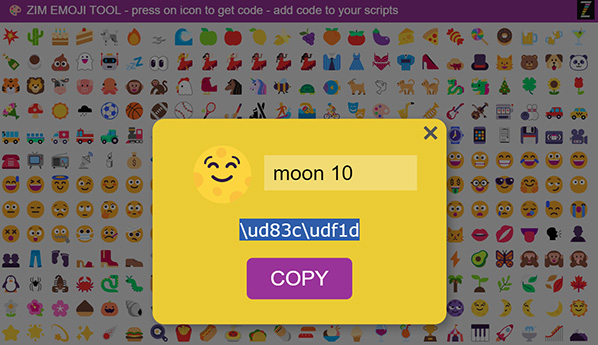
You can also copy the code from the ZIM Emoji Picker
// add an Emoji with an Emoji Code
// go to the Emoji Picker and press an Emoji
// then press COPY and paste the code in the ""
new Emoji("\ud83c\udf1d", 200).loc(100,100).drag();
A Sprite() is made from a SpriteSheet which is a grid of pictures. There are TWO types (A,B):
A. DIFFERENT OBJECTS
Found in the AI images with a grey dashed border also showing cols and rows. You can run() a single frame to show the image you want.
Here is a Video about Sprites.
![]()
![]()
// ** OPTION 1 - ASSET MENU **
// Press the AI button at the top
// Select and UPDATE the "ai_backpacks" picture
// You should see "AI: ai_backpacks" in the comments
// Add the Sprite
new Sprite("ai_backpacks", 5, 2) // 5 columns and 2 rows
   .center(); // will display a random backpack

// or chose which backpack to show:
new Sprite("ai_backpacks", 5, 2)
   .center()
   .run({frame:1}); // show the second backpack (0 is the first)

// or Emit a bunch of backpacks!
new Emitter(new Sprite("ai_backpacks", 5, 2)).center();


// ** OPTION 2 - ZAPP DIRECTIVES **
// Press the AI button at the top
// Press the FULL SCREEN at top right of thumbnail
// Get the file name and extension (.jpg or .png)
zapp_assets = ["ai_backpacks.png"];
zapp_path = "https://zimjs.org/assets/";
new Sprite("ai_backpacks.png", 5, 2) // 5 columns and 2 rows
   .center(); // will display a random backpack

// or chose which backpack to show:
new Sprite("ai_backpacks.png", 5, 2)
   .center()
   .run({frame:1}); // show the second backpack (0 is the first)

// or Emit a bunch of backpacks!
new Emitter(new Sprite("ai_backpacks.png", 5, 2)).center();
B. ANIMATIONS
An animation Sprite() uses pictures of an object in motion. There are a few animation sprites (not in AI) with a red dashed border also showing cols and rows. Here is a Video about Animated Sprites
// ** OPTION 1 - ASSET MENU **
// Press the NATURE button at the top
// Select and UPDATE the "monkey" picture
// You should see "NATURE: monkey" in the comments
// We must run() the animation sprite as well
// which is like animate() but for Sprites.
// The longer the time the slower the animation.
new Sprite("monkey", 4, 4)
   .center()
   .run({time:1, loop:true});


// ** OPTION 2 - ZAPP DIRECTIVES **
// Press the NATURE button at the top
// Press the FULL SCREEN at top right of thumbnail
// Get the file name and extension (.jpg or .png)
zapp_assets = ["monkey.png"];
zapp_path = "https://zimjs.org/assets/";
new Sprite("monkey.png", 4, 4)
   .center()
   .run({time:1, loop:true});
Also see Adding Assets from Internet
For more Sprite examples
Pictures, Sounds, Sprites, SVG, animated GIFs can be loaded from the Internet. There may be permission issues so talk to your leader.
// Here we load an animated GIF
// from the ZIM site but it could be anywhere
// on the Internet that lets assets be loaded

zapp_assets = ["genko.gif"];
zapp_path = "https://zimjs.com/nft/bubbling/assets/";

F.color = green;

// Add an animated GIF
new GIF("genko.gif",205,272)
    .centerReg()
    .wiggle("x",W/2,0,100,1,5)
    .wiggle("y",H/2,0,100,1,5)
    .wiggle("rotation",0,5,15,3,5);
// Here we load Sprites that need extra data

zapp_assets = ["spaceguy.png", "spaceguy.json"];
zapp_path = "https://zimjs.org/assets/";
new Sprite({json:"spaceguy.json"})
    .sca(2)
    .center()
    .run({loop:true});

// OR to load fruit:
zapp_assets = ["fruit.png", "fruit.json"];
zapp_path = "https://zimjs.org/assets/";
new Sprite({json:"fruit.json"})
    .loc(100,100)
    .run({frame:3}); // avacado

// OR use a label if provided
// in this case, there are labels for each fruit
new Sprite({json:"fruit.json", label:"papya"})
    .loc(300,100);

// OR use the label in the run()
// but this is longer so use the code above
new Sprite({json:"fruit.json"})
    .run({label:"papya"})
    .loc(500,100);

// See sidescroller examples with mouse:
//  Sidescroller with Mouse
// with keyboard and shooting:
//  Sidescroller with Keys
GitHub is a Web site were people can save and share projects.
1. Find the asset on GitHub
2. Add "https://raw.githubusercontent.com/" to start
3. add master/ before file directory
4. if uploading, https://zimjs.com/assetlist helps get list
// Here we use the Zapp Directives with GitHub.
zapp_assets = ["glasses01.png", "forest.svg"];
zapp_path = "https://raw.githubusercontent.com/danzen/zimjs/master/assets/";

// Add the Pic
new Pic("glasses01.png").center();

// Add the SVG
new SVG("forest.svg").sca(3).loc(100,100);

// You can make SVGs at  https://boxy-svg.com/app

// And save them at  https://gist.github.com/  get the raw link

// Or save them at  https://imgur.com/
Fonts can easily be loaded from Google as follows. See https://fonts.google.com.
Fonts can also be loaded from font files like the examples in Adding Assets from the Internet.
// Here we load Google Fonts using zapp assets.
// add gf_ before the Google font name
zapp_assets = ["gf_Dancing+Script", "gf_Chewy"];

// Do not include the gf_ nor the + in the Label
new Label("This is fancy!", 50, "Dancing Script").center();

// To make new lines in a Label use \n
new Label("Chewy\nChewy\nChewy", 50, "Chewy", purple)
    .pos(100,100,RIGHT,BOTTOM);